CKA를 준비하면서 공부한 요약 내용입니다.
Pre-Requisites
- Switching and Routing
- Switching
- Routing
- Default Gateway
- DNS
- DNS Configurations on Linux
- CoreDNS Introduction
- Network Namespaces
- Docker Networking
Switching Routing
Switching
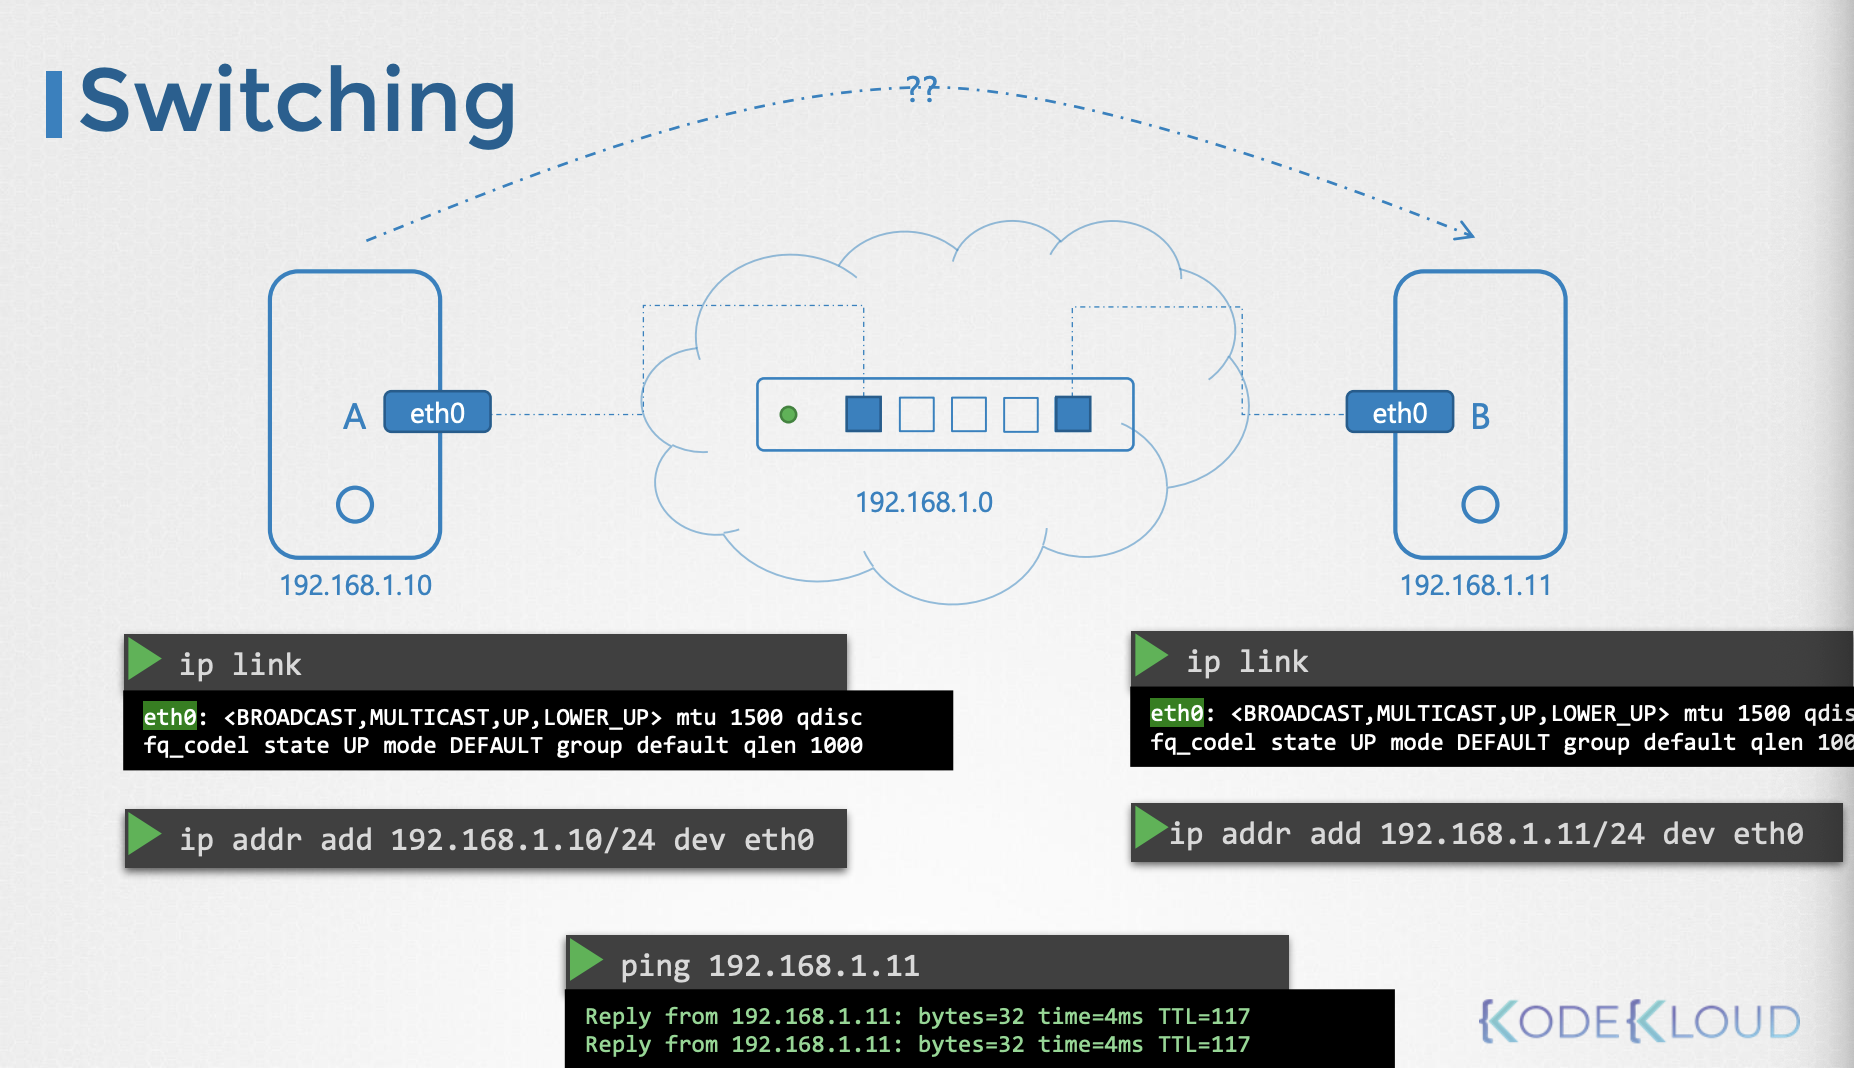
상황
- There are two computers and want to communicate to each other
- → use switch
방법
- see the interface of host
ip link- look at the interface named
eth0
- assume ip address
- switch: 192.168.1.0
- give ip to hosts
ip addr add <ip>/<port> <hostname> <interface>- A: 192.168.1.10
ip addr add 192.168.1.10/24 dev eth0
- B: 192.168.1.11
ip addr add 192.168.1.11/24 dev eth0
- Two computers can communicate each other through switch
ping 192.16.1.11
특징
- switch can only enable communications within network
- it can receive packets from a host on the network and deliver it to other system within the same network
Routing
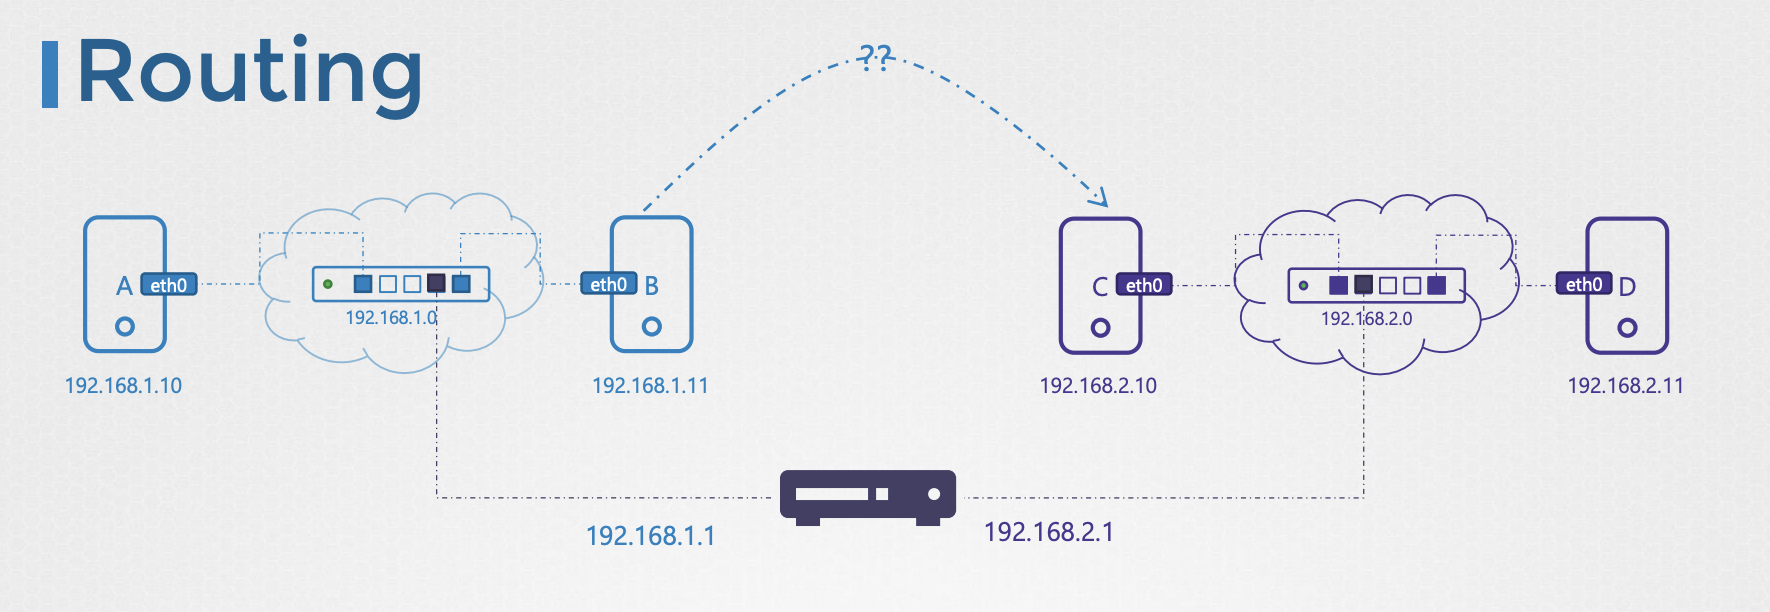
상황
- New system exists
- Two computer name with C, D
- Ip address
- C: 192.168.2.10
- D: 192.168.2.11
- How does computer A reach to computer c?
- → Router
- helps connect two networks together.
방법
- Connecting two networks, it need two ip assigned.
- first network (A&B): 192.168.1.1
- second network (C&D): 192.168.2.1
- Send A to C
- how does know where is C?
- → Gateway
Gateway
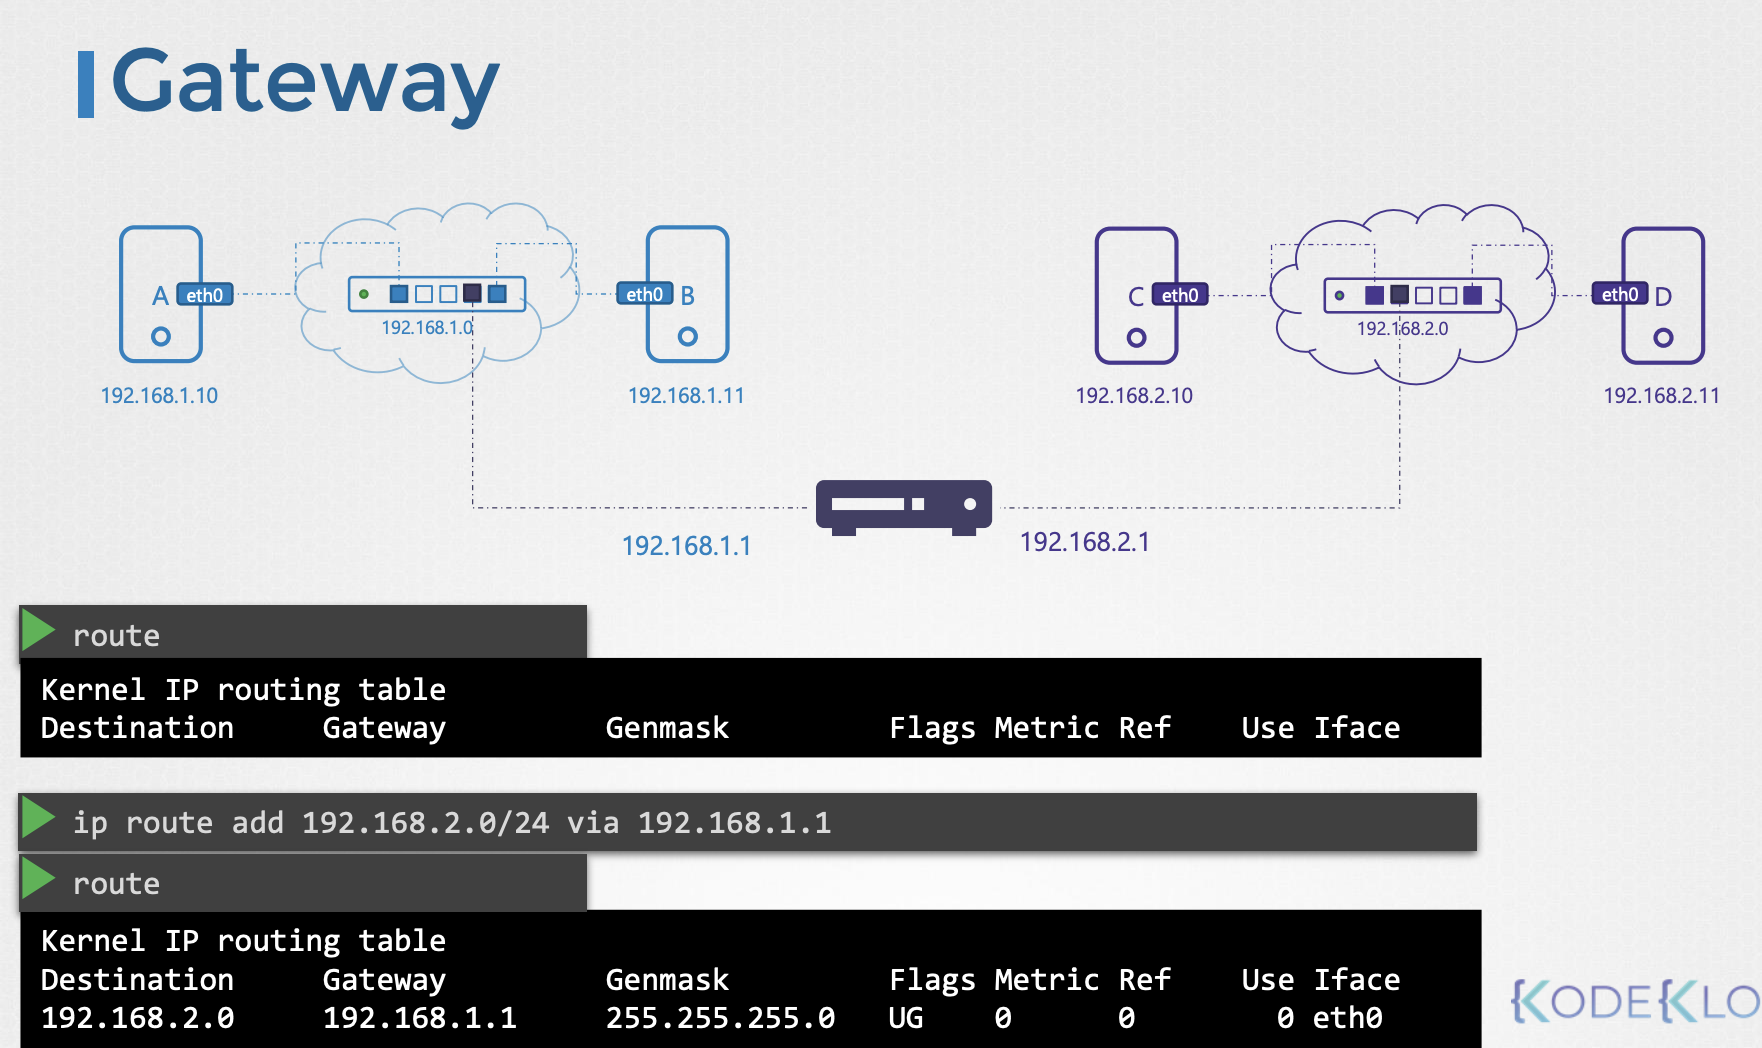
상황
- network ← room
- gateway ← a door to the outside world to other networks
방법
- systems need to know where that door is to go through
- to see the existing routing configuration on a system
route- displays the kernels routing table
- Configure a gateway
ip route add 192.168.2.0/24 via 192.168.1.1- → you can reach the 192.168.2.0 network through the door or gateway at 192.168.1.11
route- see the route added
- Configure on all system
ip route add 192.168.1.0/24 via 192.168.2.1route
Internet
상황
- System need acces to the internet
방법
ip route add 172.217.194.0/24 via 192.168.2.1- add a new road in routing table to road all traffic to the network 172.217.194.0
Default gateway
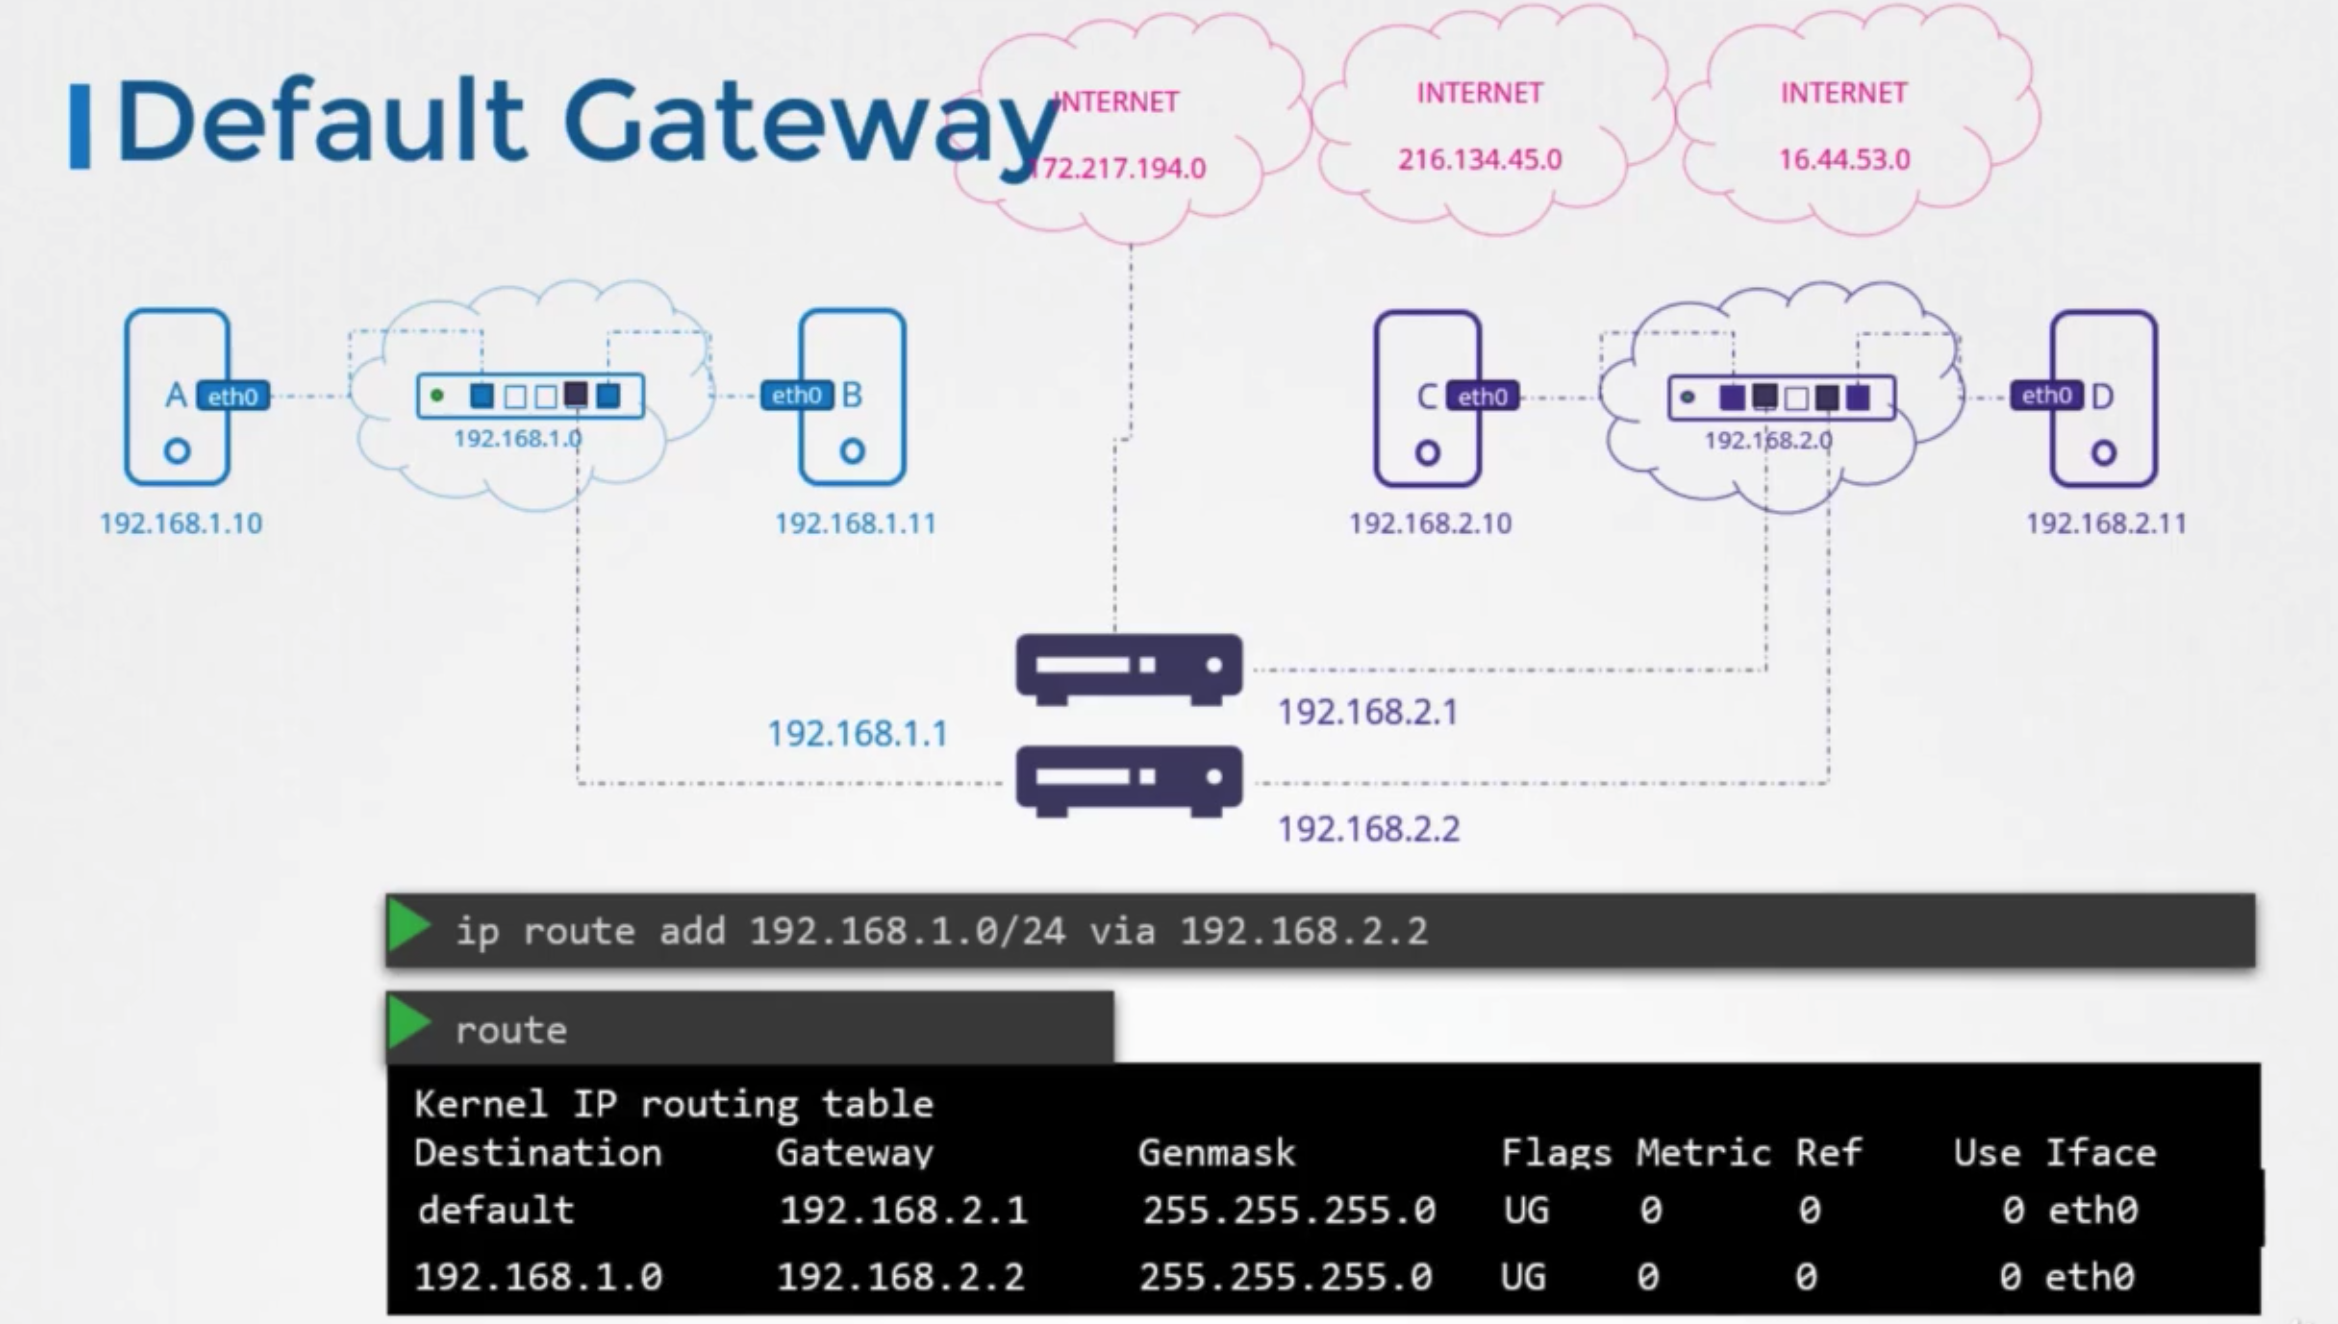
상황
- any request to any network outside of existing network goes to this particular router
방법
ip route add default via 192.168.2.1- also can called 0.0.0.0
ip route add 0.0.0.0 via 192.168.2.1
- if default gateway is defined, in same network there is no need to add 192.168.1.0
- in sepreated network
- one entry for private network
ip addr add 192.168.1.0/24 via 192.168.2.2
Linux as a host
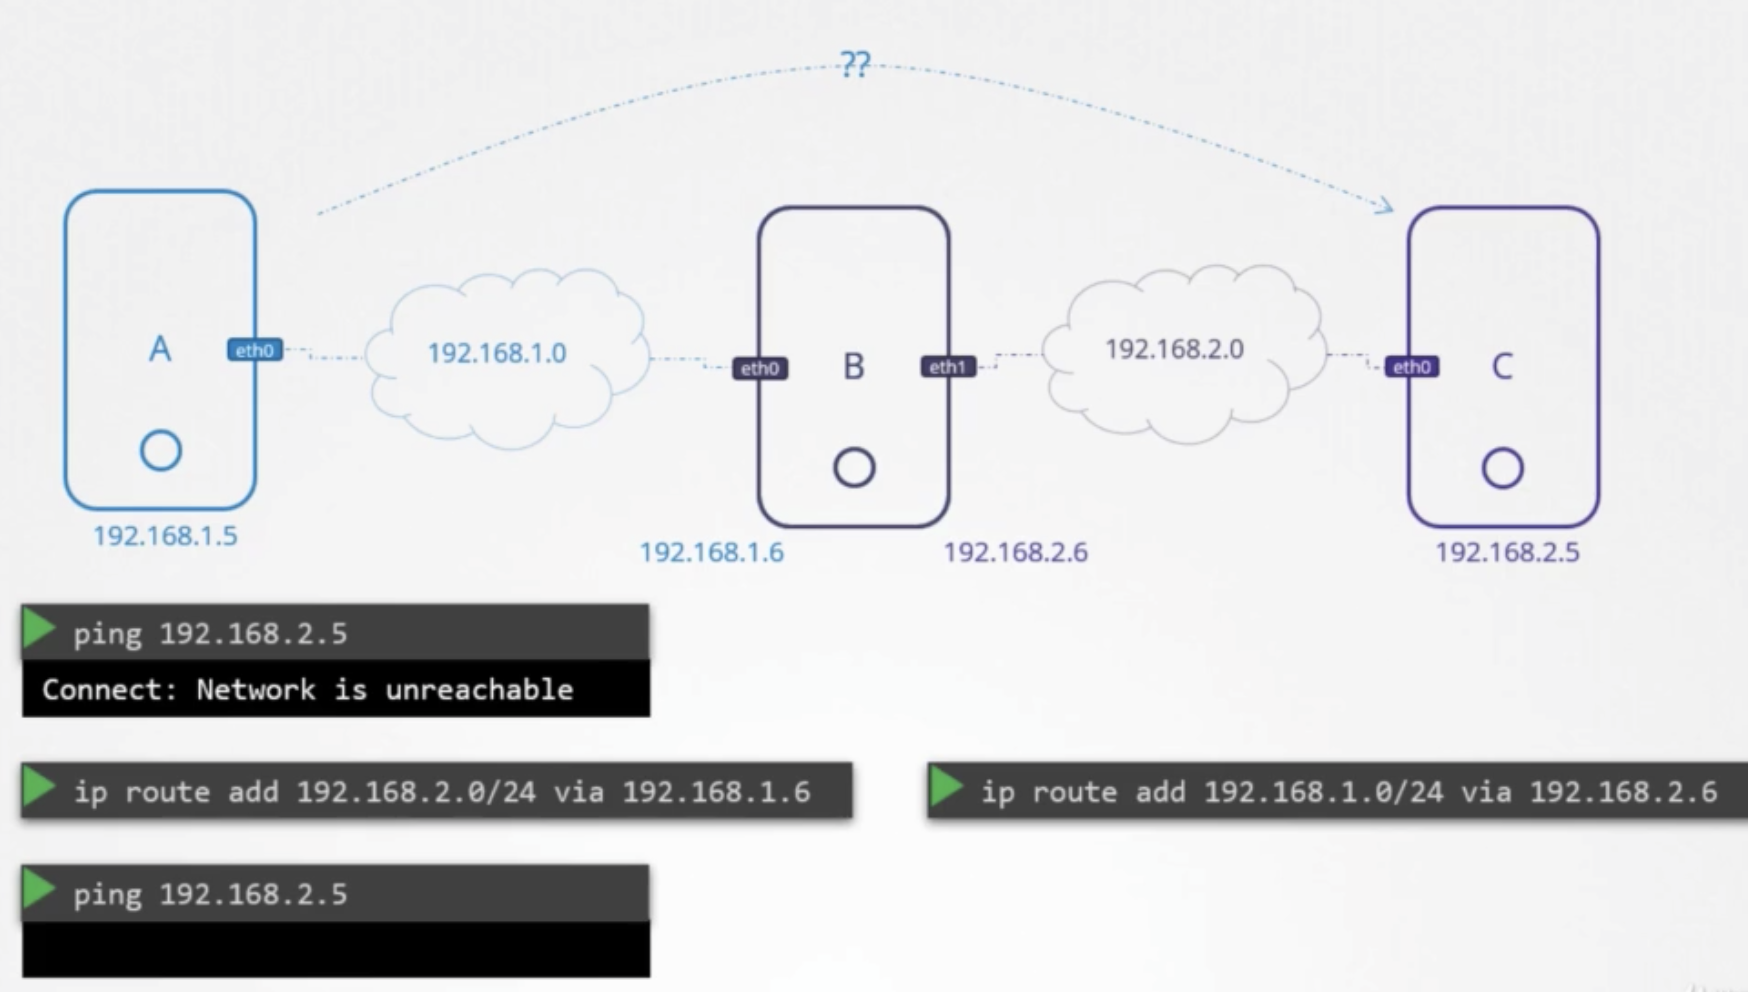
상황
- 3 hosts, A, B, C
- host B is connected to both networks using eth0 and eth1
- A&B are connected with 192.168.1.0
- B&C are connected with 192.168.2.0
- how to reach from A to C
- → need to tell host A that the door or gateway to network C is through host B
방법
- add a routing table entry
ip route add 192.168.2.0/24 via 192.168.1.6
- when packet is reached to host C, host C will have to send back response to host A
ip route add 192.168.1.0/24 via 192.168.2.6
- in Linux, packets are not forwarded from one interface to the next
- eg) pacets receivced on eht0 on host B, are not forwarded to through eth1
- eth0: private, eth1: public
- allow forward
- default: denied
1
2
> cat /proc/sys/net/ipv4/ip_forward 0 - set allowed
1
2
> echo 1> /proc/sys/net/ipv4/ip_forward 1 - this is not persistant, changed if reboot.
- to make persistent, modify the same value in the
/etc/sysctl.conf1net.ipv4.ip_forward=1
- default: denied
Take Aways
ip
ip link- to list and modify interfactes on the host
ip addr- to see the ip addresses assigned to those interface
ip addr ad- add IP addresses on the interfaces
DNS
Name Resolution
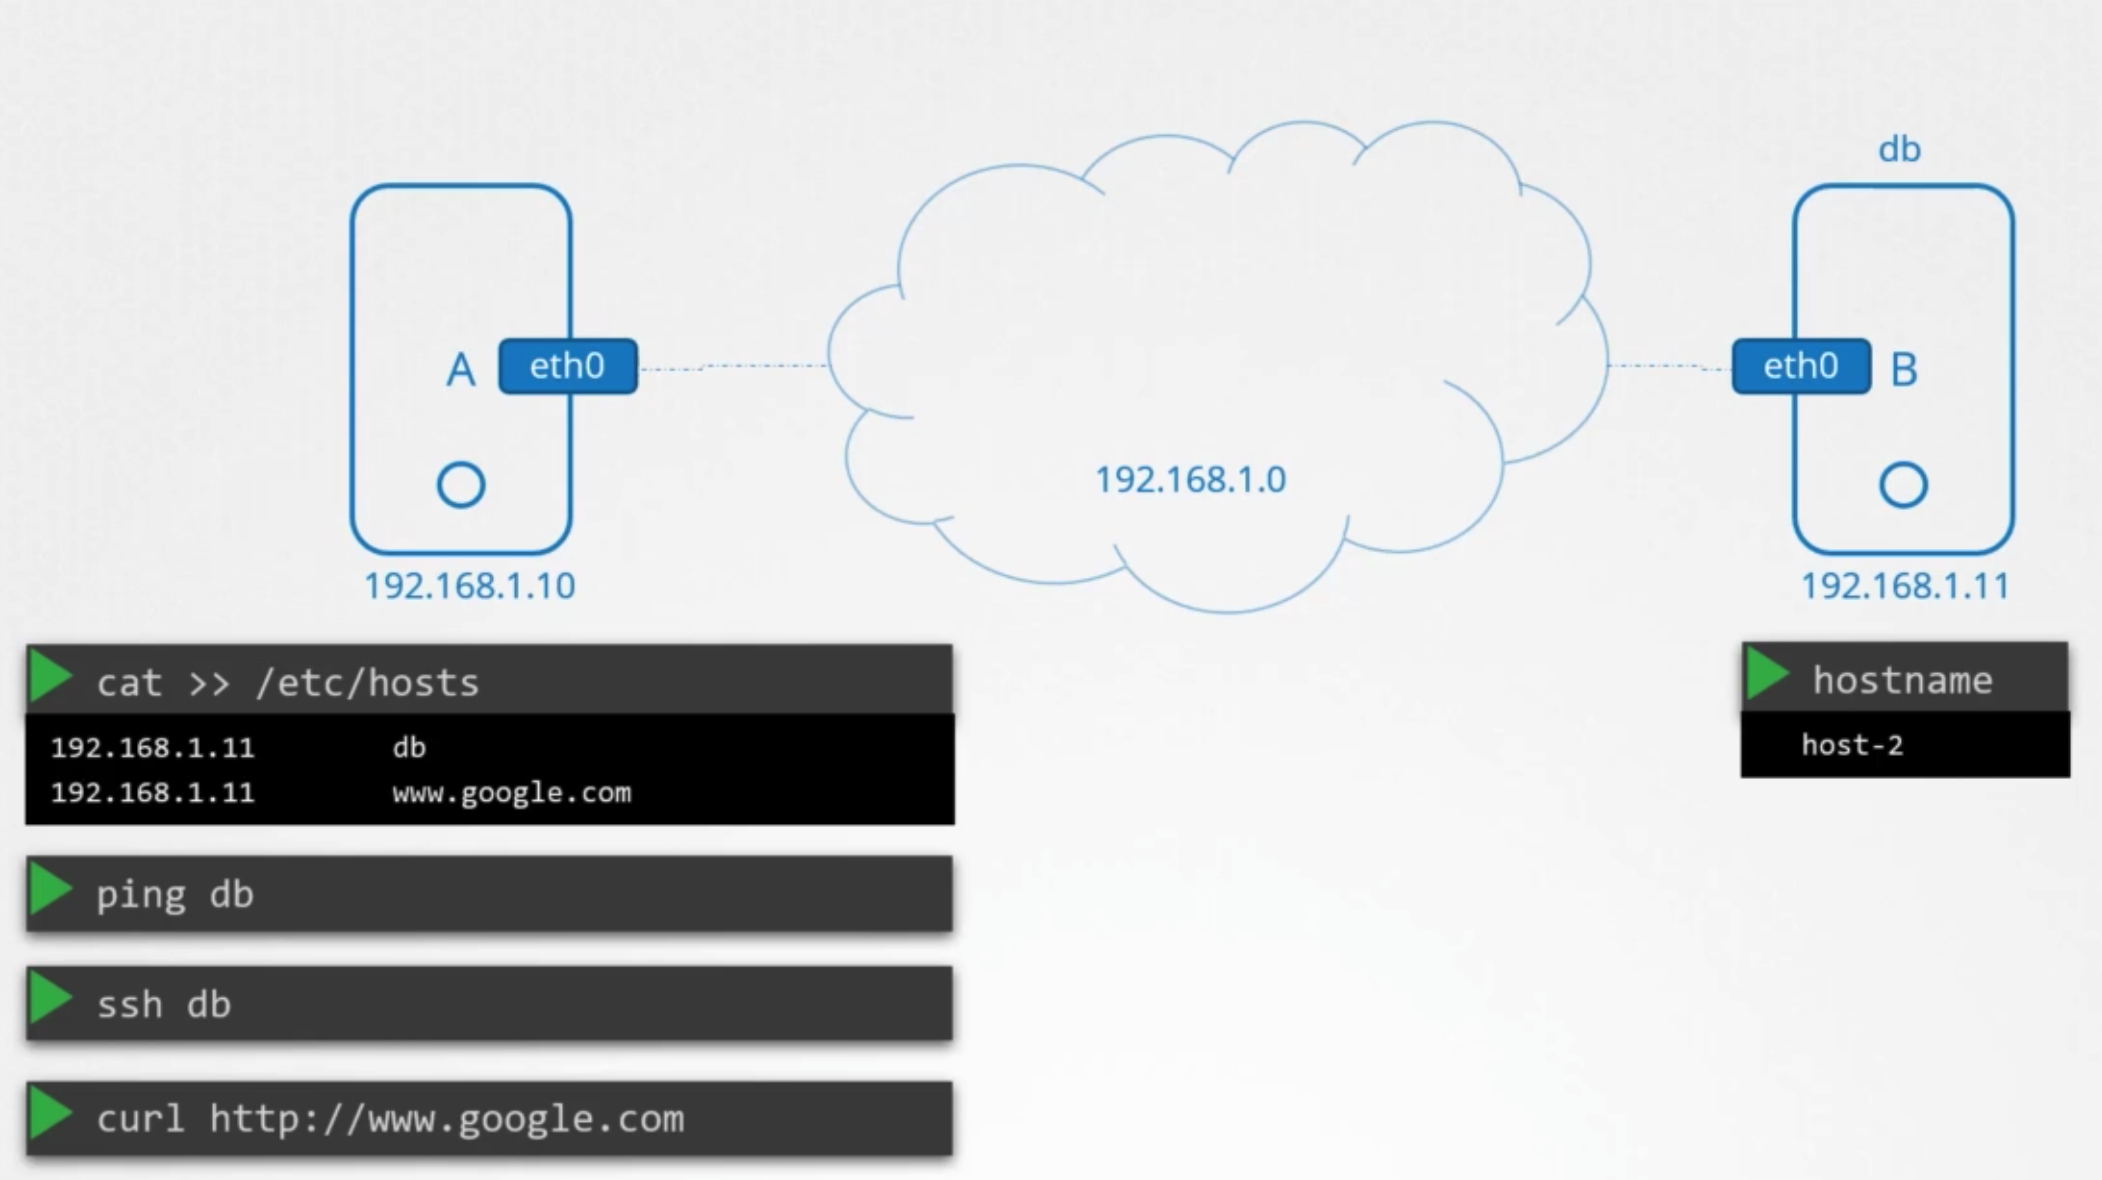
상황
- two computers A and B
- same network
- assigned IP
- A: 192.168.1.0
- B: 192.168.1.11
- able to ping one computer to others with IP
ping 192.168.1.11
- B has a database service
- give a name DB
- want to ping to B, using DB instead of IP address
ping db- → err:
ping :unkown host db
방법
- When i say db, it means IP 192.161.1.11
1
2
cat >> /etc/hosts 192.168.1.11 db ping db- successful
특징
- doesn’t matter real host name
- can have many names
- need to all specify other system
DNS Server
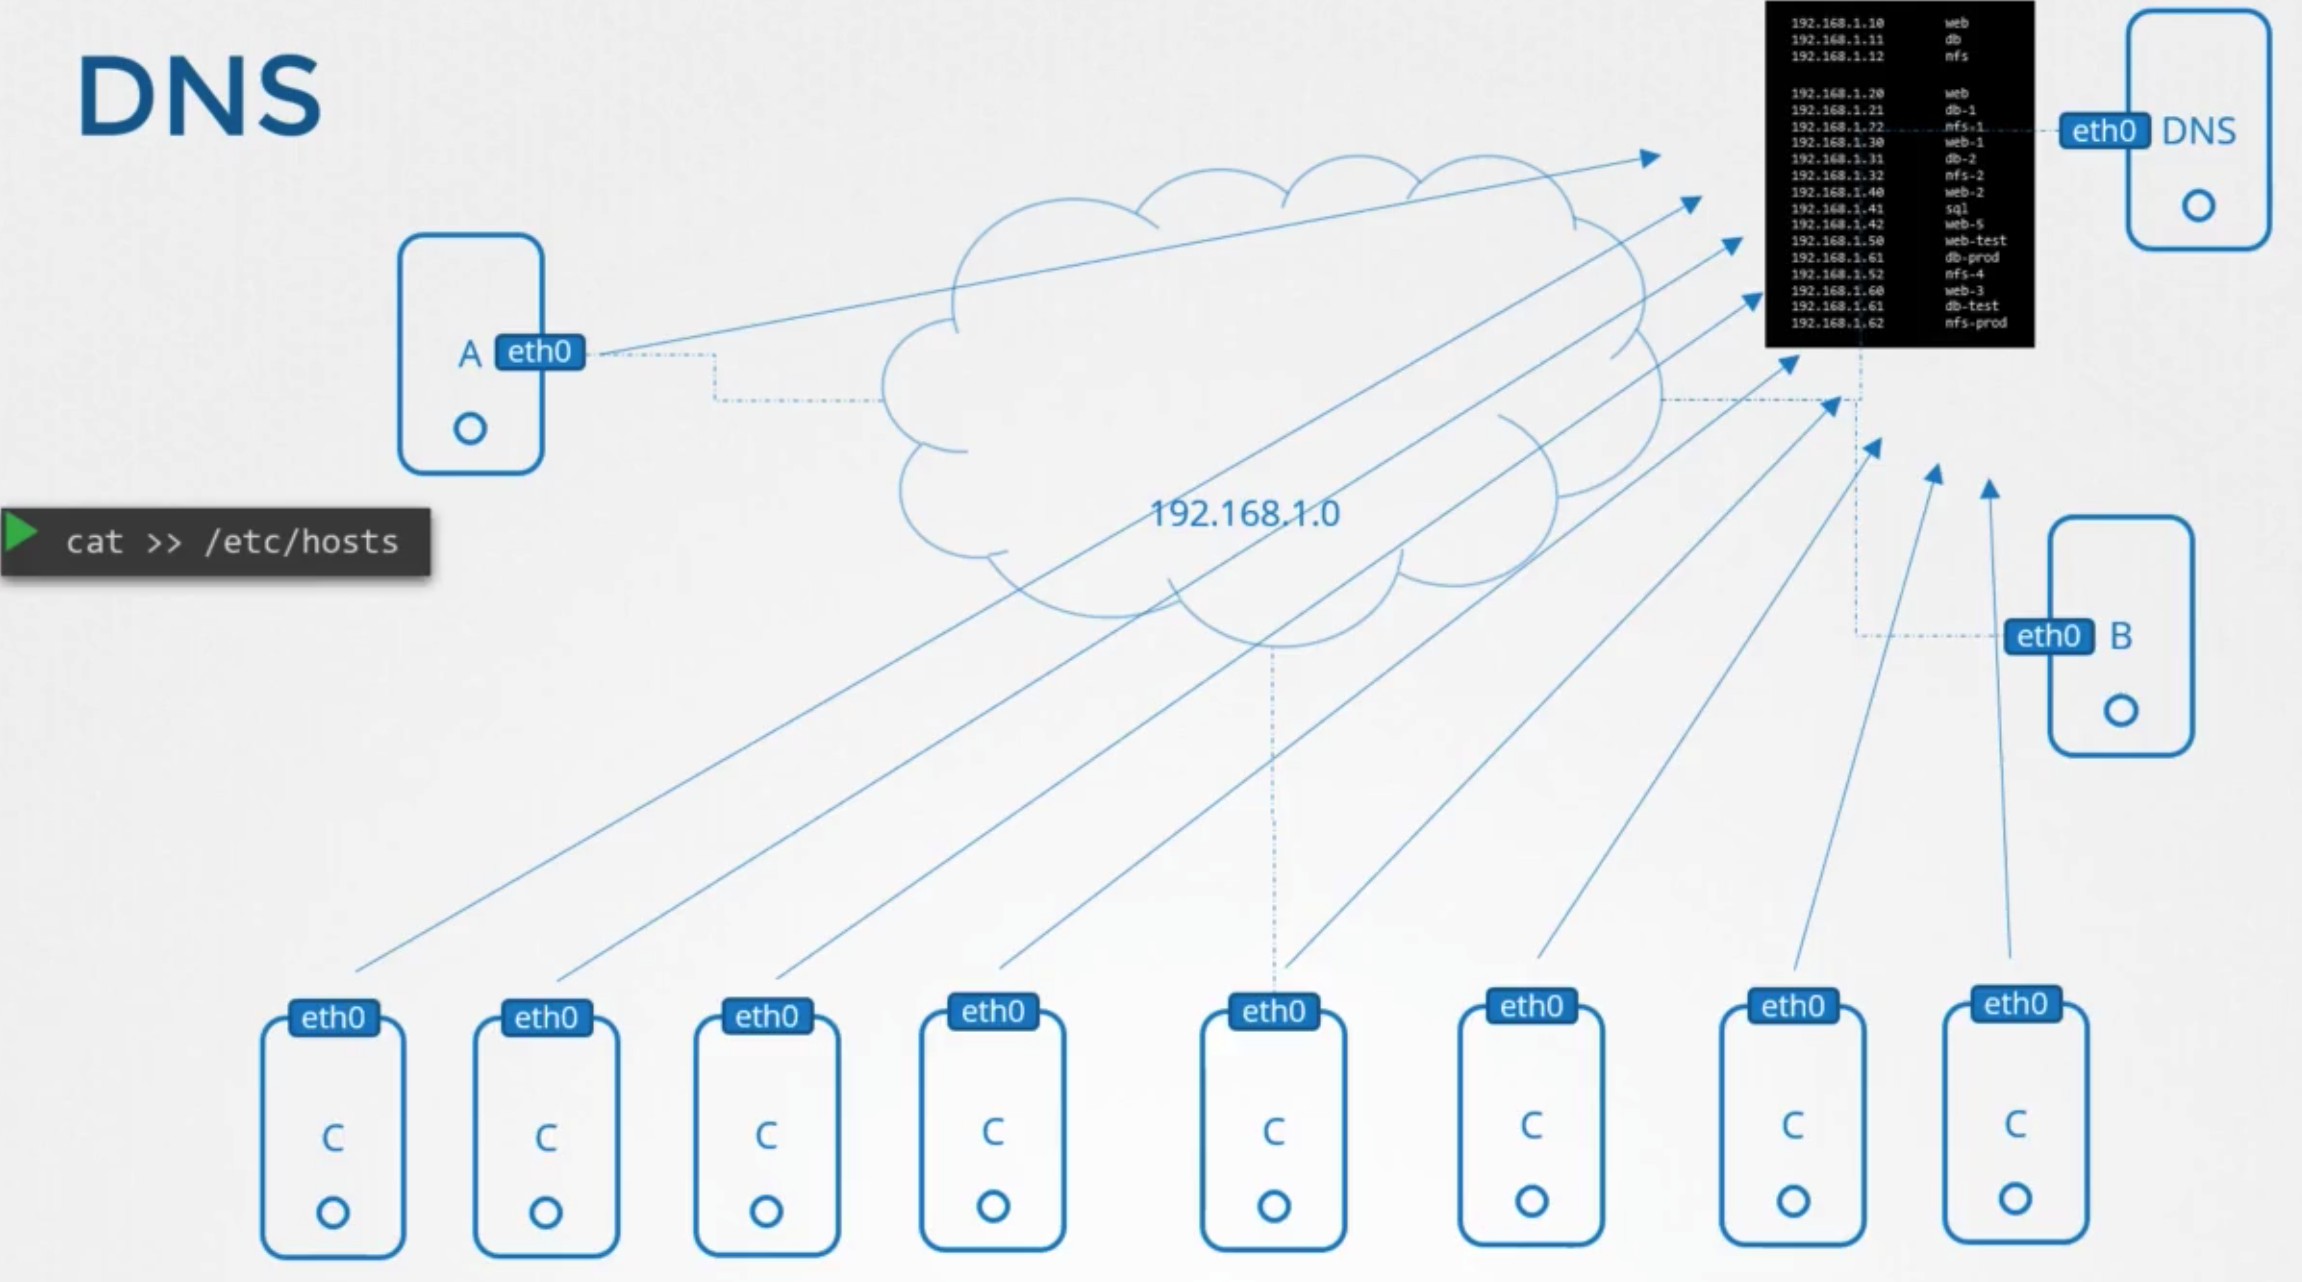
상황
- until the enviroment grew and these files got filled with too many entries
- managing these files too hard
- move all these files in one server
- → DNS Server
- point all hosts to look up tahat server
- ip: 192.168.1.100
방법
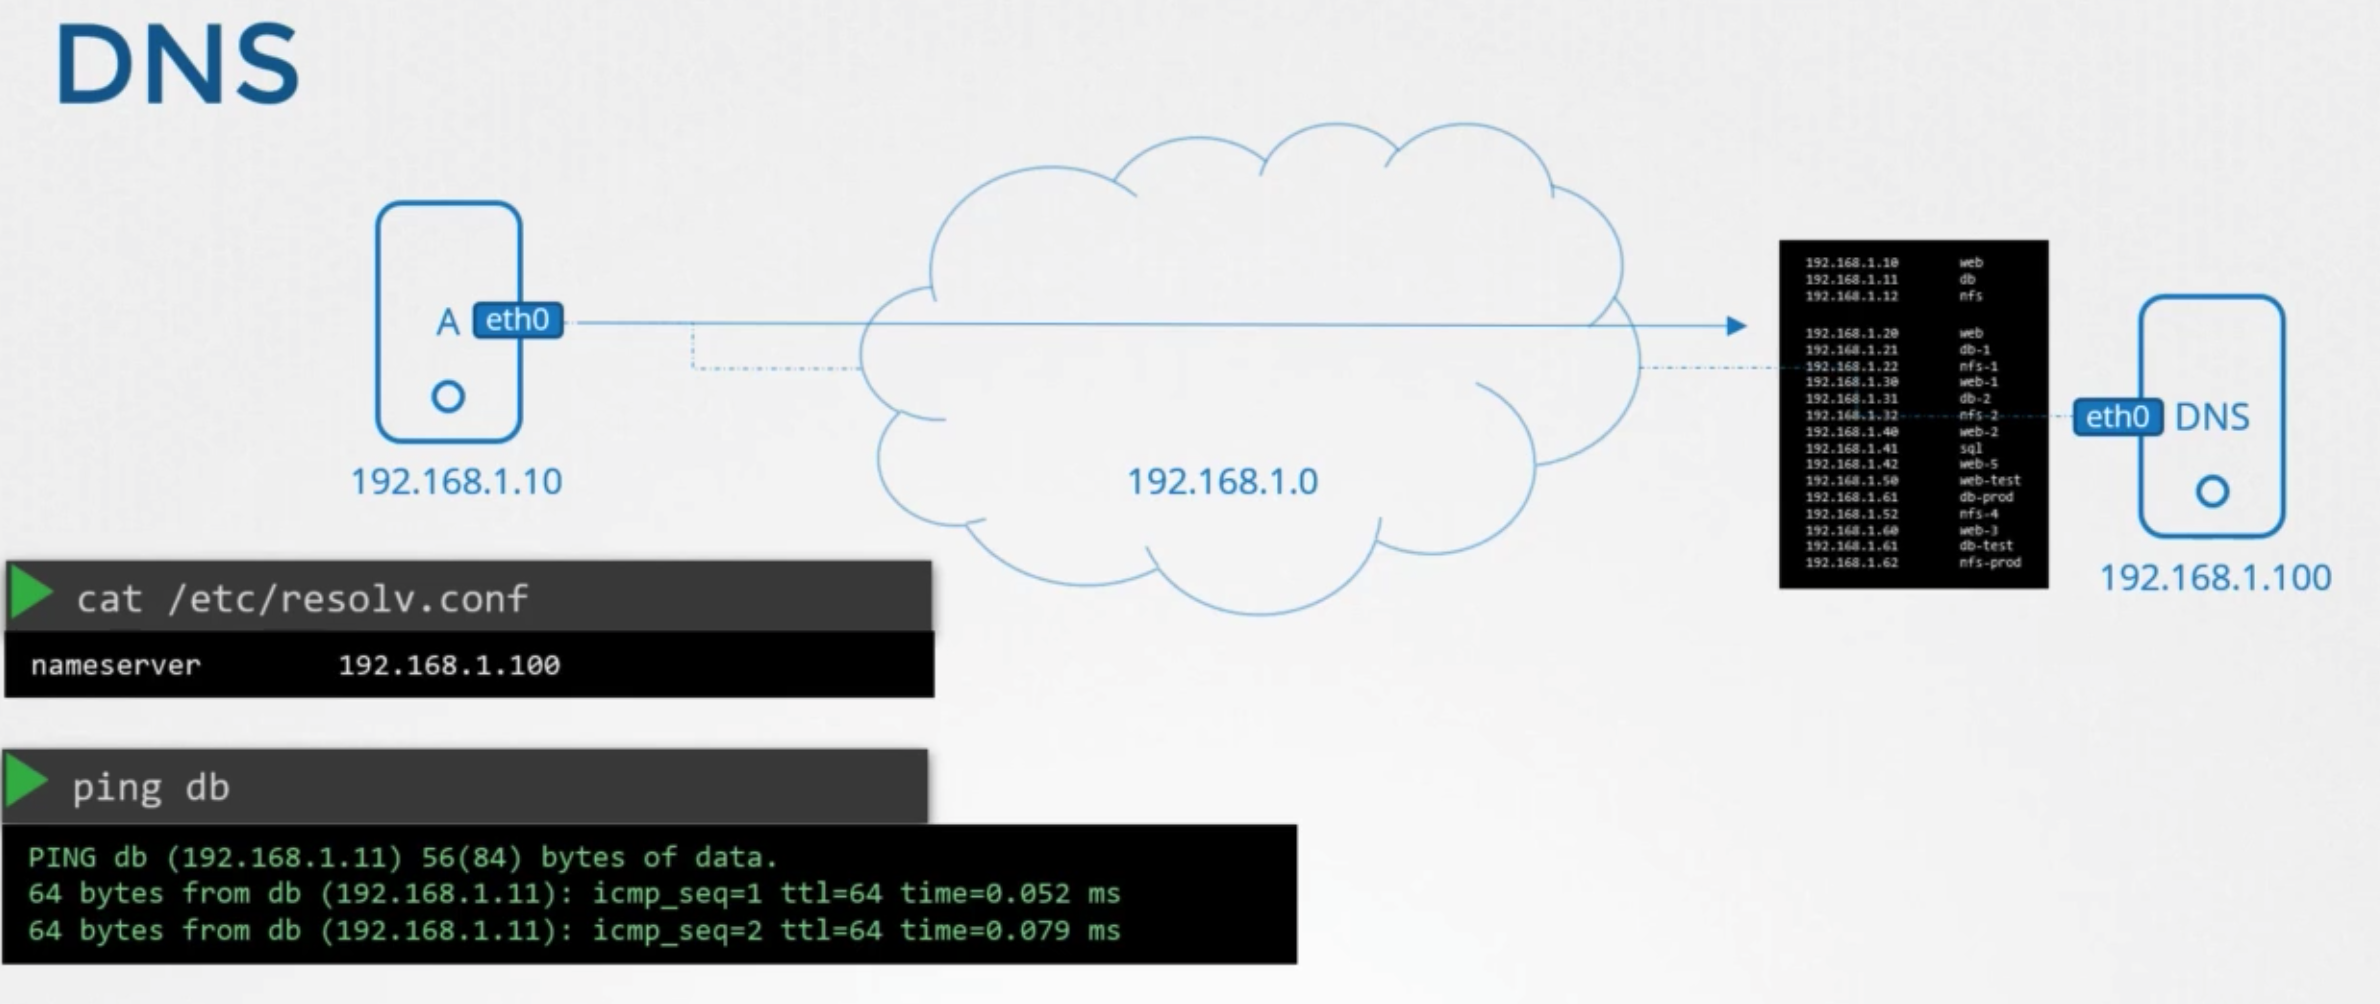
- add entry
1
2
cat /etc/resolv.conf nameserver 192.168.1.100 - configure in all host
특징
- also can use
/etc/hosts1 2cat >> /etc/hosts 192.168.1.115 testping test
- if an entry in both places
- host first looks in the local
/etc/hosts - and then look at the name sever
- host first looks in the local
- order can change
etc/nsswitch.conf
- multiple name server is possible
Domain Names
Structure
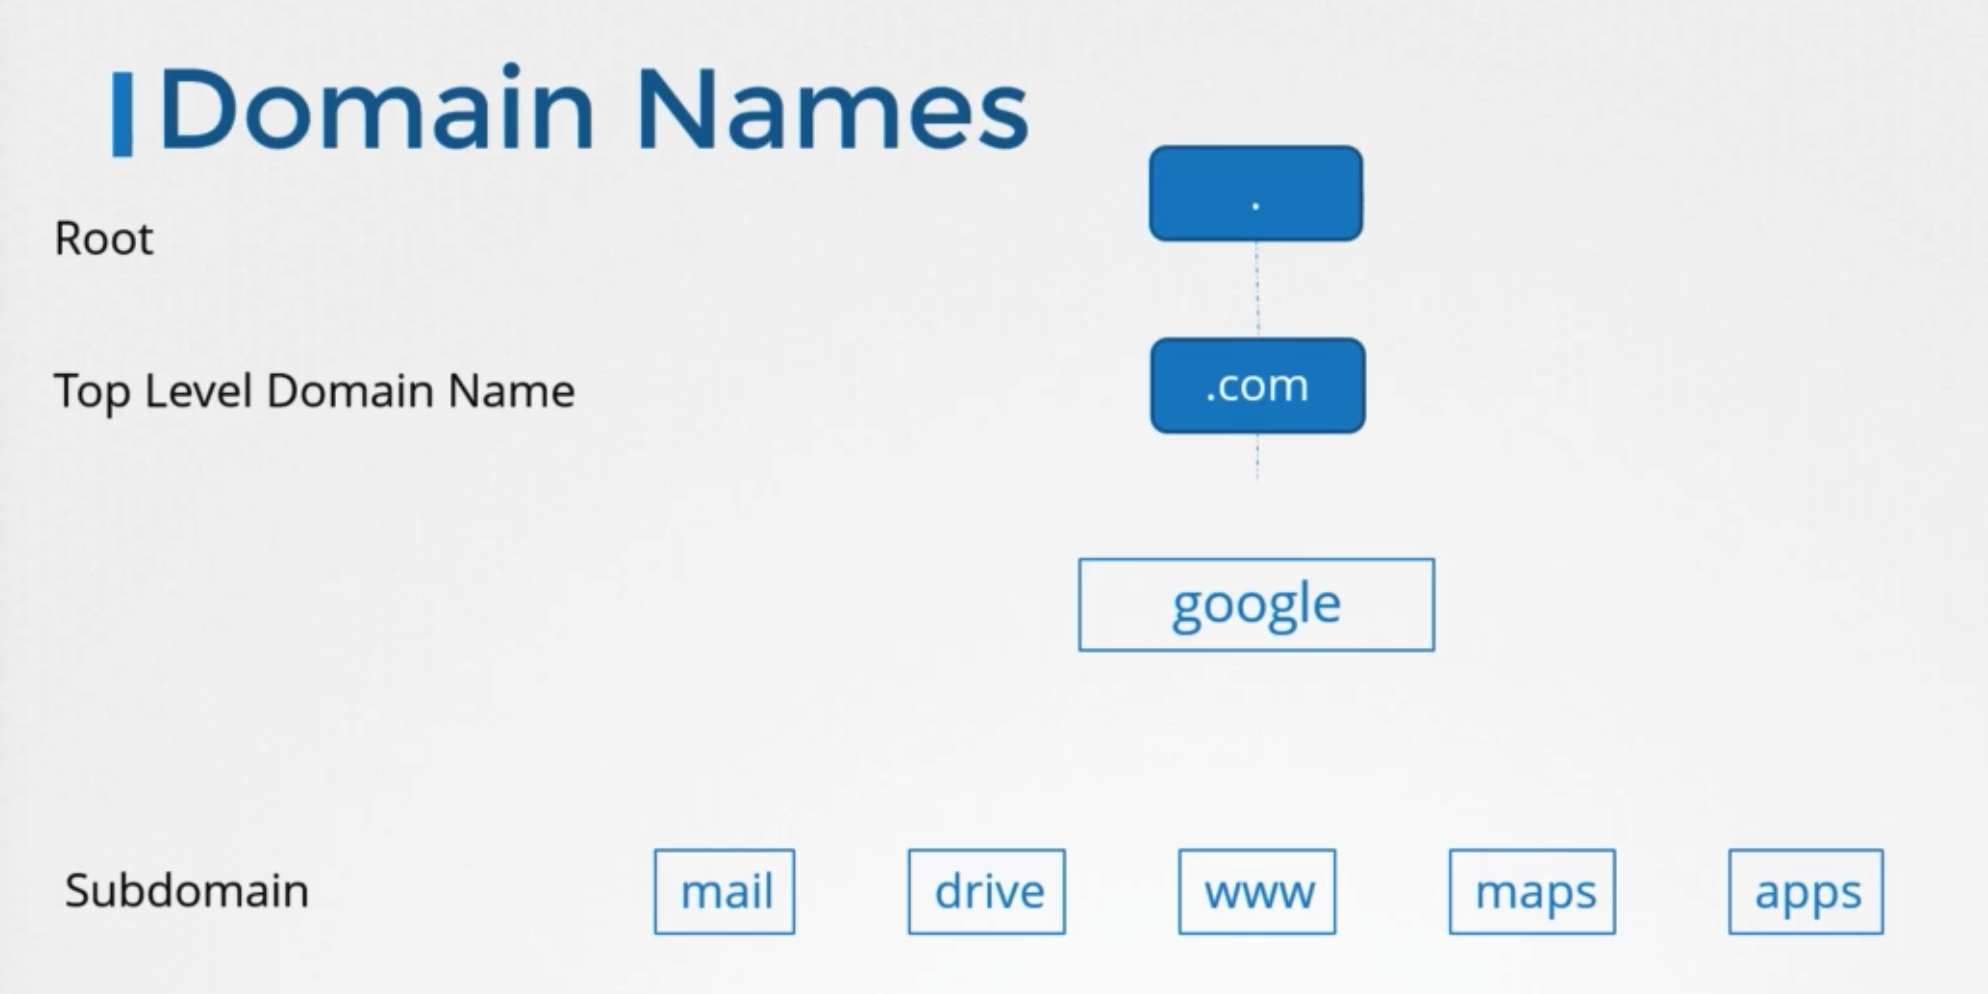
- tree structure
- .com
- top level domain
- google
- domain name
- www
- subdomain
- helping further grouping things together
- eg) maps, drive, ..
- subdomain
- .com
In public
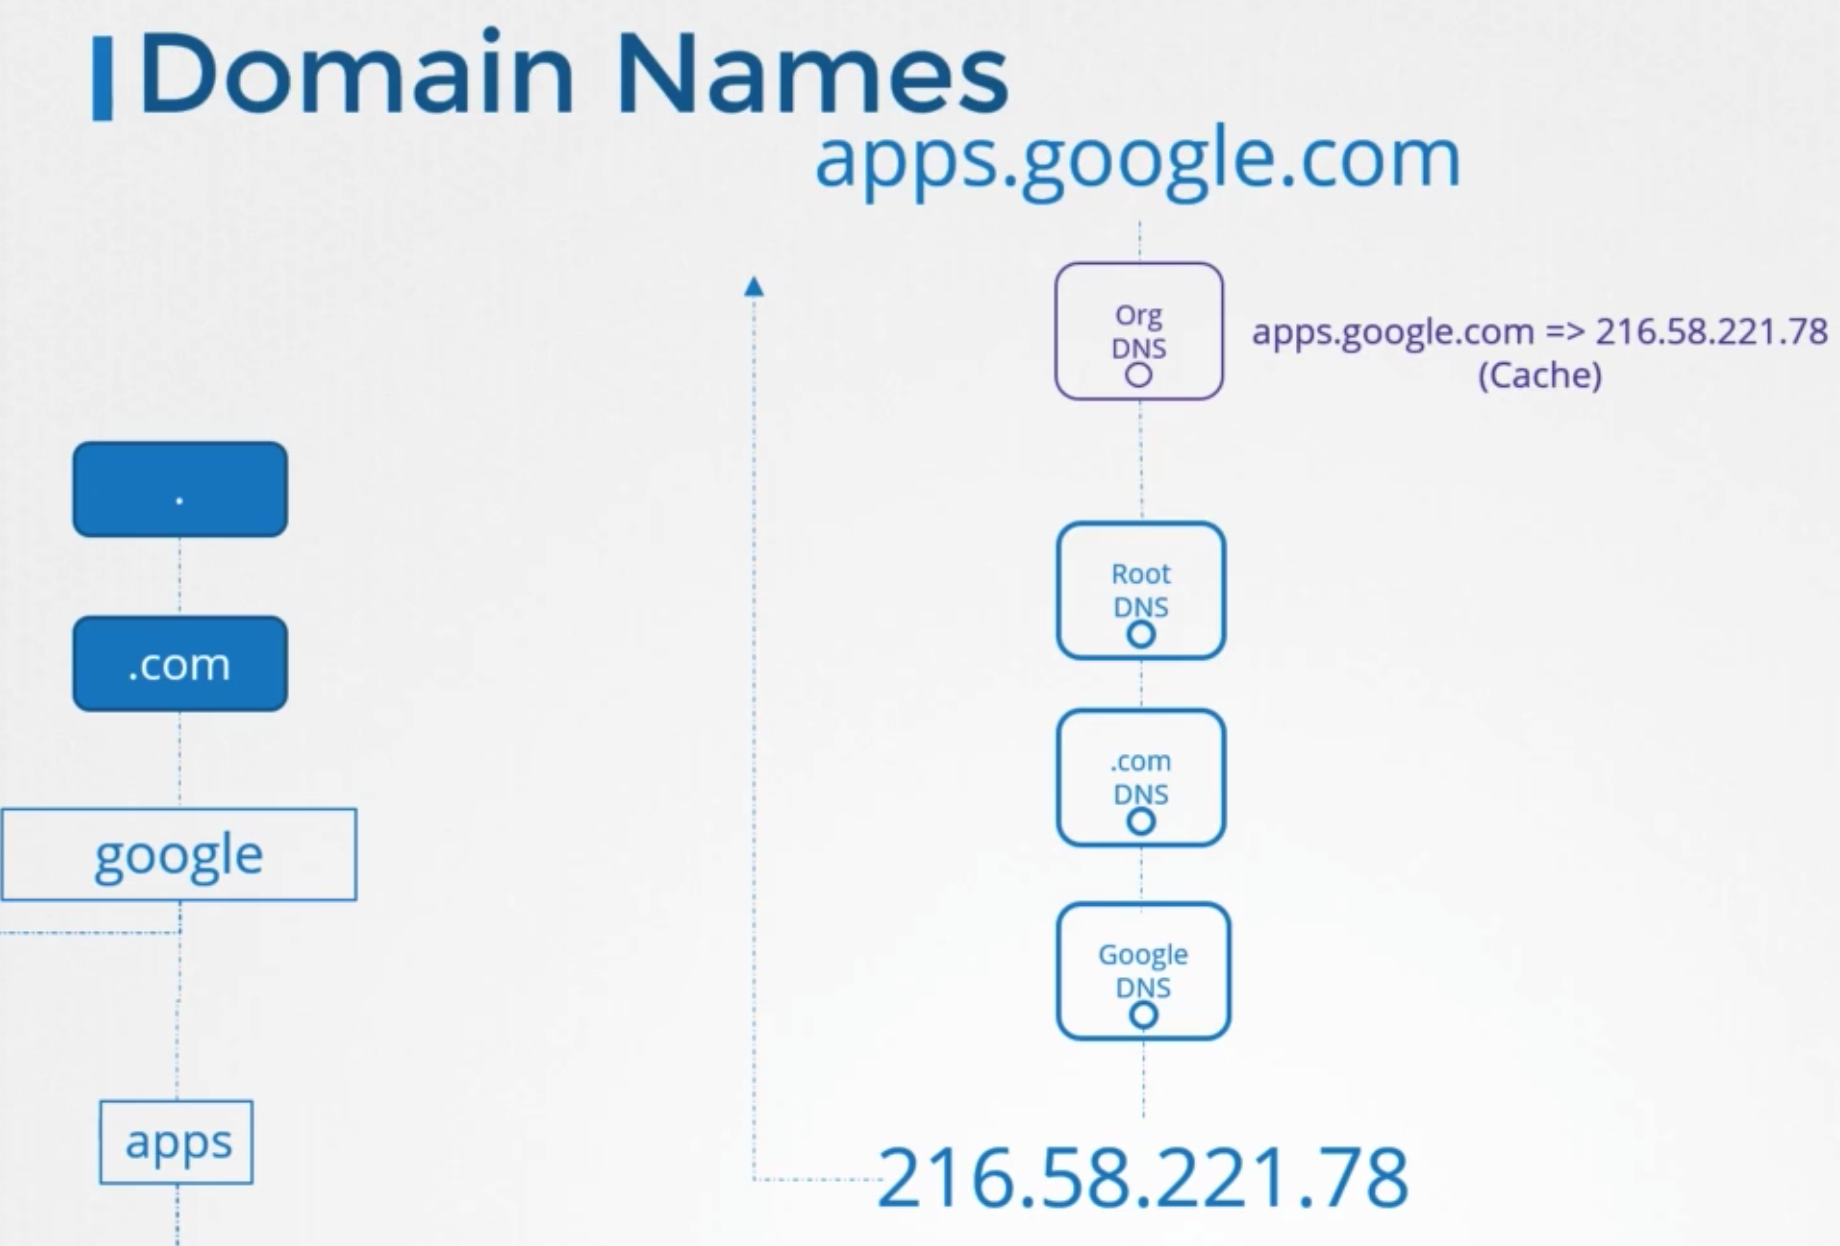
- request hits organization’s internal DNS server
- forwards request to the Internet
- point to a serving .com
- forwards to Google
- Google DNS server provides IP of ther serving the apps applications
- to speed up all future results, organization’s DNS server choose to cache this IP
In private
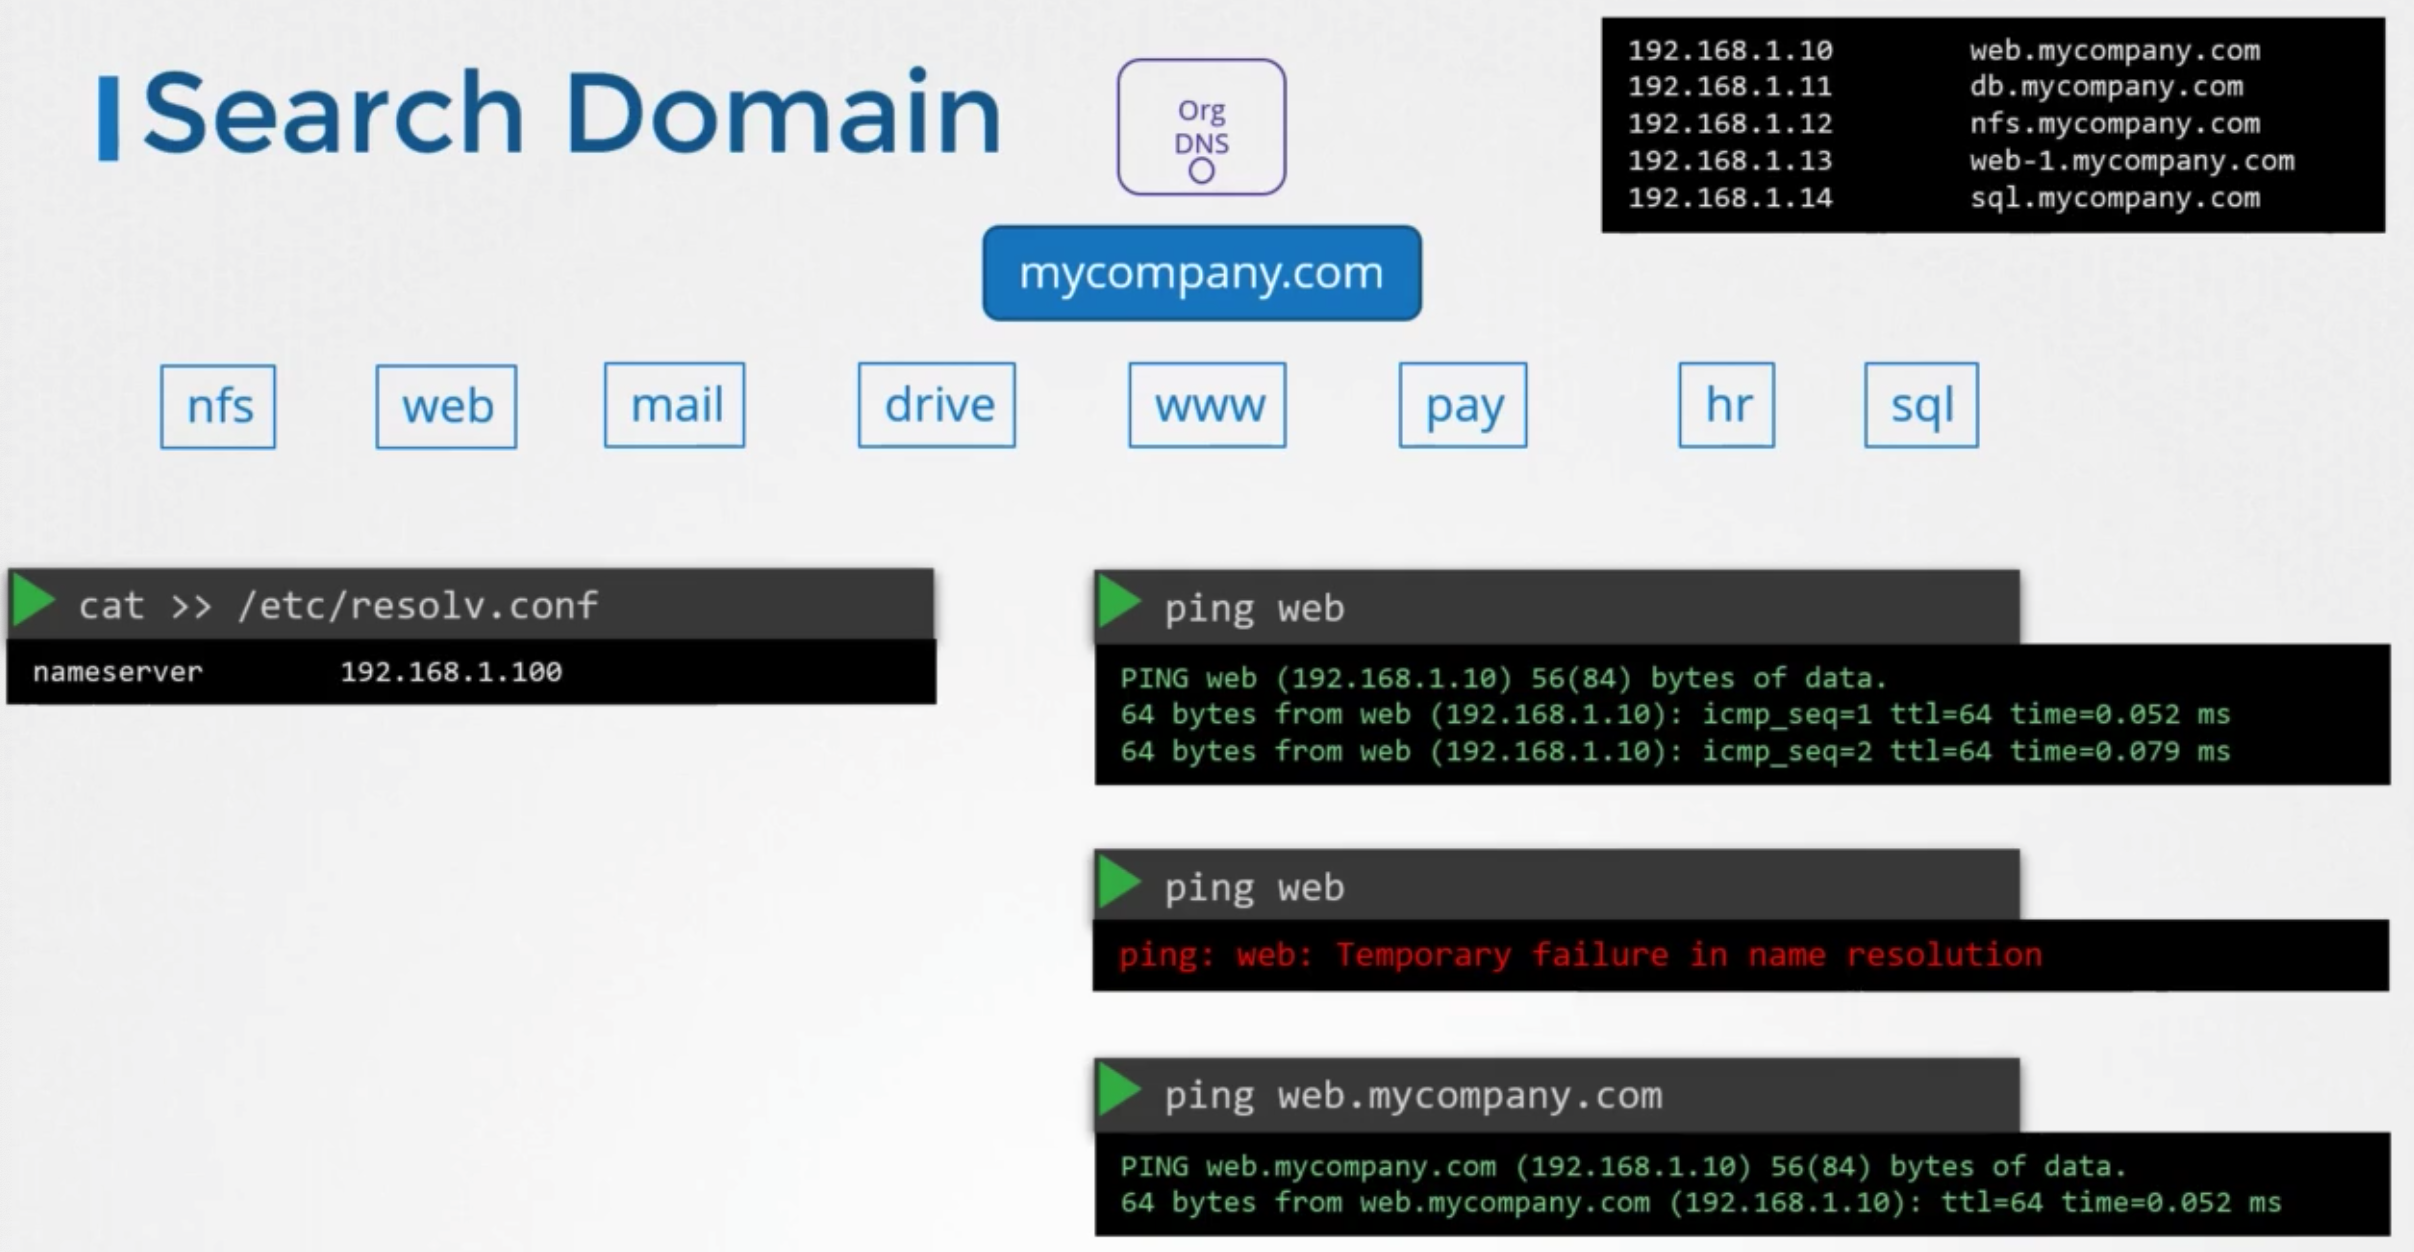
- within in company do not wany to use domain name
1 2 3cat >> /etc/resolv.conf nameserver 192.168.1.100 search mycompany.com
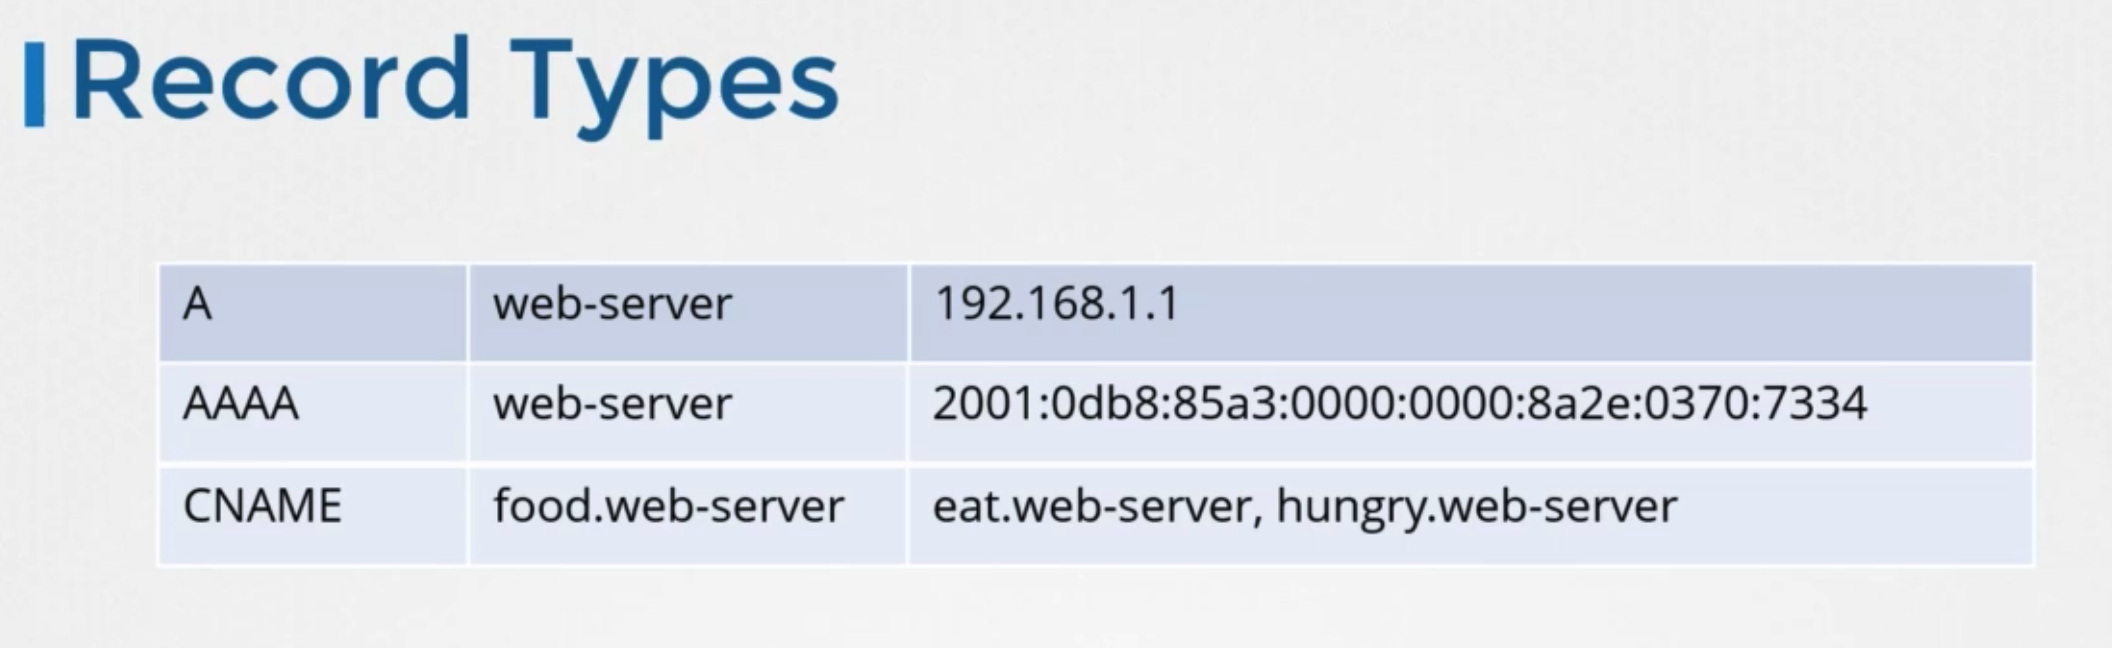
Record Types
Tools
nslookup
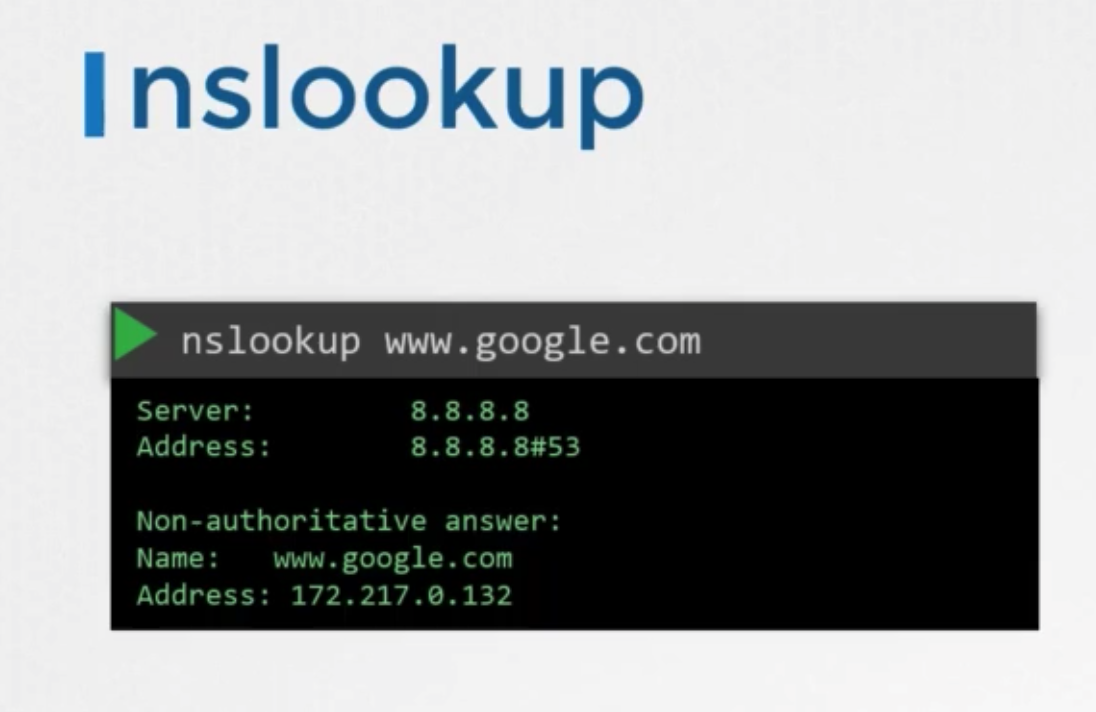
- to query hostname from a DNS server
- does not consider the entries in the local
/etc/hostsfile- entry for web application has to be present in DNS server.
dig
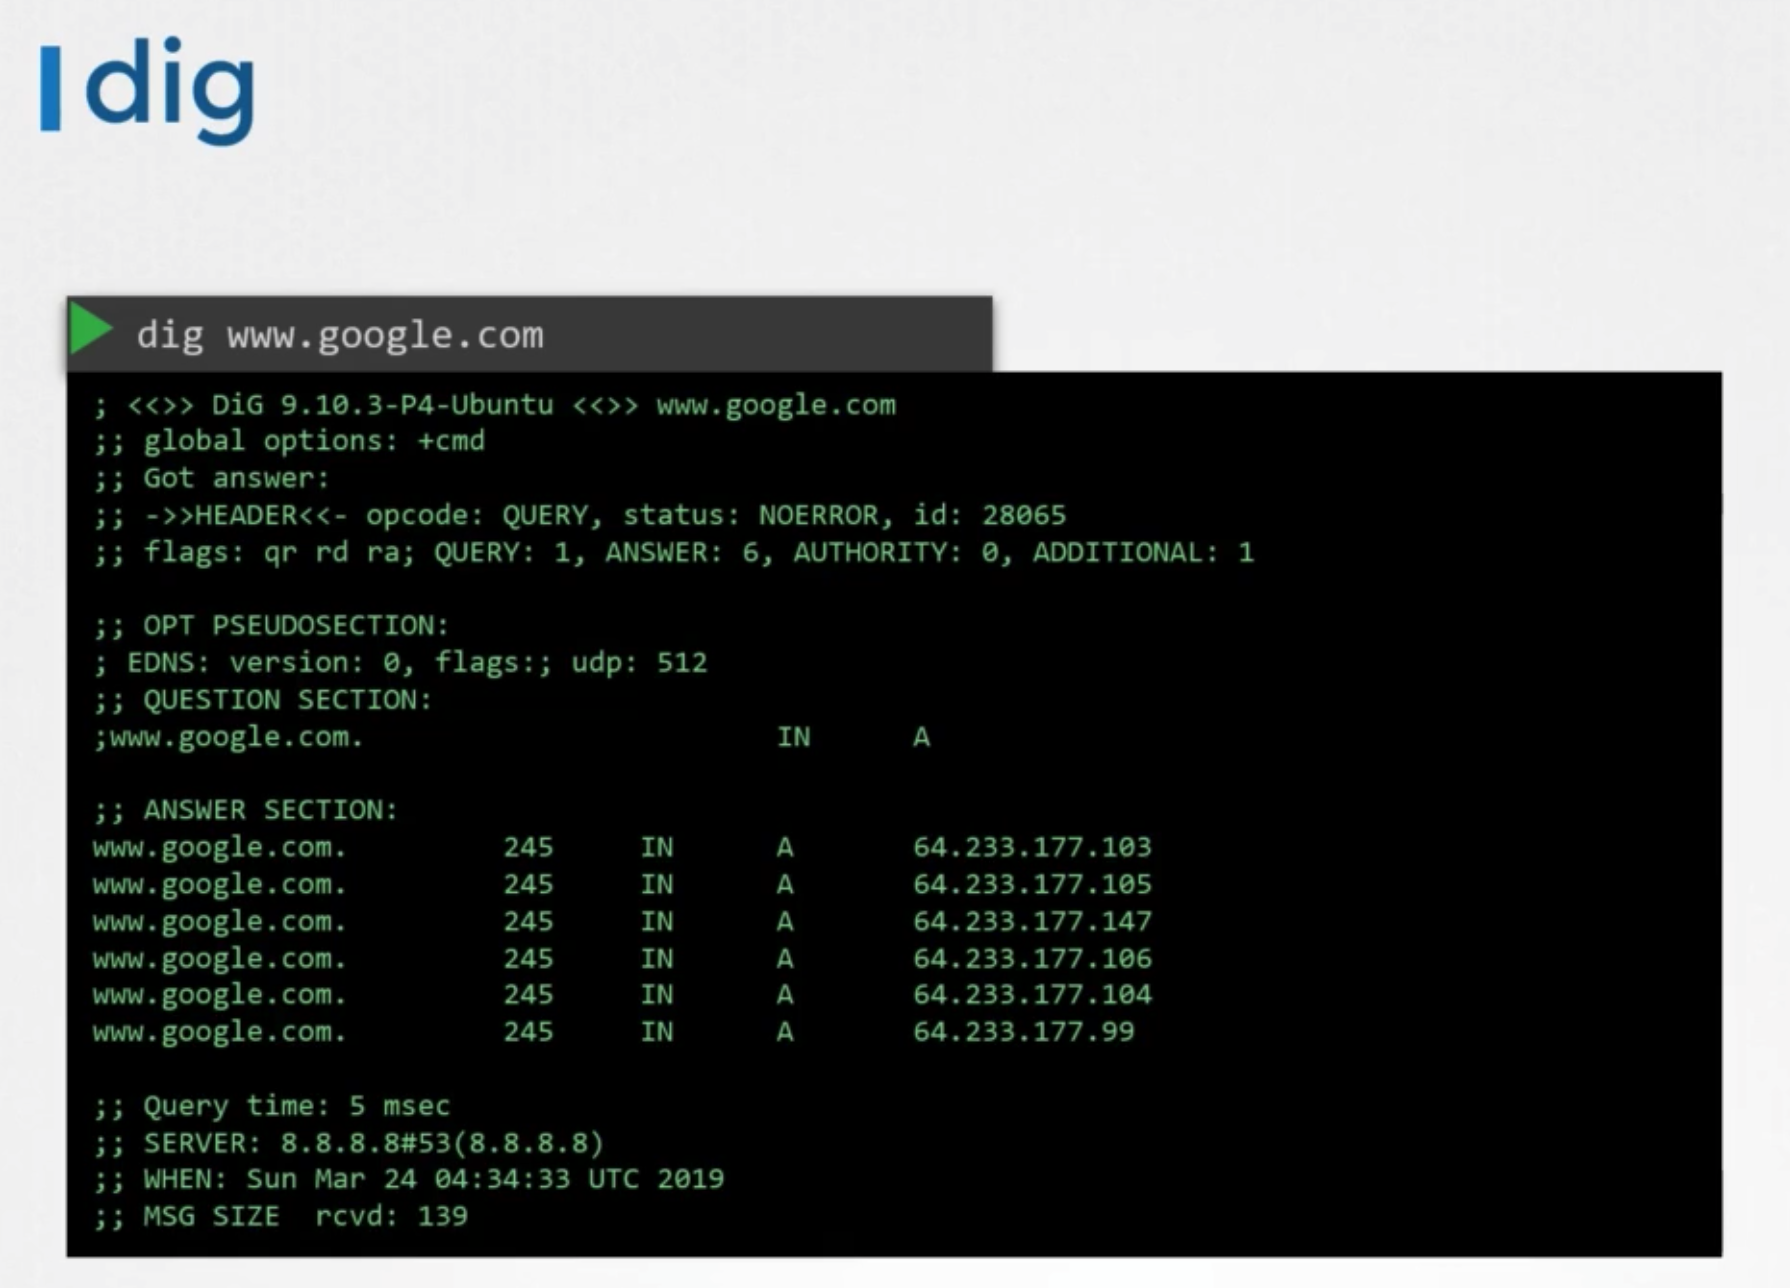
- give more information
Network Namespaces
Process Namespace
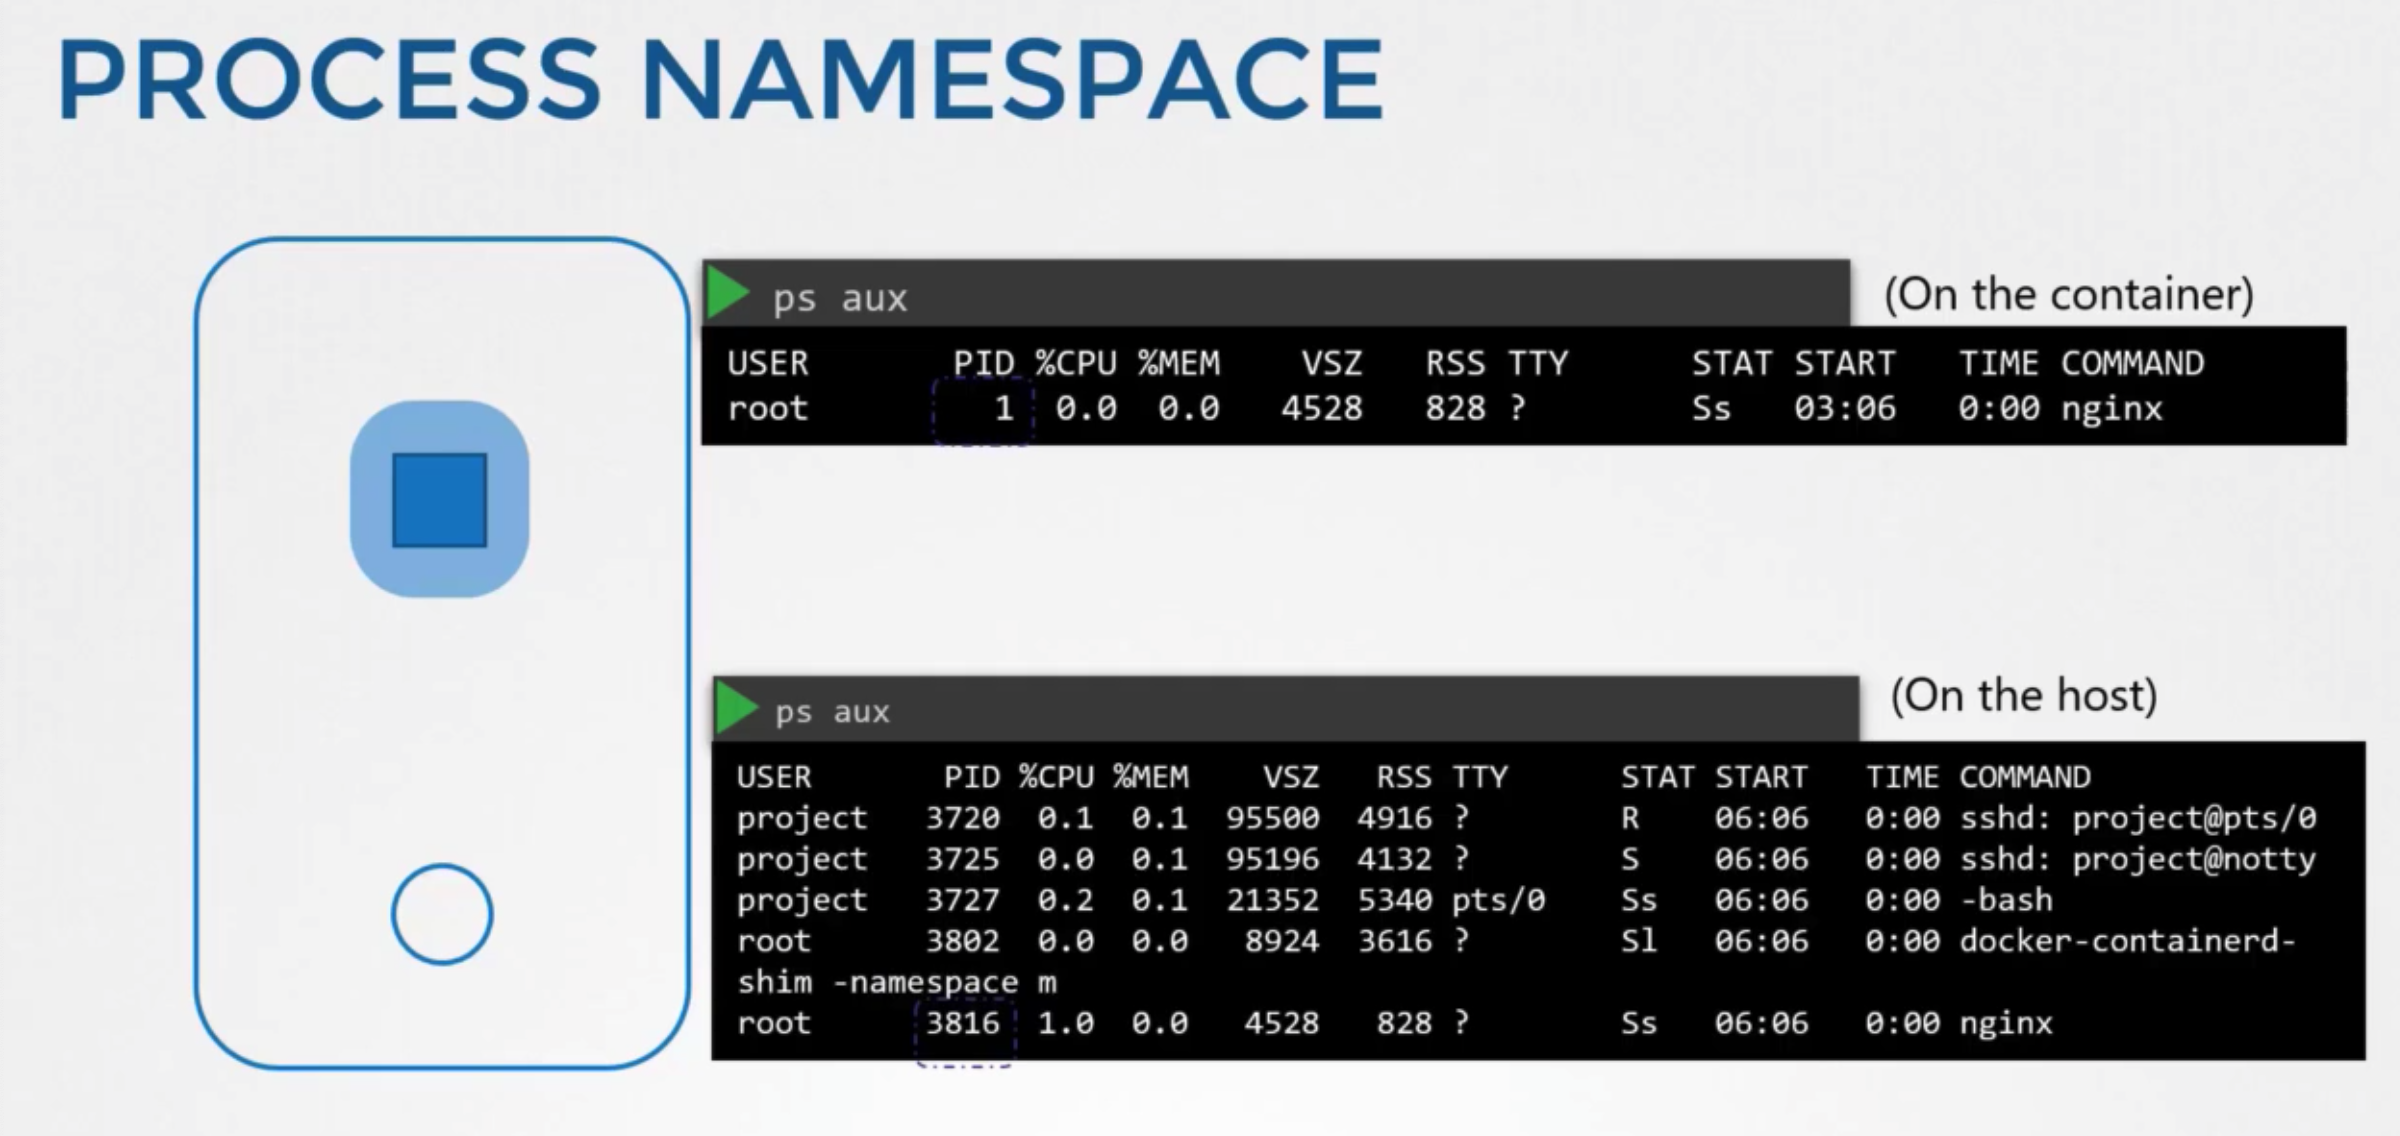
- container host
- create a container, want to make sure that it is isolated
- create a special room, called namespace
- only sees the processes run by container
- underlying host
- has visibility in to all of the proceeses
- including those running inside containers
- has visibility in to all of the proceeses
Network namespace
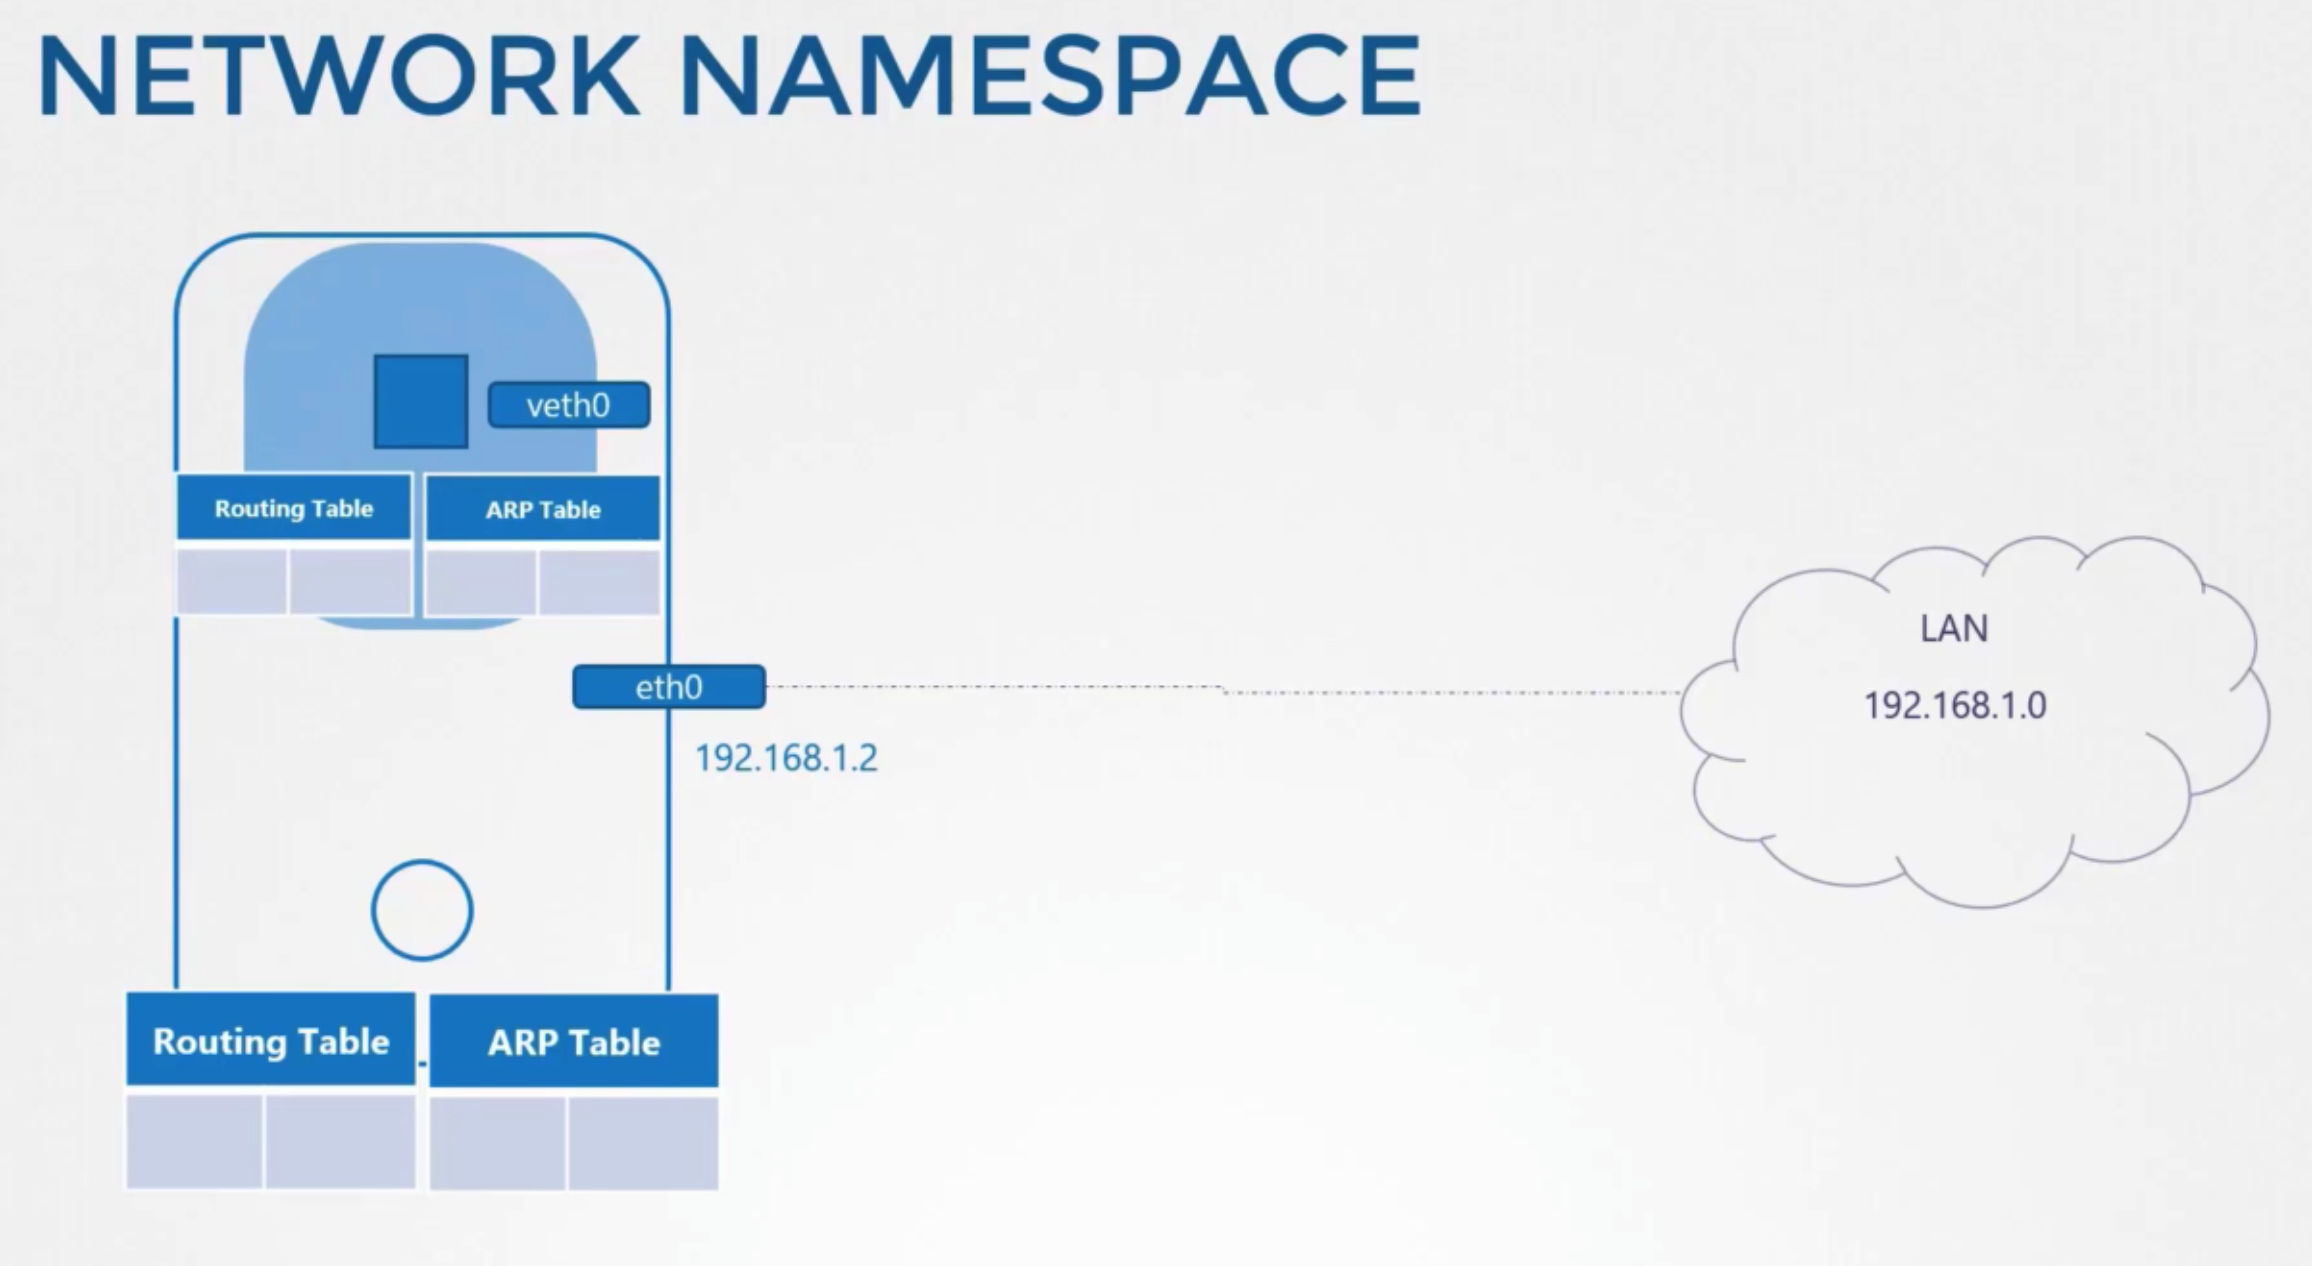
- host has its own intercates that connect to the local area network
- own routing table, arp table
- information about rest of the network
방법
- create a container
- create a network namespace for it
- it has no visibility to any network related infromation on the host within its namespace
- the container have its own virtual interfaces, routing and arp tables
Create network namespace
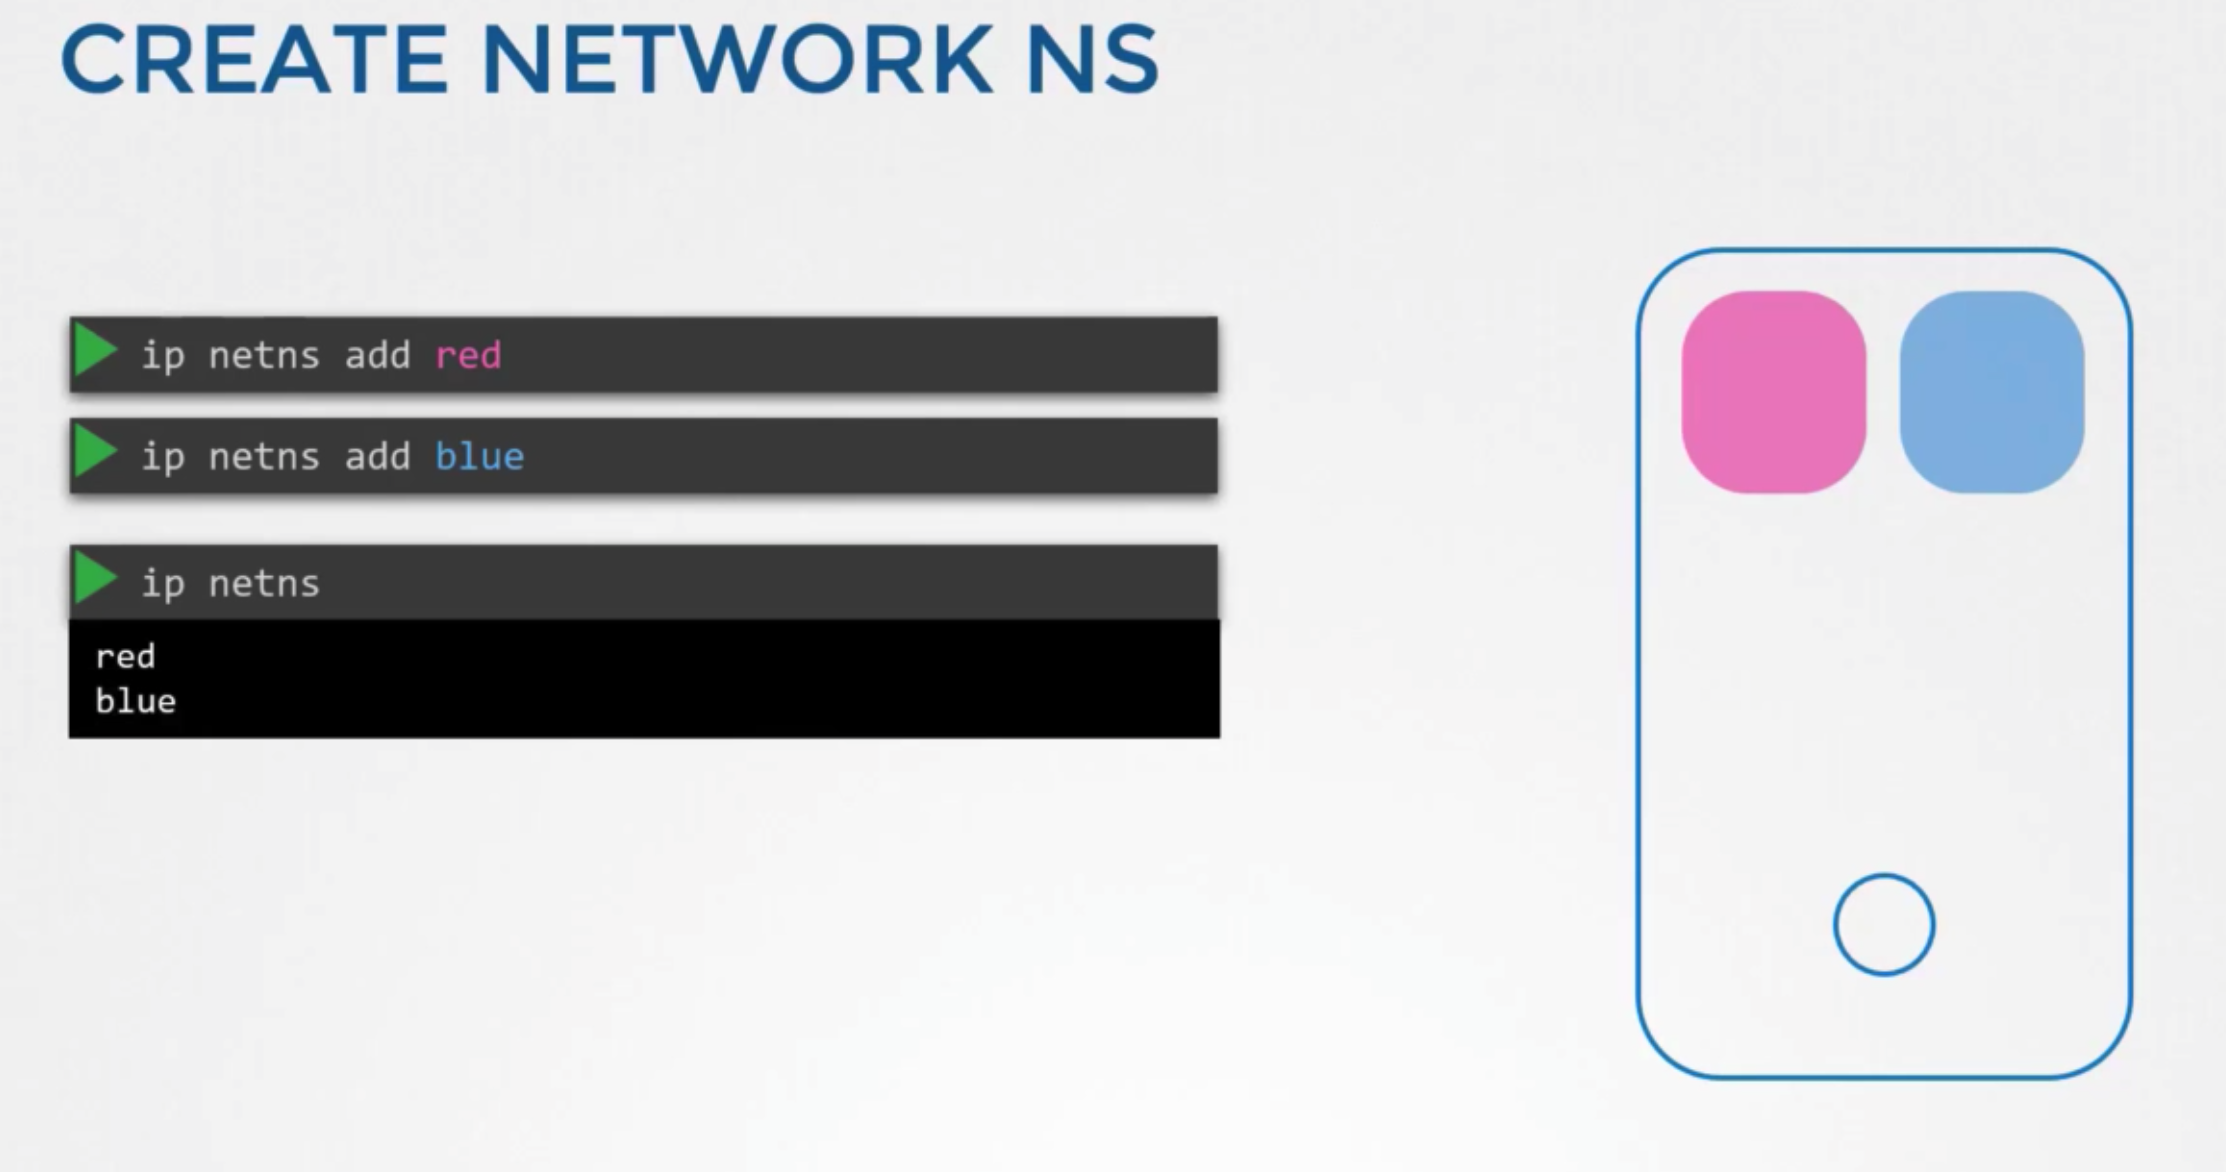
- 생성
ip netns add redip netns add blue
- 상태
ip netns
Exec in network ns
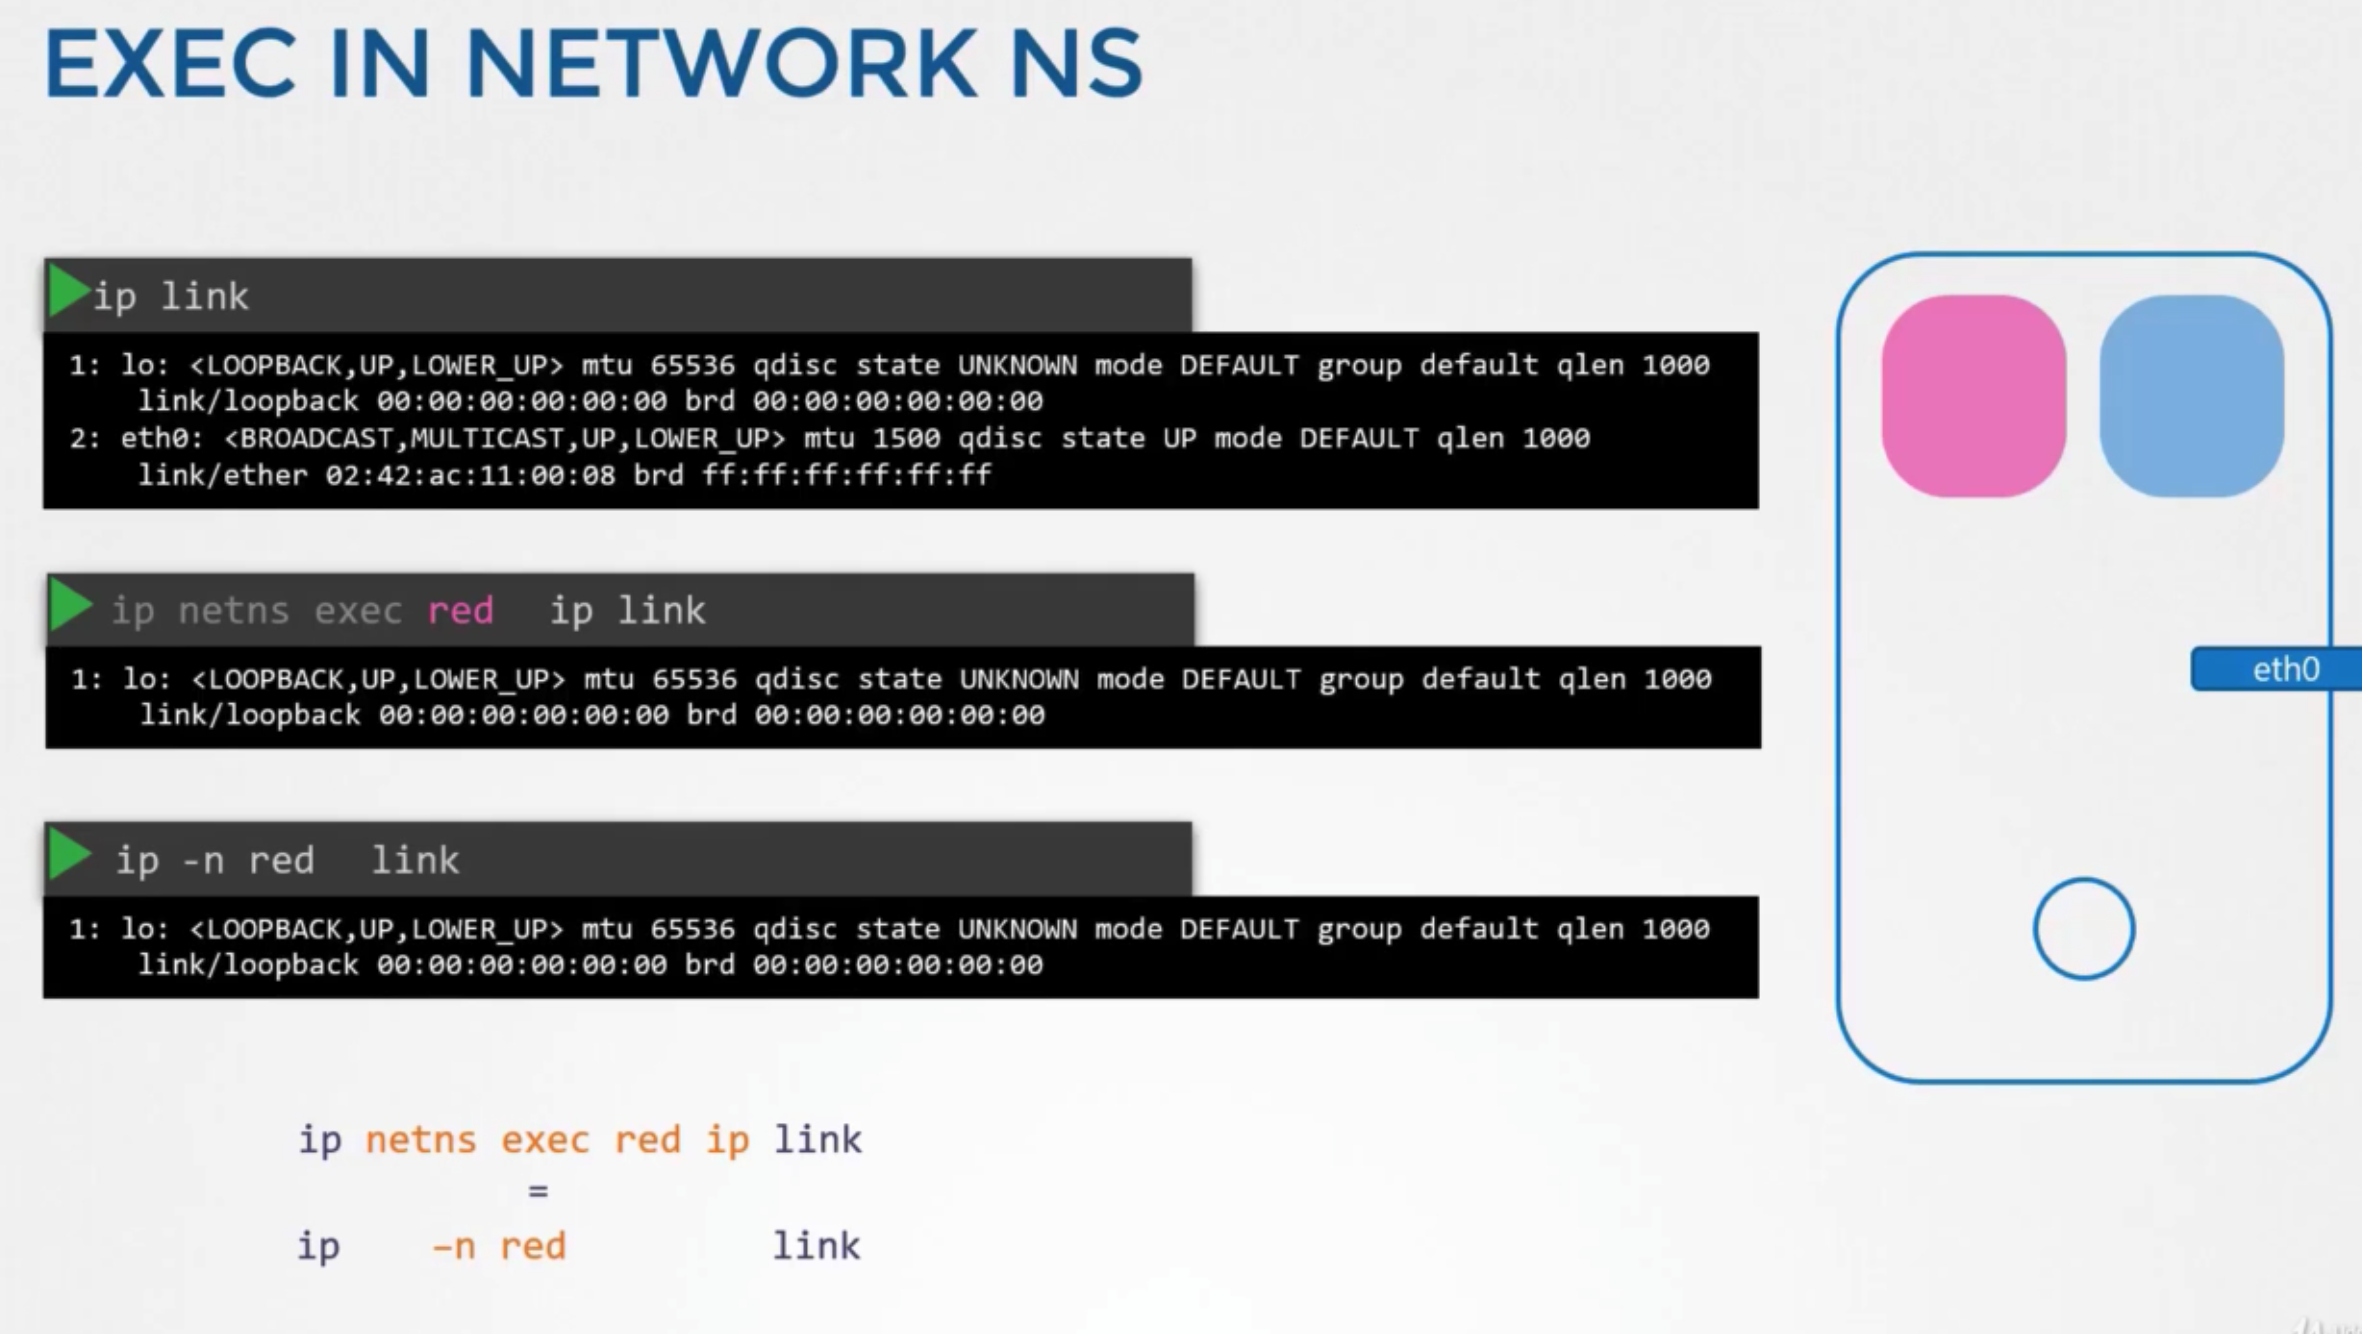
- interfaces
- to list interfaces on my host
ip link
- to list interfaces on network namespace
ip netns exec red ip linkip -n red link
- to list interfaces on my host
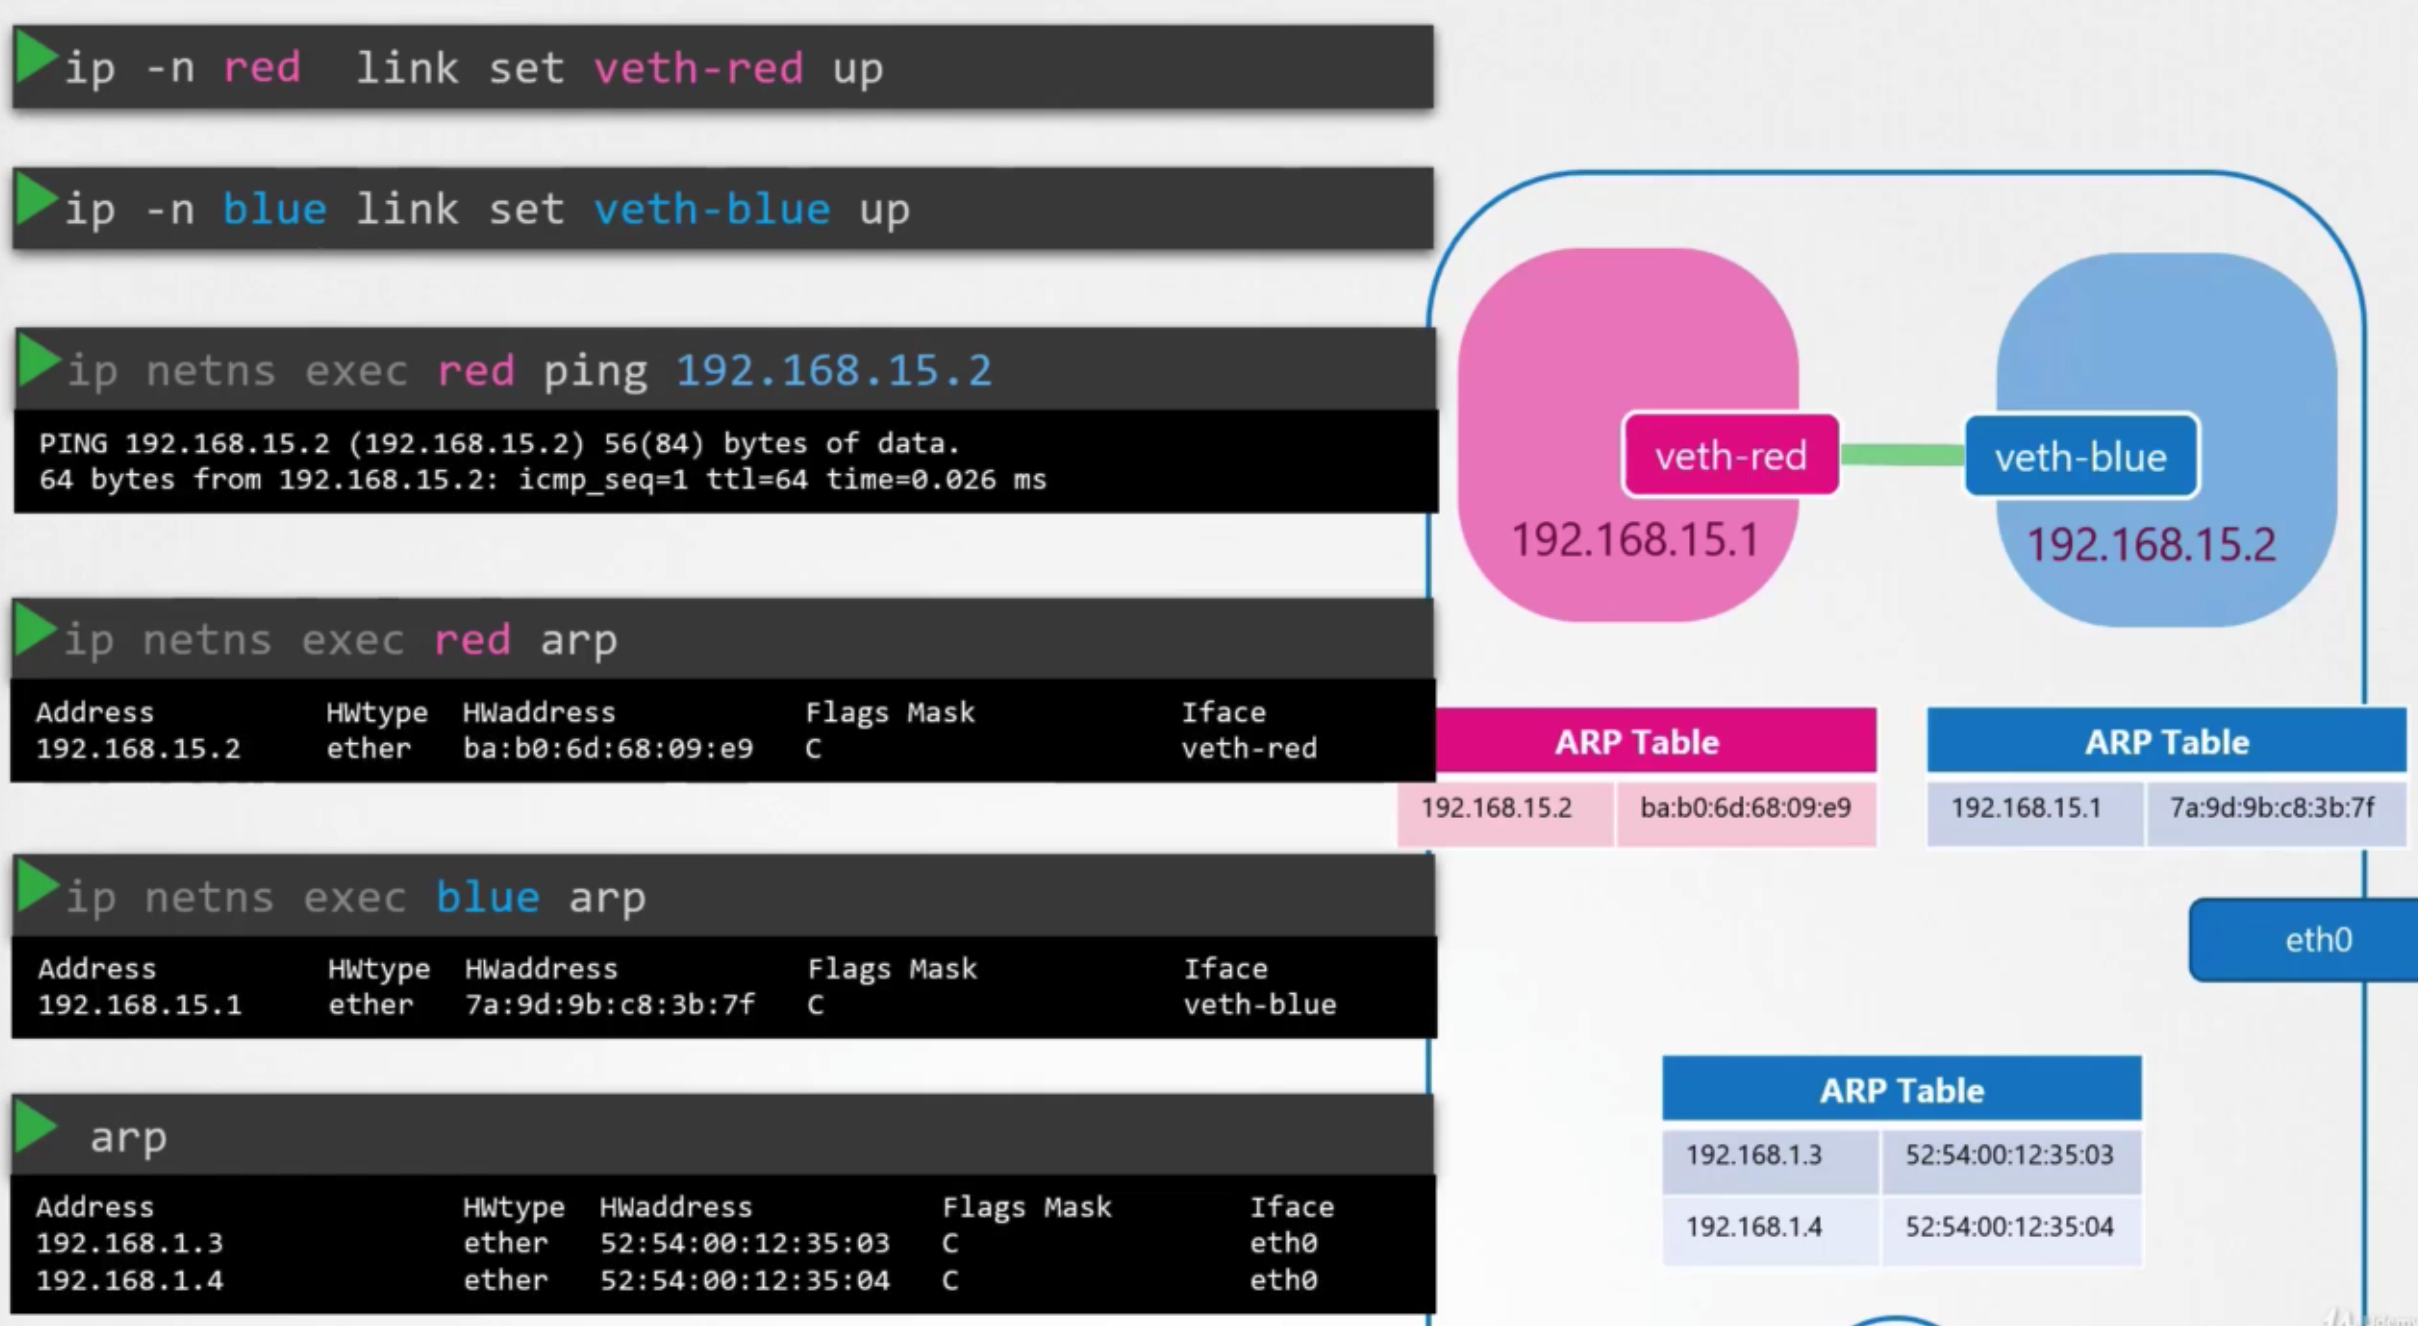
- arp & route table
- no entries in namespace
- these namespaces has no connectivity to other network
Connect
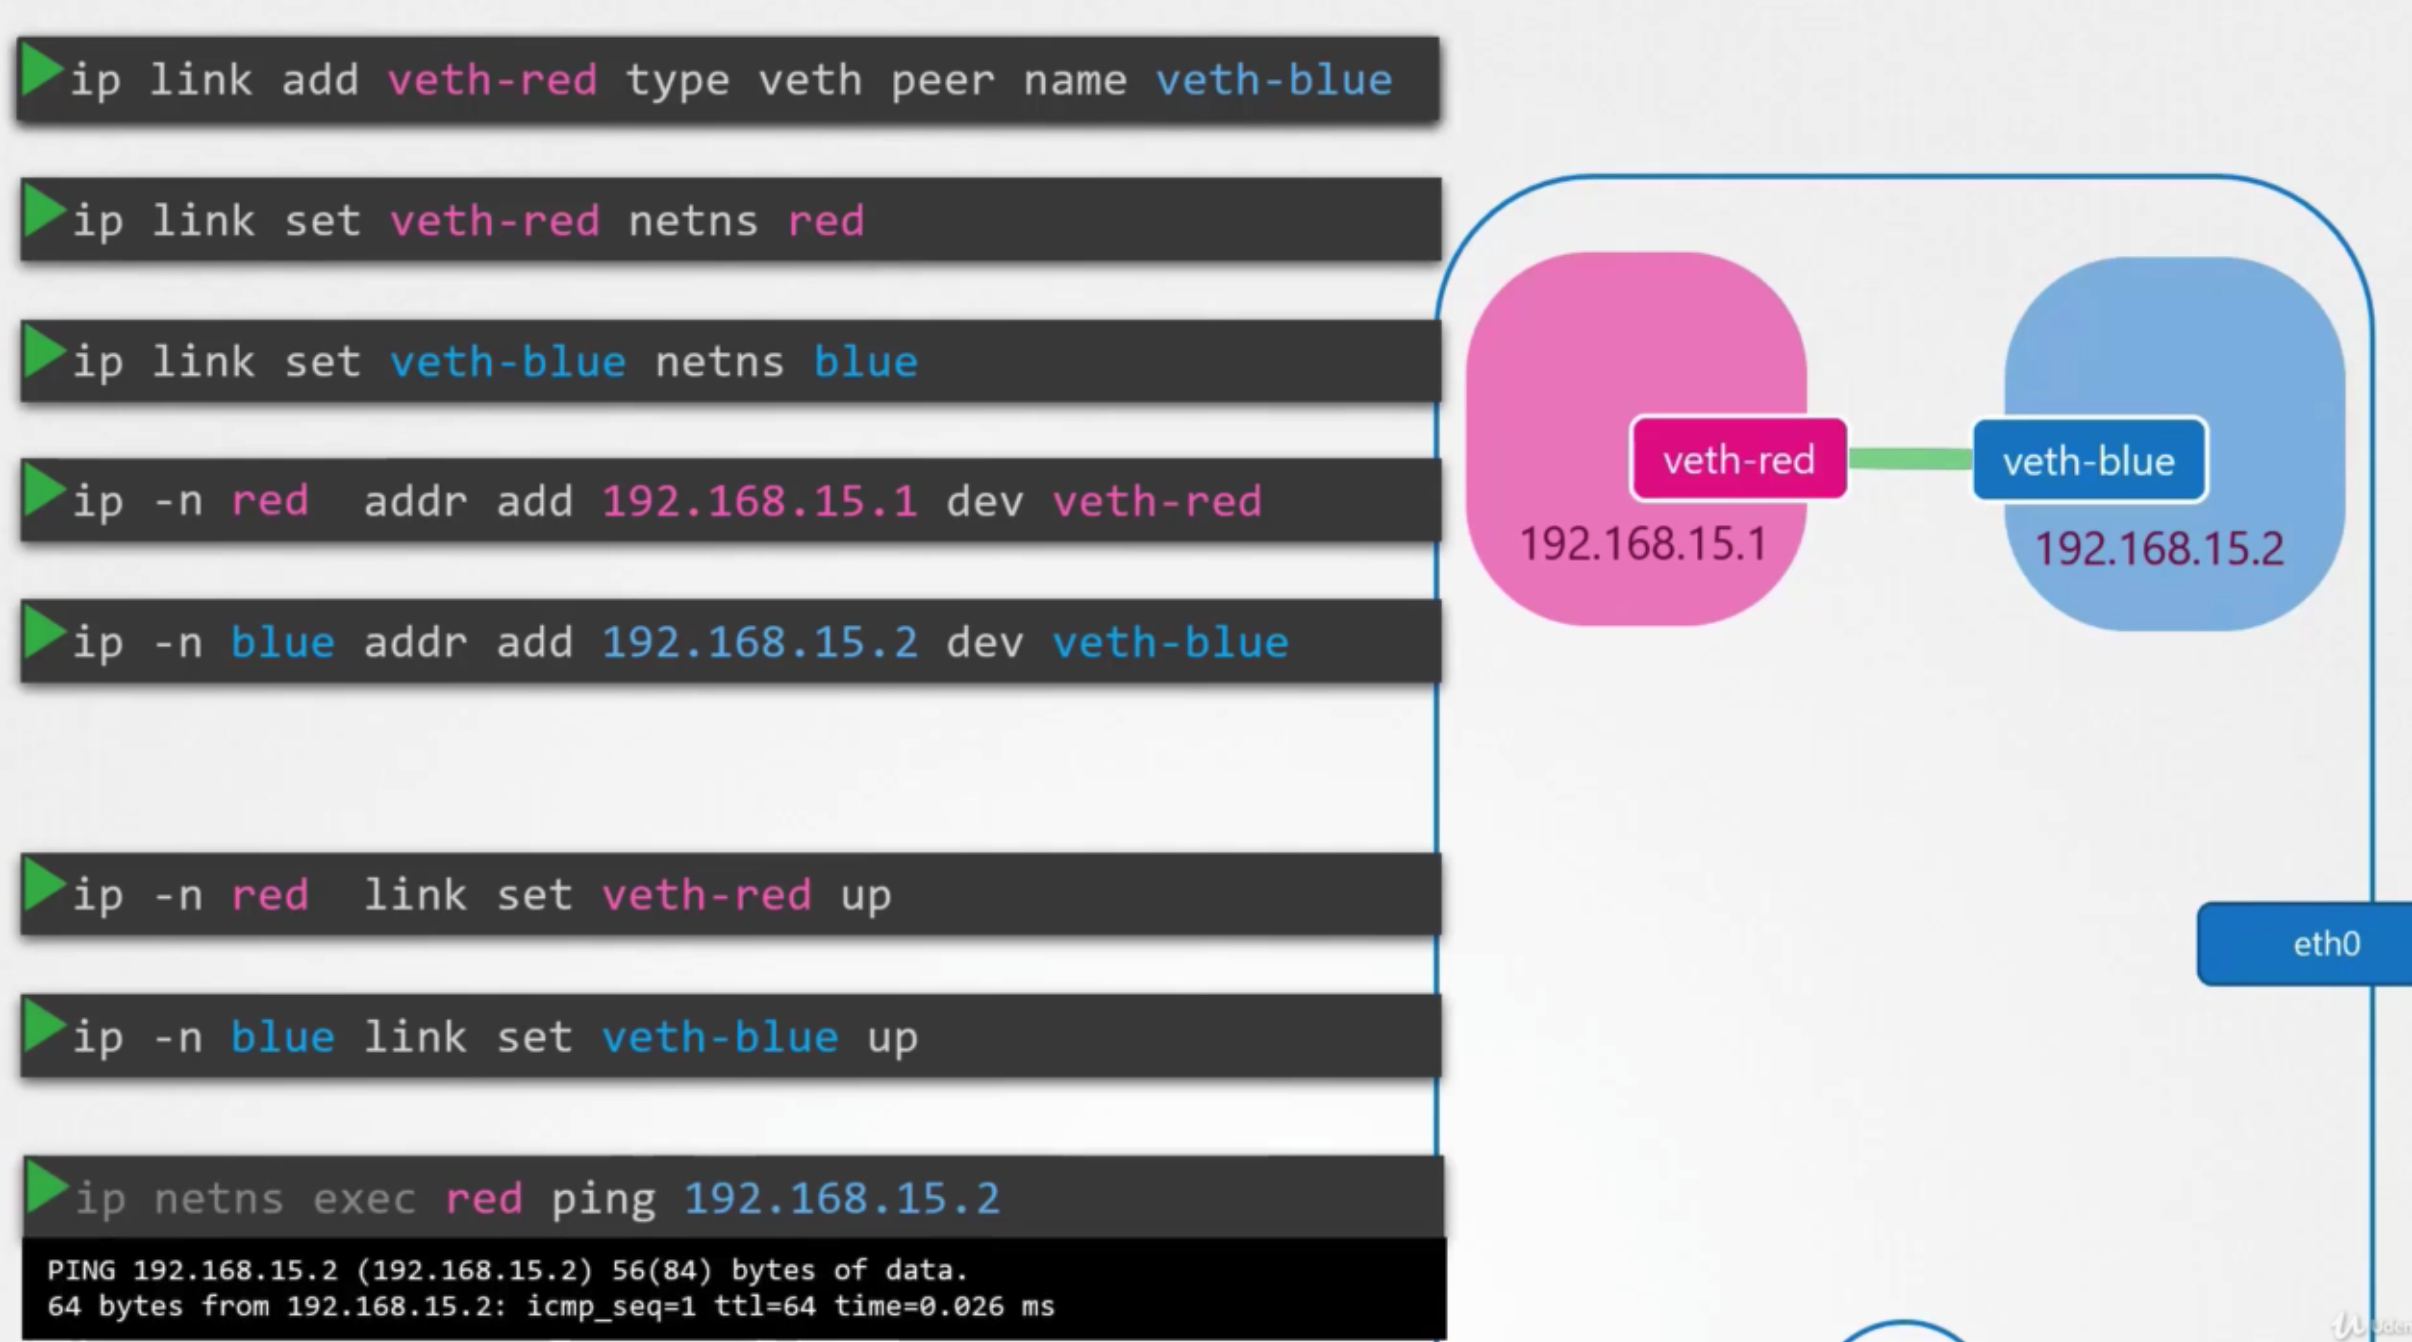
- connect namespaces together using a virtual ehternet pair or a virtual cable
방법
- create the cable
ip link add veth-red type veth peer name veth-blue
- attach each interface to the appropriate namespace
ip link set veth-red netns redip link set veth-blue netns blue
- assign IP addresses to each of these namespaces
ip -n red addr add 192.168.15.1 dev veth-redip -n blue addr add 192.168.15.2 dev veth-blue
- bring up the interface
ip -n red link set veth-red upip -n blue link set veth-blue up
확인
- arp table is created
Virtual network
- many pods → need a switch
- create a virtual switch
- how to create virtual networks?
- 여러 open source들
- 여기선 linux bridge
생성
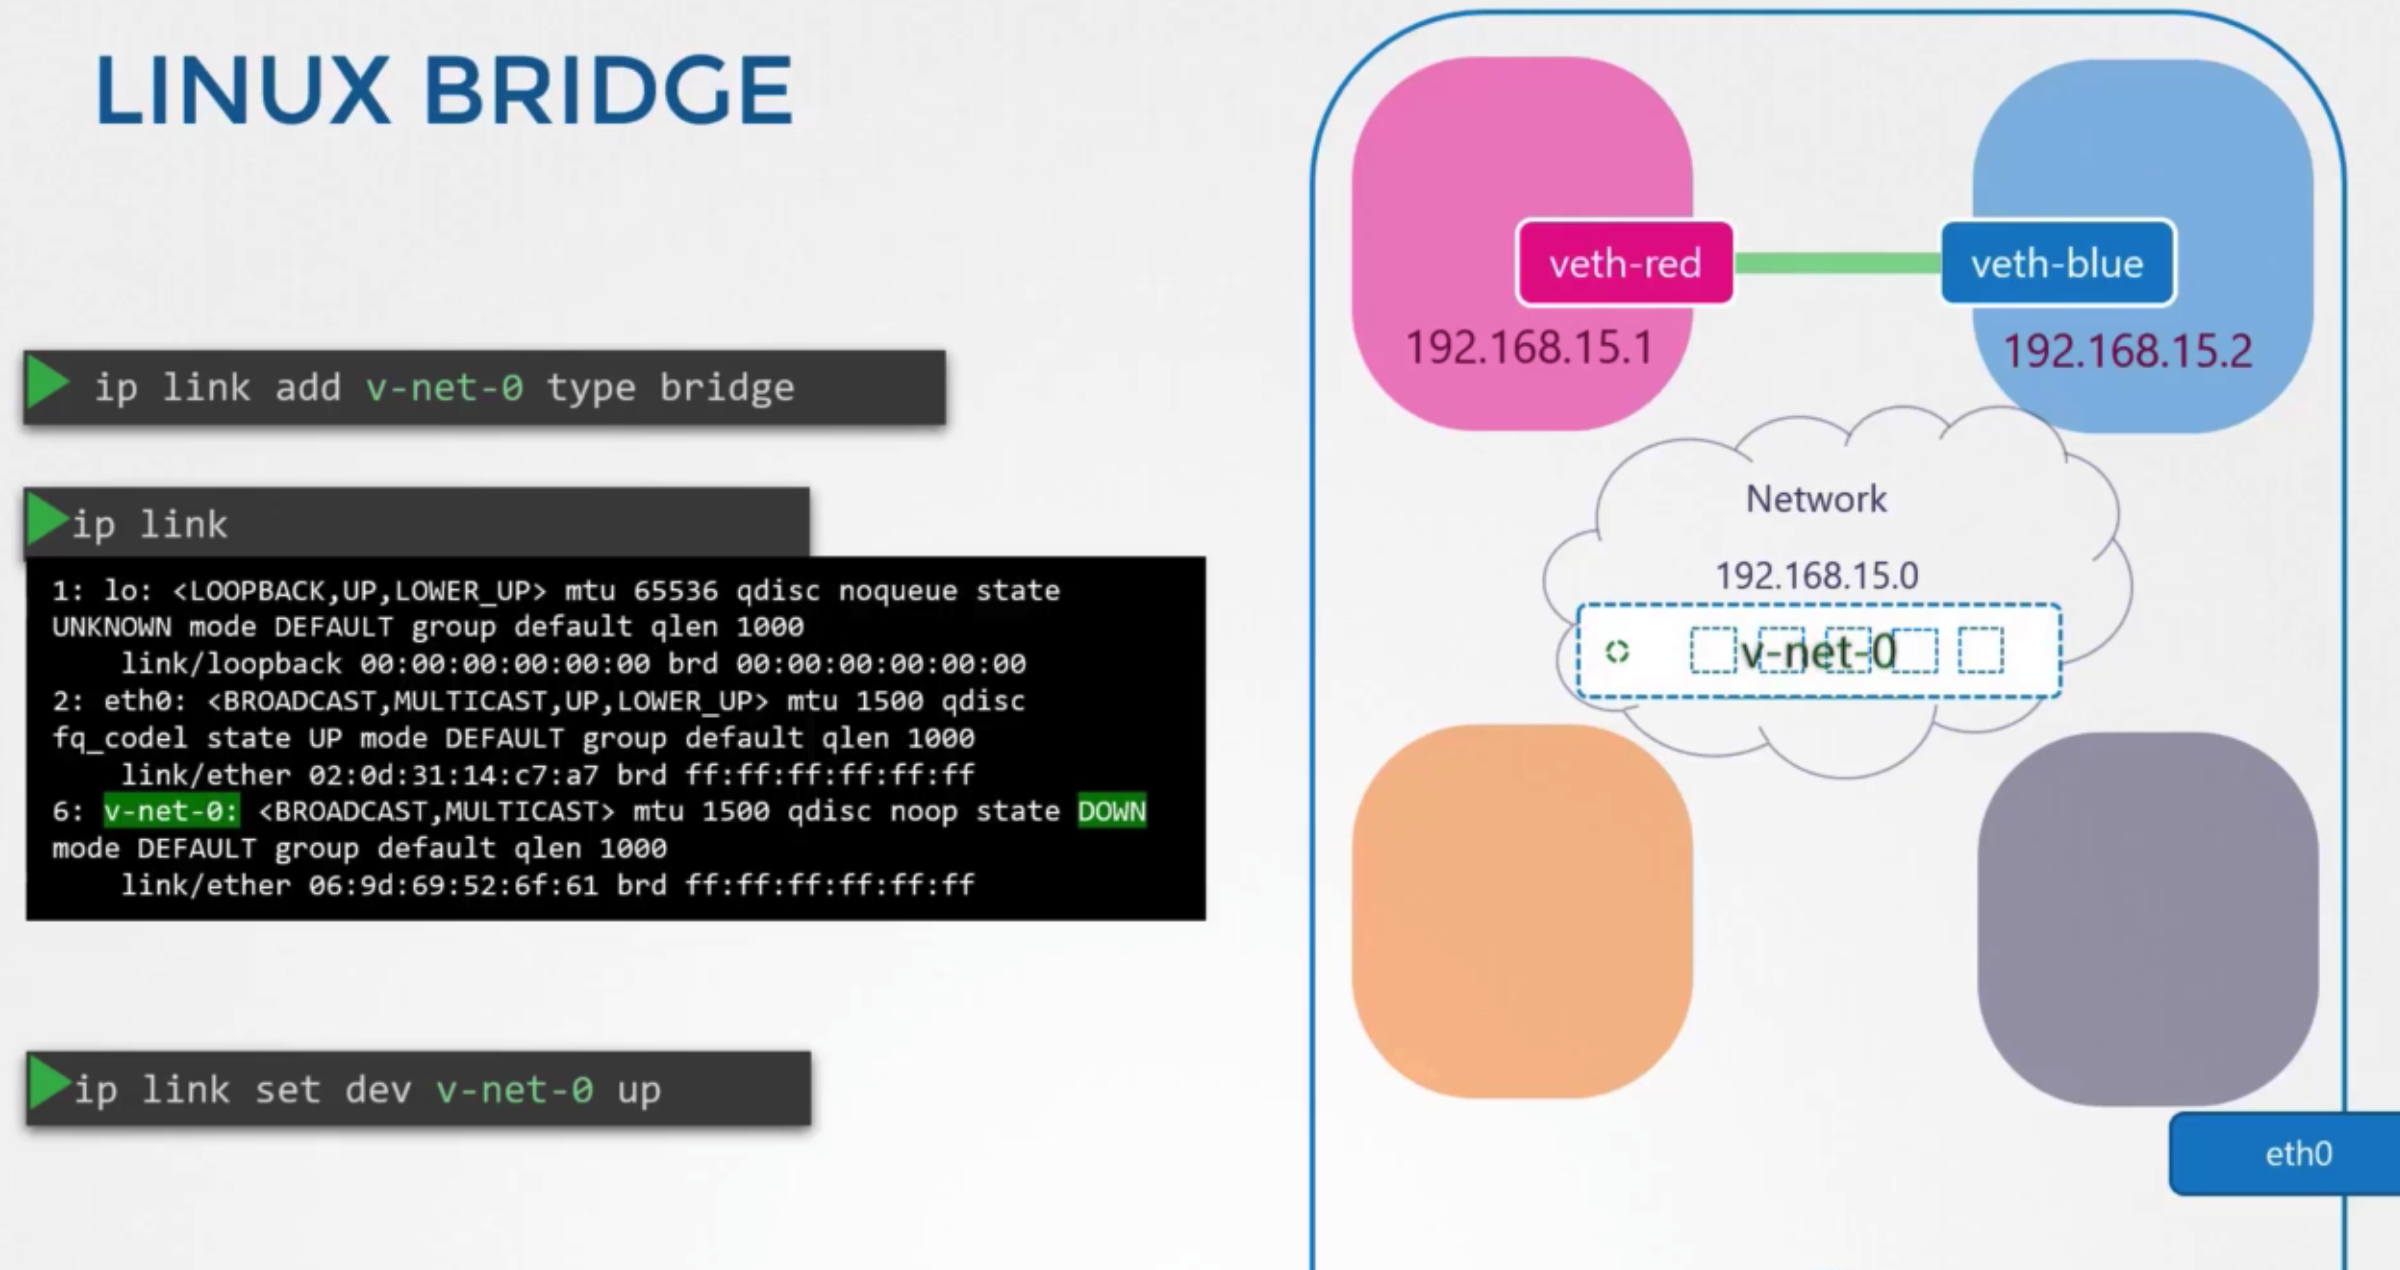
- add a new interface to the host
ip link add v-net-0 type bridge
- check
ip link
- turn up
ip link set de v-net-0 up
- connect the namespaces to new virtual network switch
연결
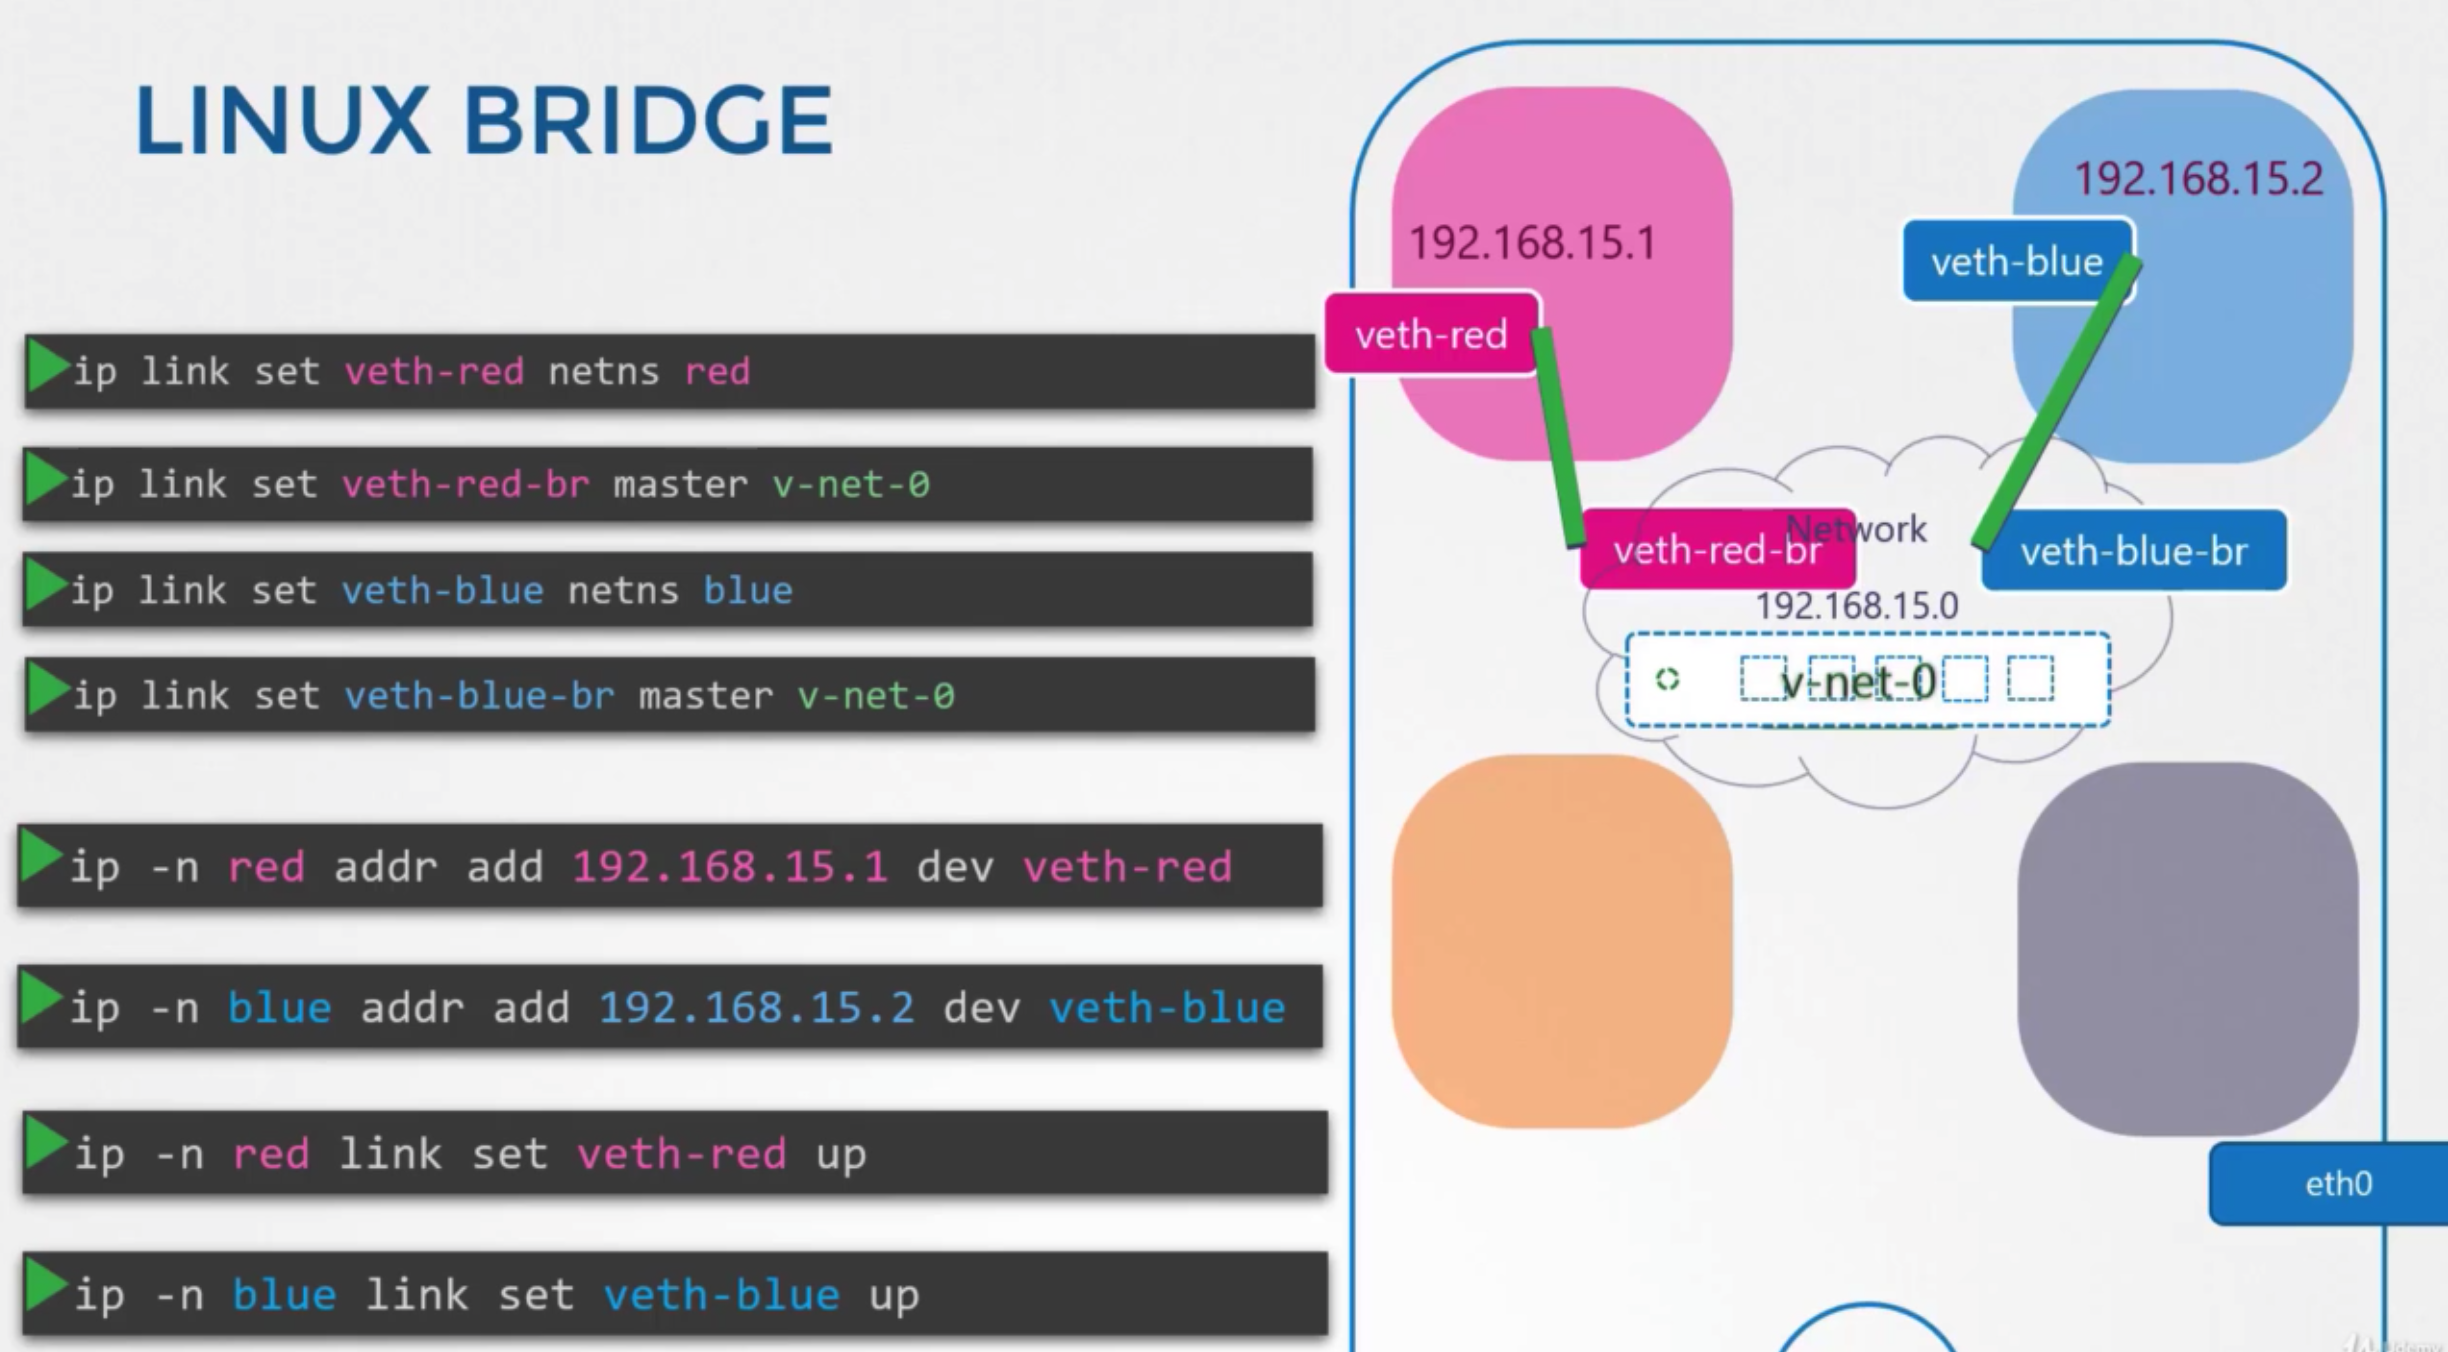
- create a cable
ip link add veth-red type veth peer name veth-red-brip link add veth-blue type veth peer name veth-blue-br
- attach one end of this interface to the red namespace
ip link set veth-red netns redip link set veth-red-br master v-net-0
- same job with 2 in blue
ip link set veth-blue netns blueip link set veth-blue-br master v-net-0
- assign ip address
ip -n red addr add 192.168.15.1 dev veth-redip -n blue addr add 192.168.15.2 dev veth-blue
- turn devices up
ip -n red link set veth-red upip -n blue link set veth-blue up
Host and namespace
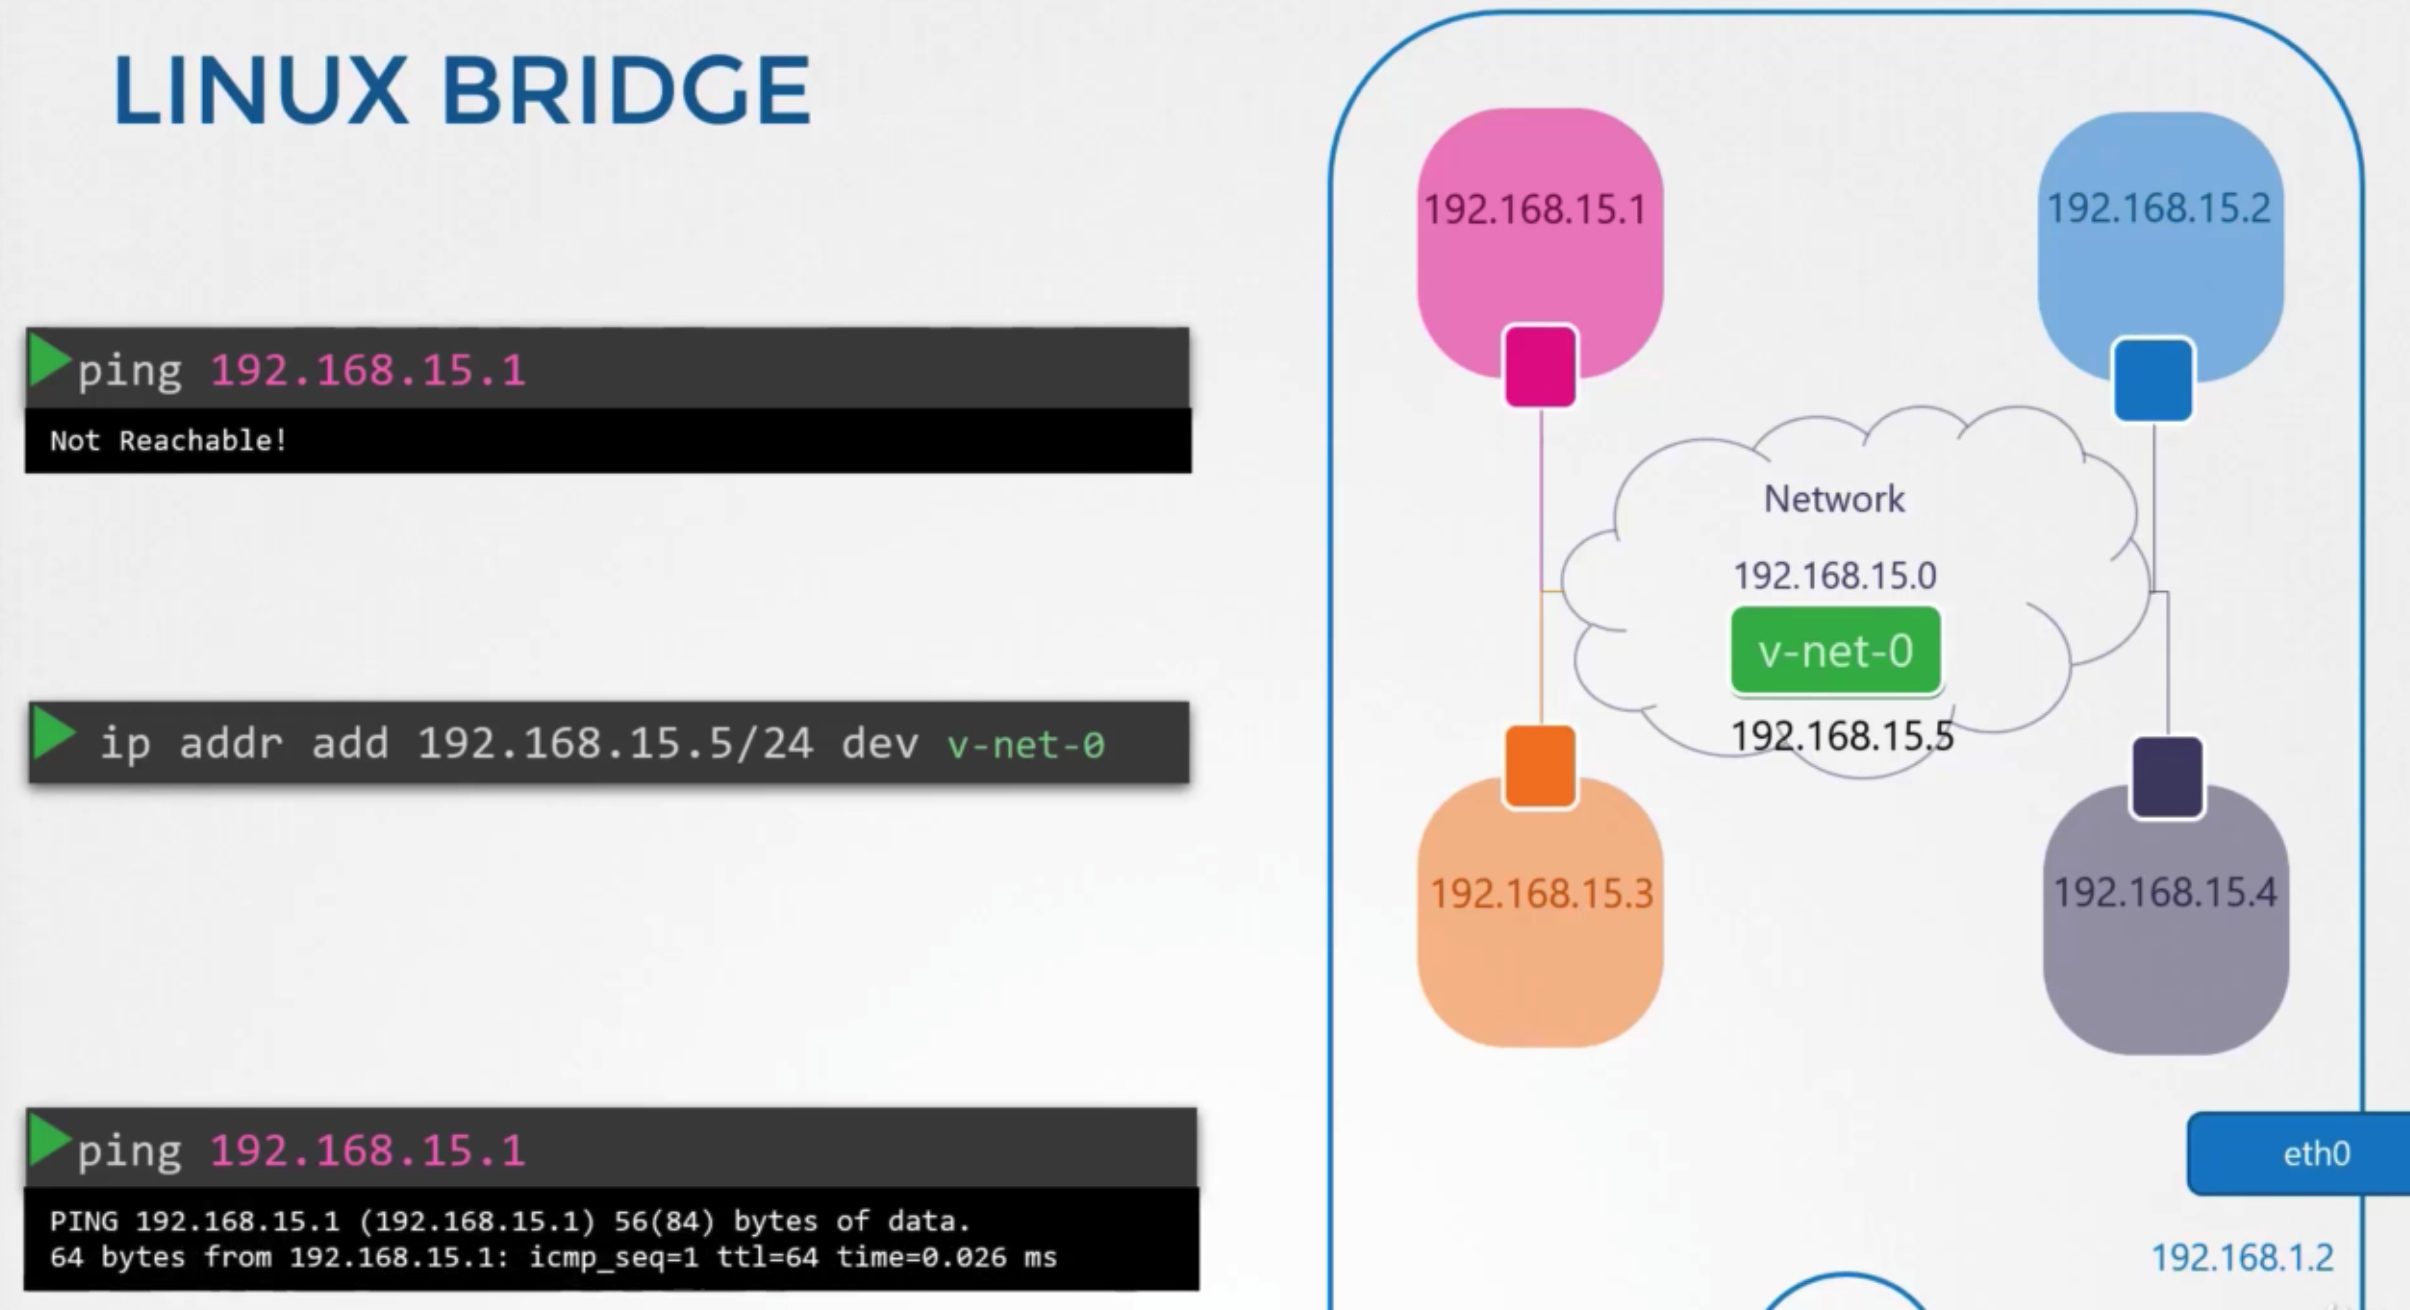
- try trired to reach one of these interfaces in this namespaces from my host
- → doesn’t work
- connect interface with host
ip addr add 192.168.15.5/25 dev net-0
Localhost
상황
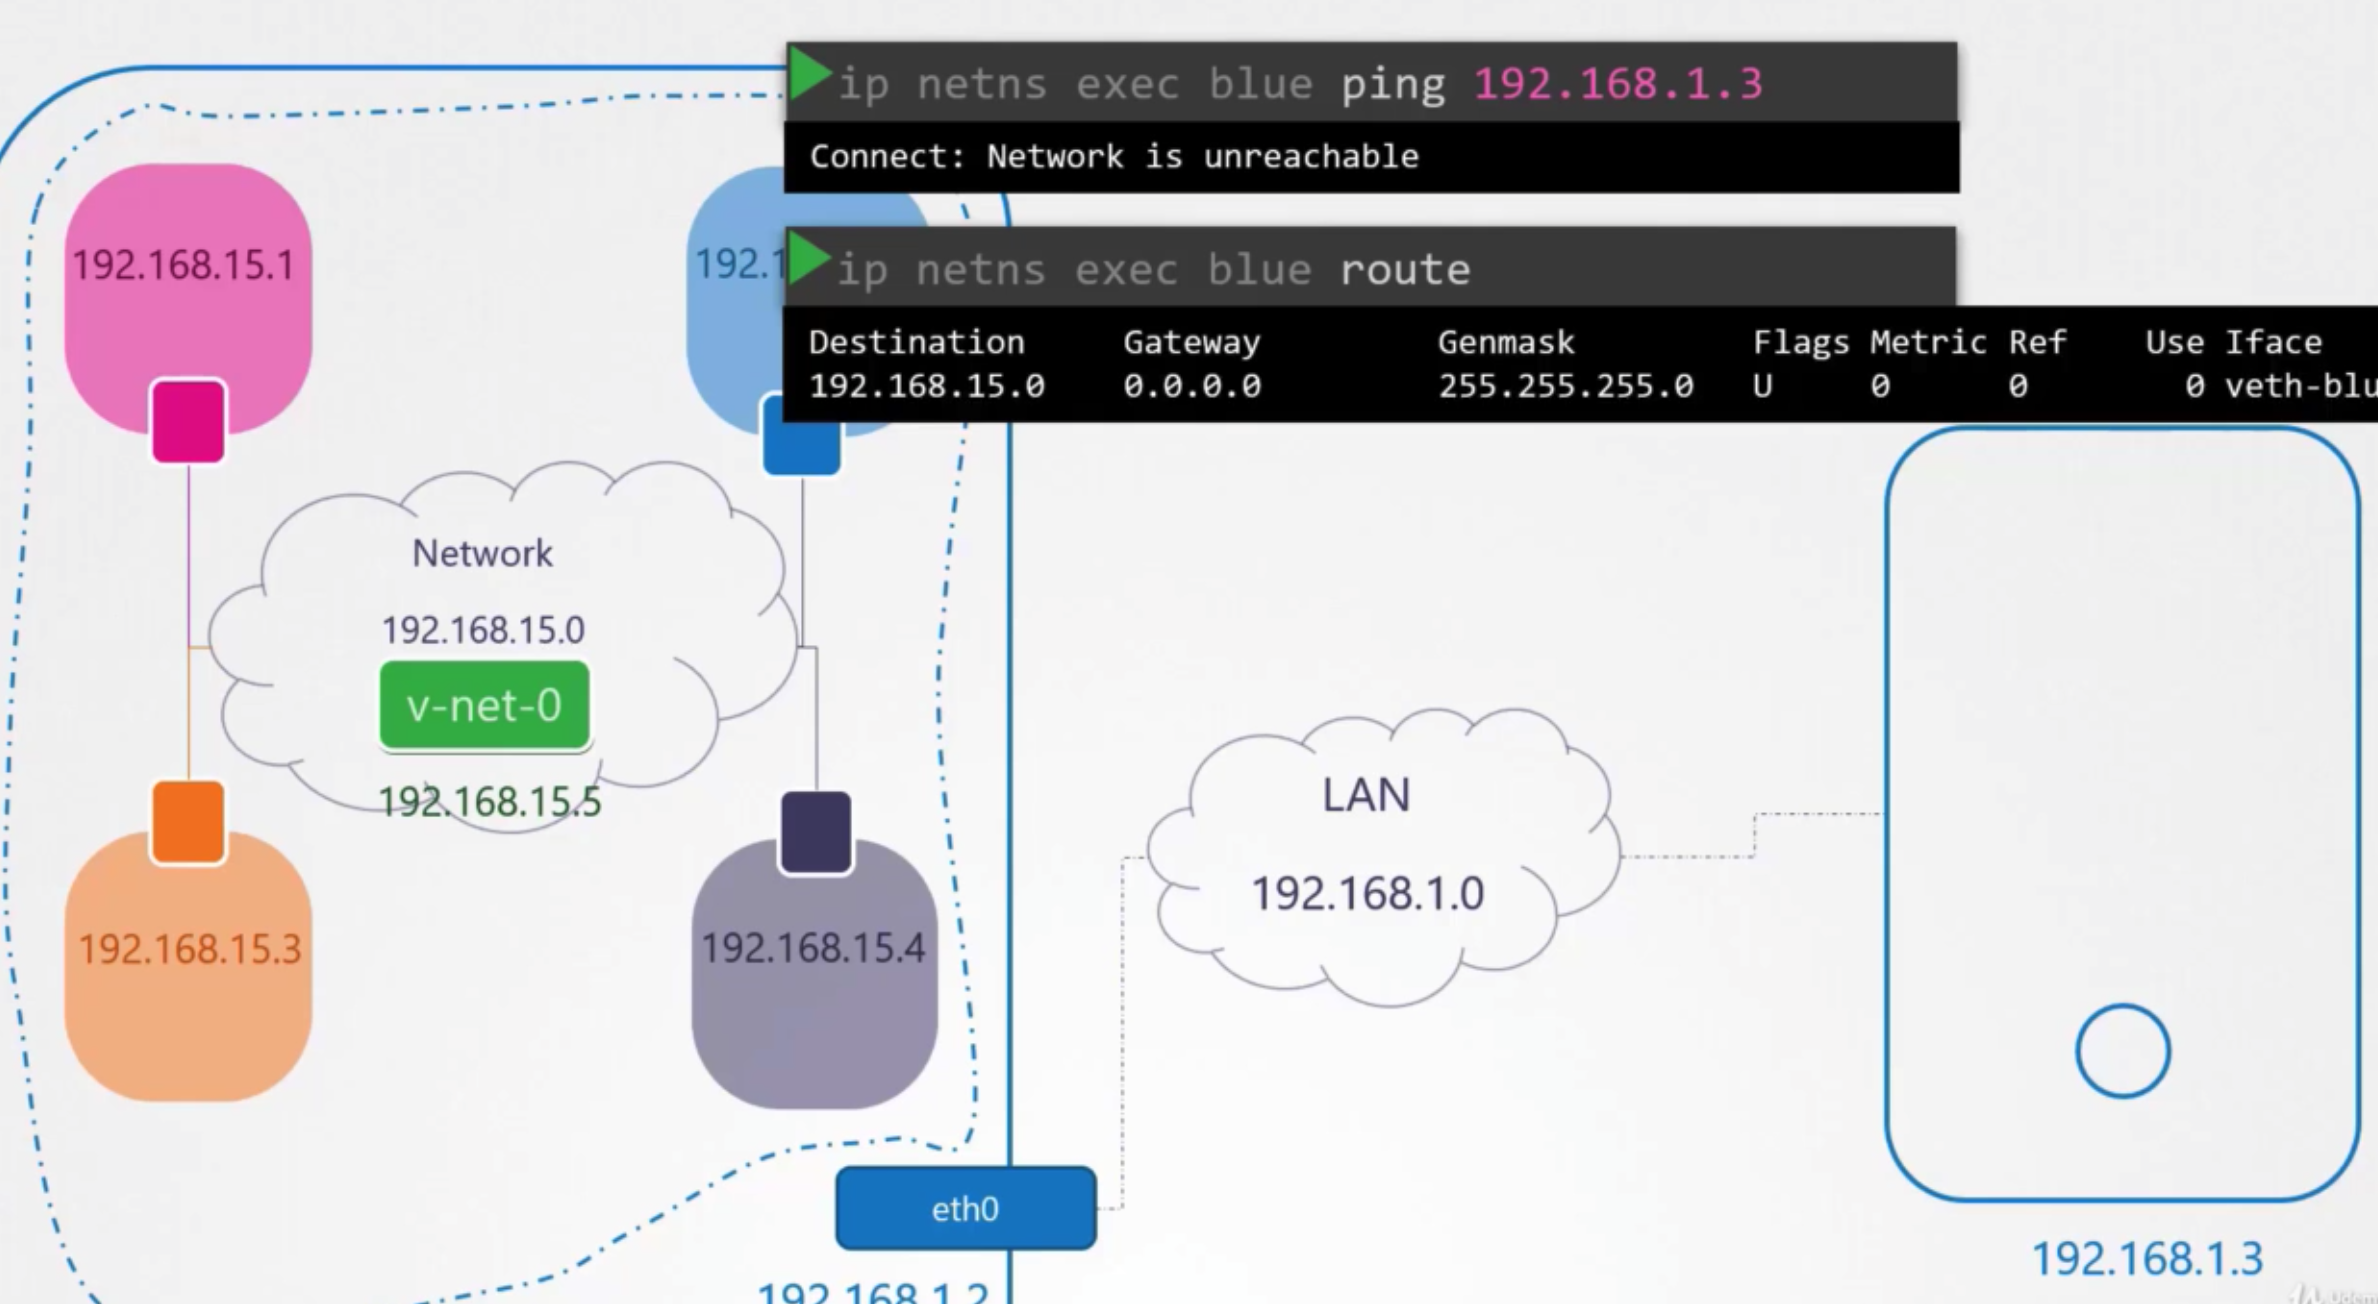
- can’t reach the outside world and no one from outside world can not reach hosted inside
- how to configure this bridge to reach the network through the internet port?
- → need to add an entry in to the routing table to provide a gateway or door to the outside world
- localhost
- has all these namesapces
- has an interface to attach to the private network
- a gateway that connects the two networks toghter
방법
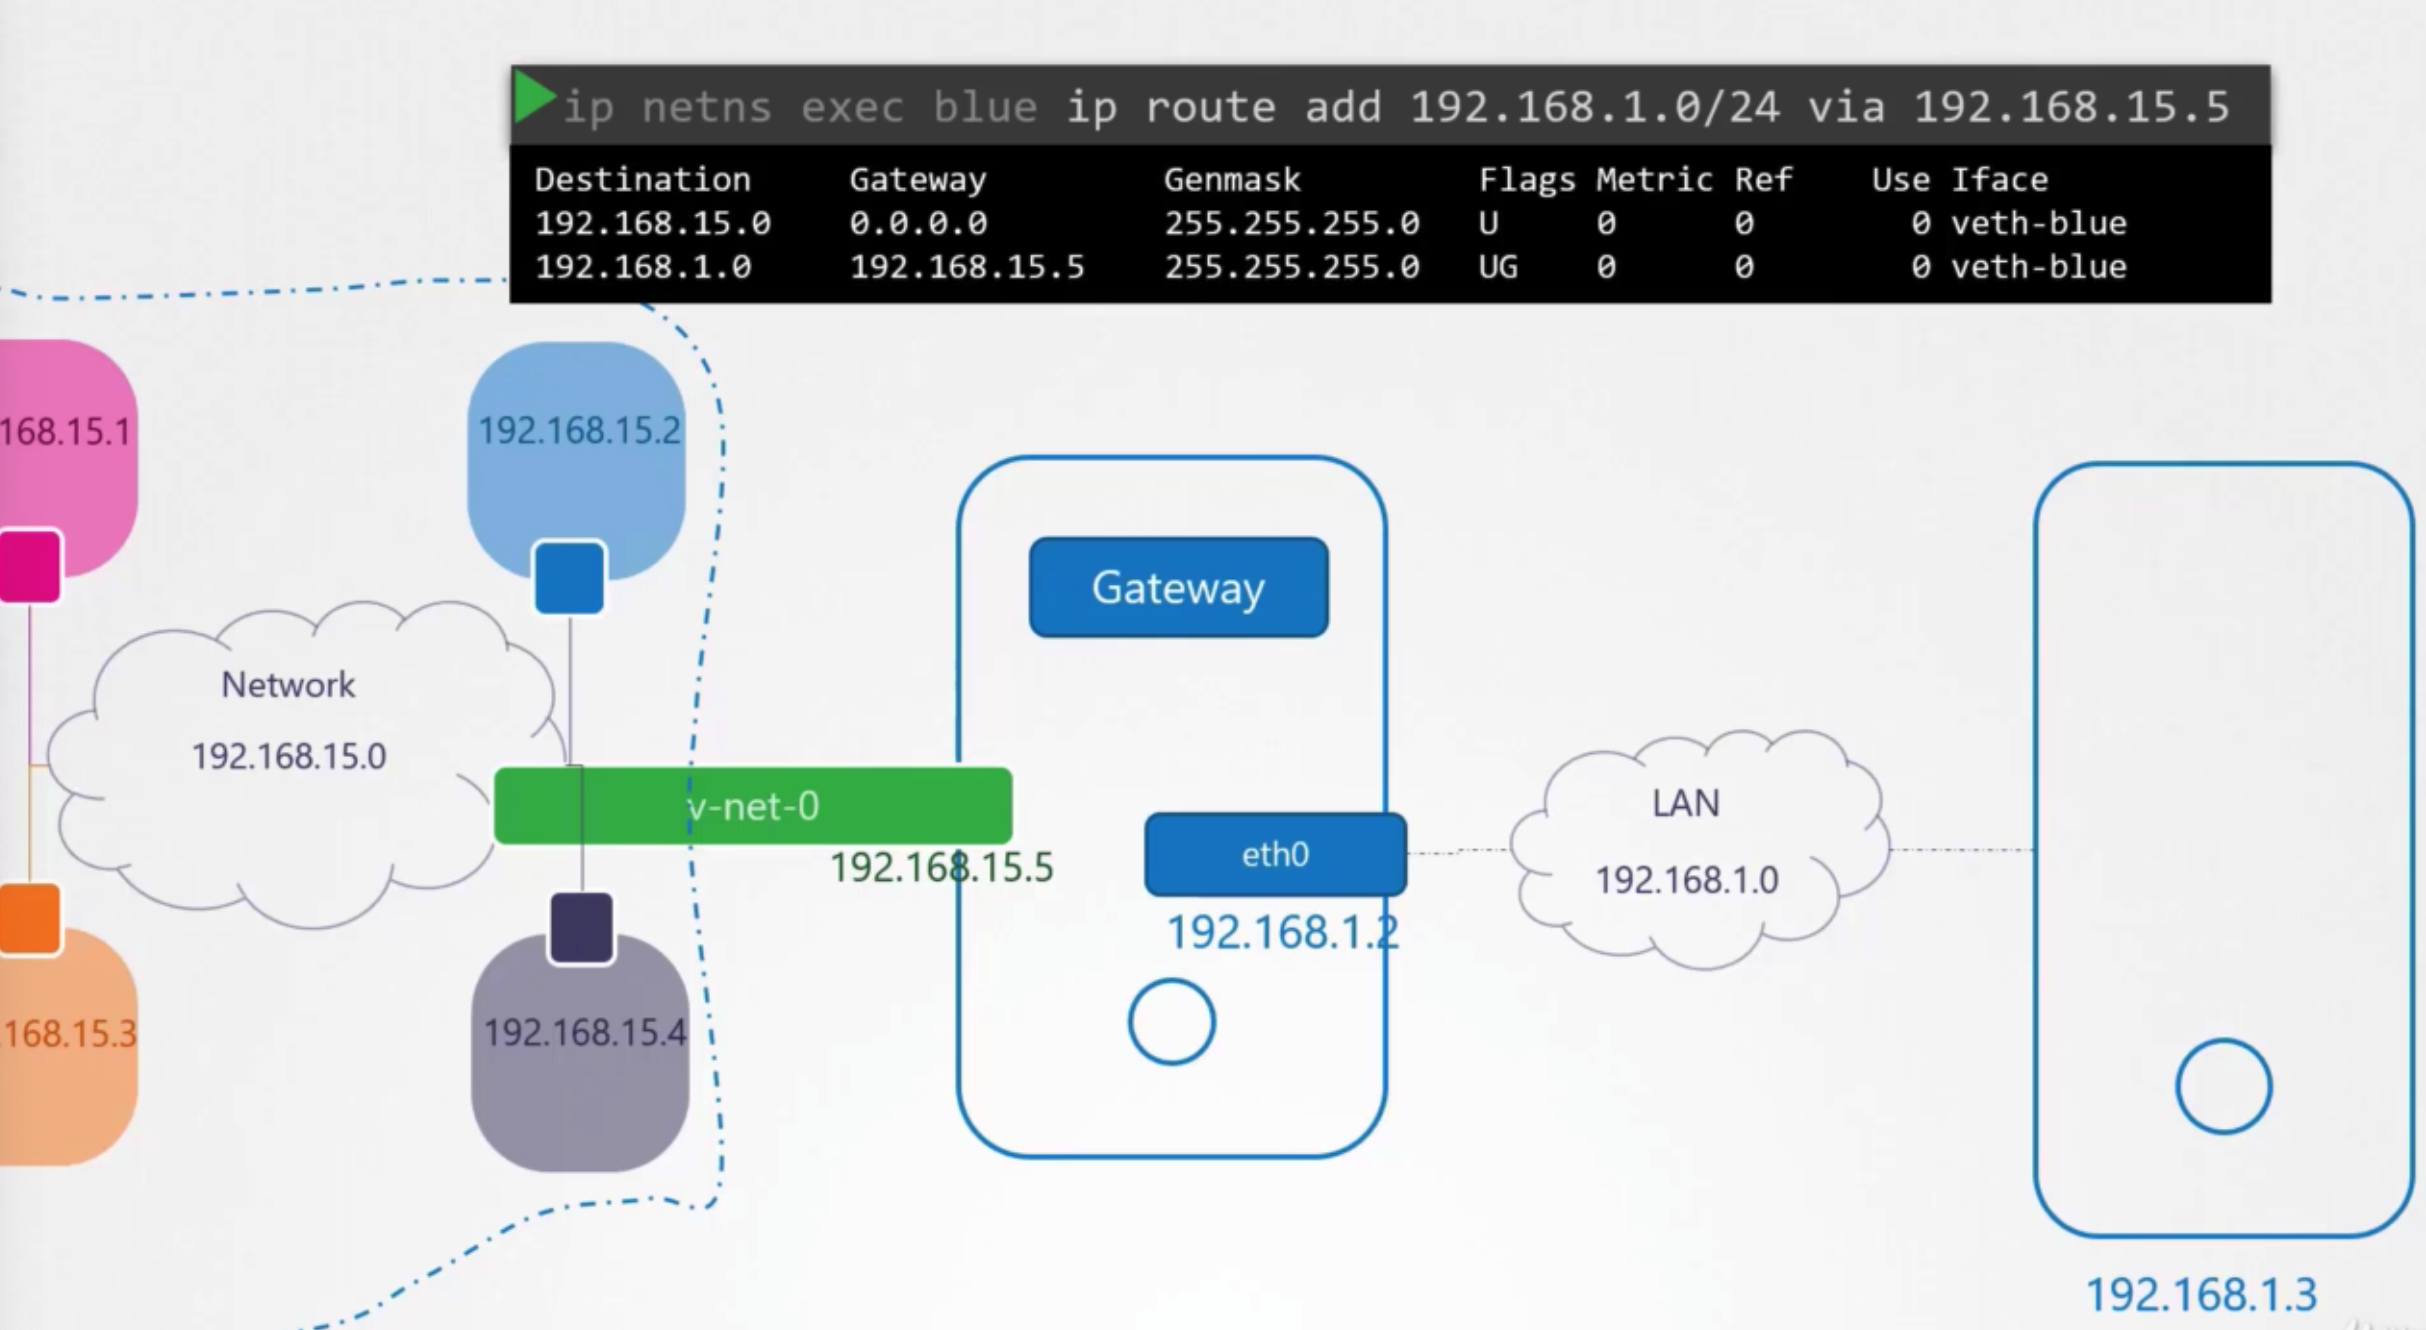
- add localhost to router
ip netns exec blue ip route add 192.168.1.0/24 via 192.168.15.5- host has two ip addresses
- 192.168.15.5
- external network: 192.168.1.2
- forward
iptables -t nat -A POSTROUT -s 192.168.15.0/25 -j MASQUERADE
- connect to internet
ip netns exec blue ip route add default via 192.168.15.5
Docker Networking
Single Docker host
- Has an ethernet interface at eth0 that connects to the local network with the IP address 192.168.1.10
- run a container, there is different networking option to choose from
- none network
- host network
- bridge
None network
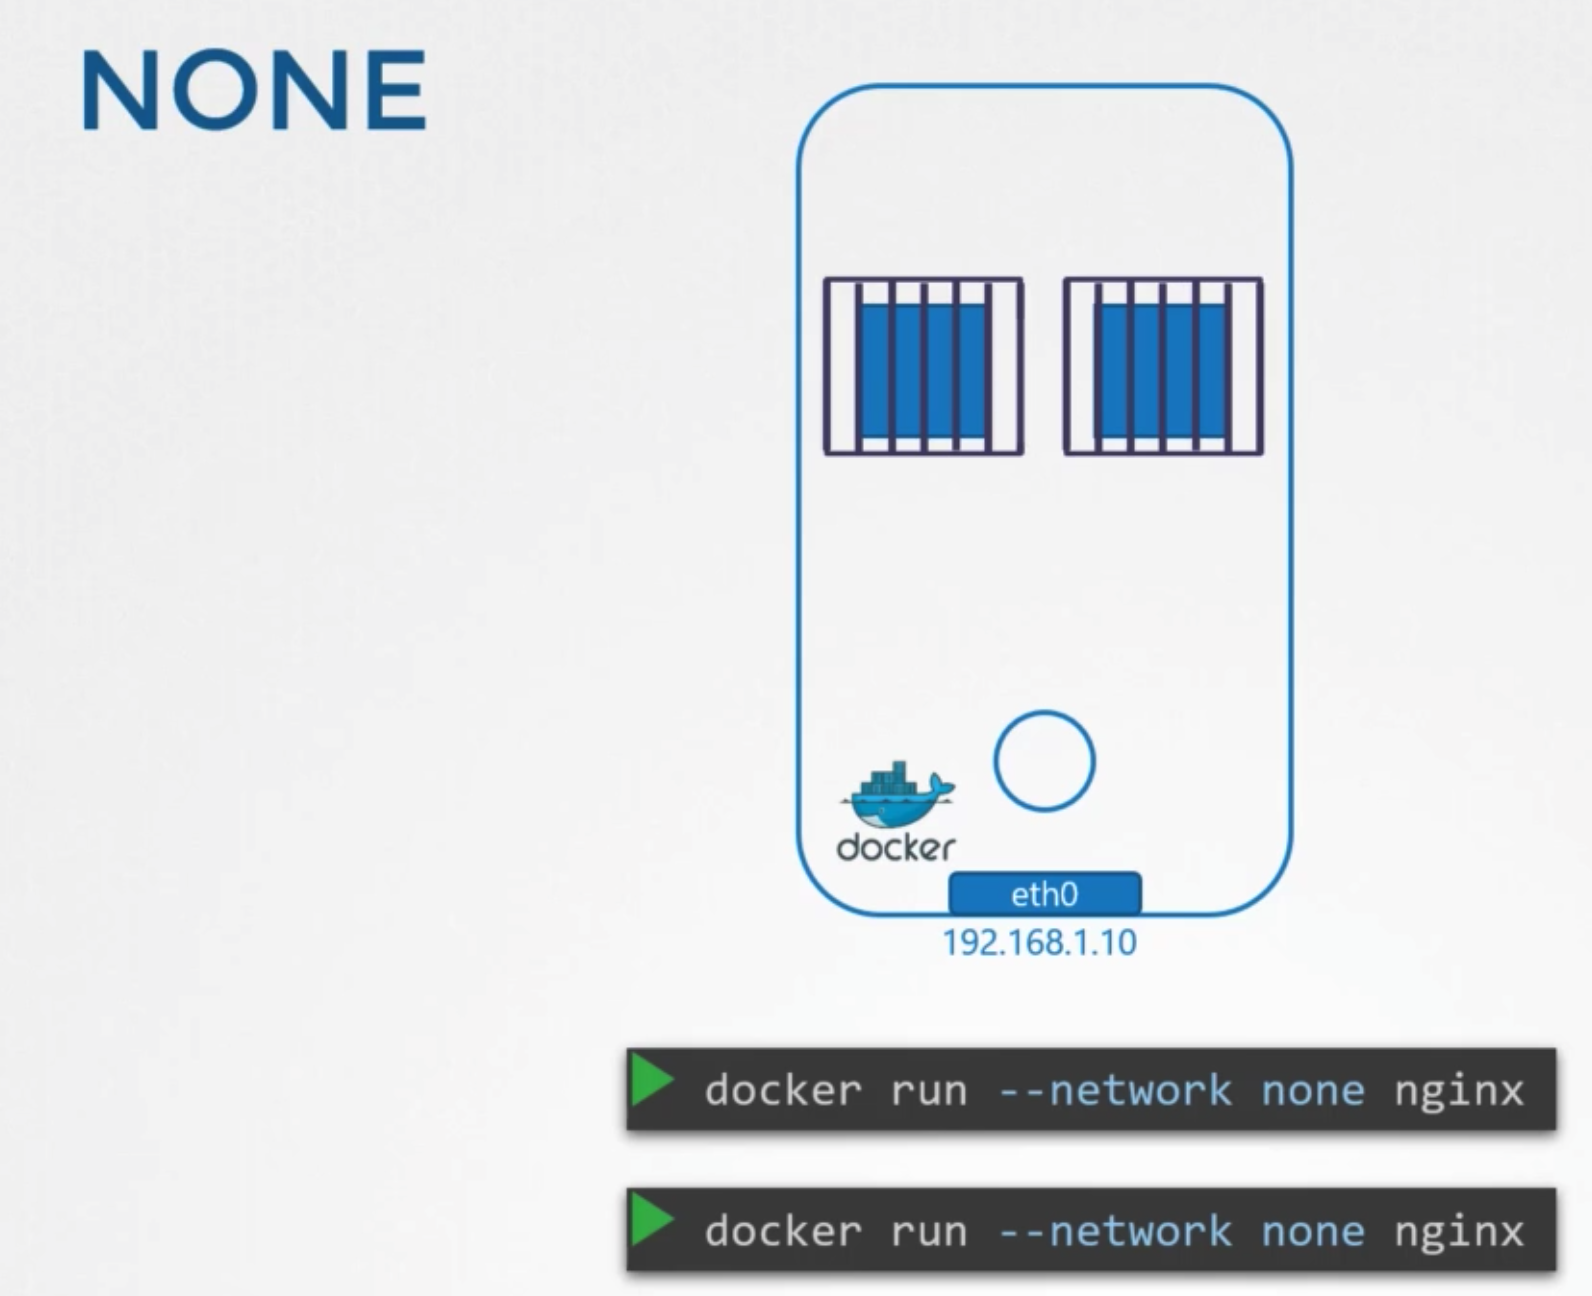
- docker container is not attached to any network
Host network
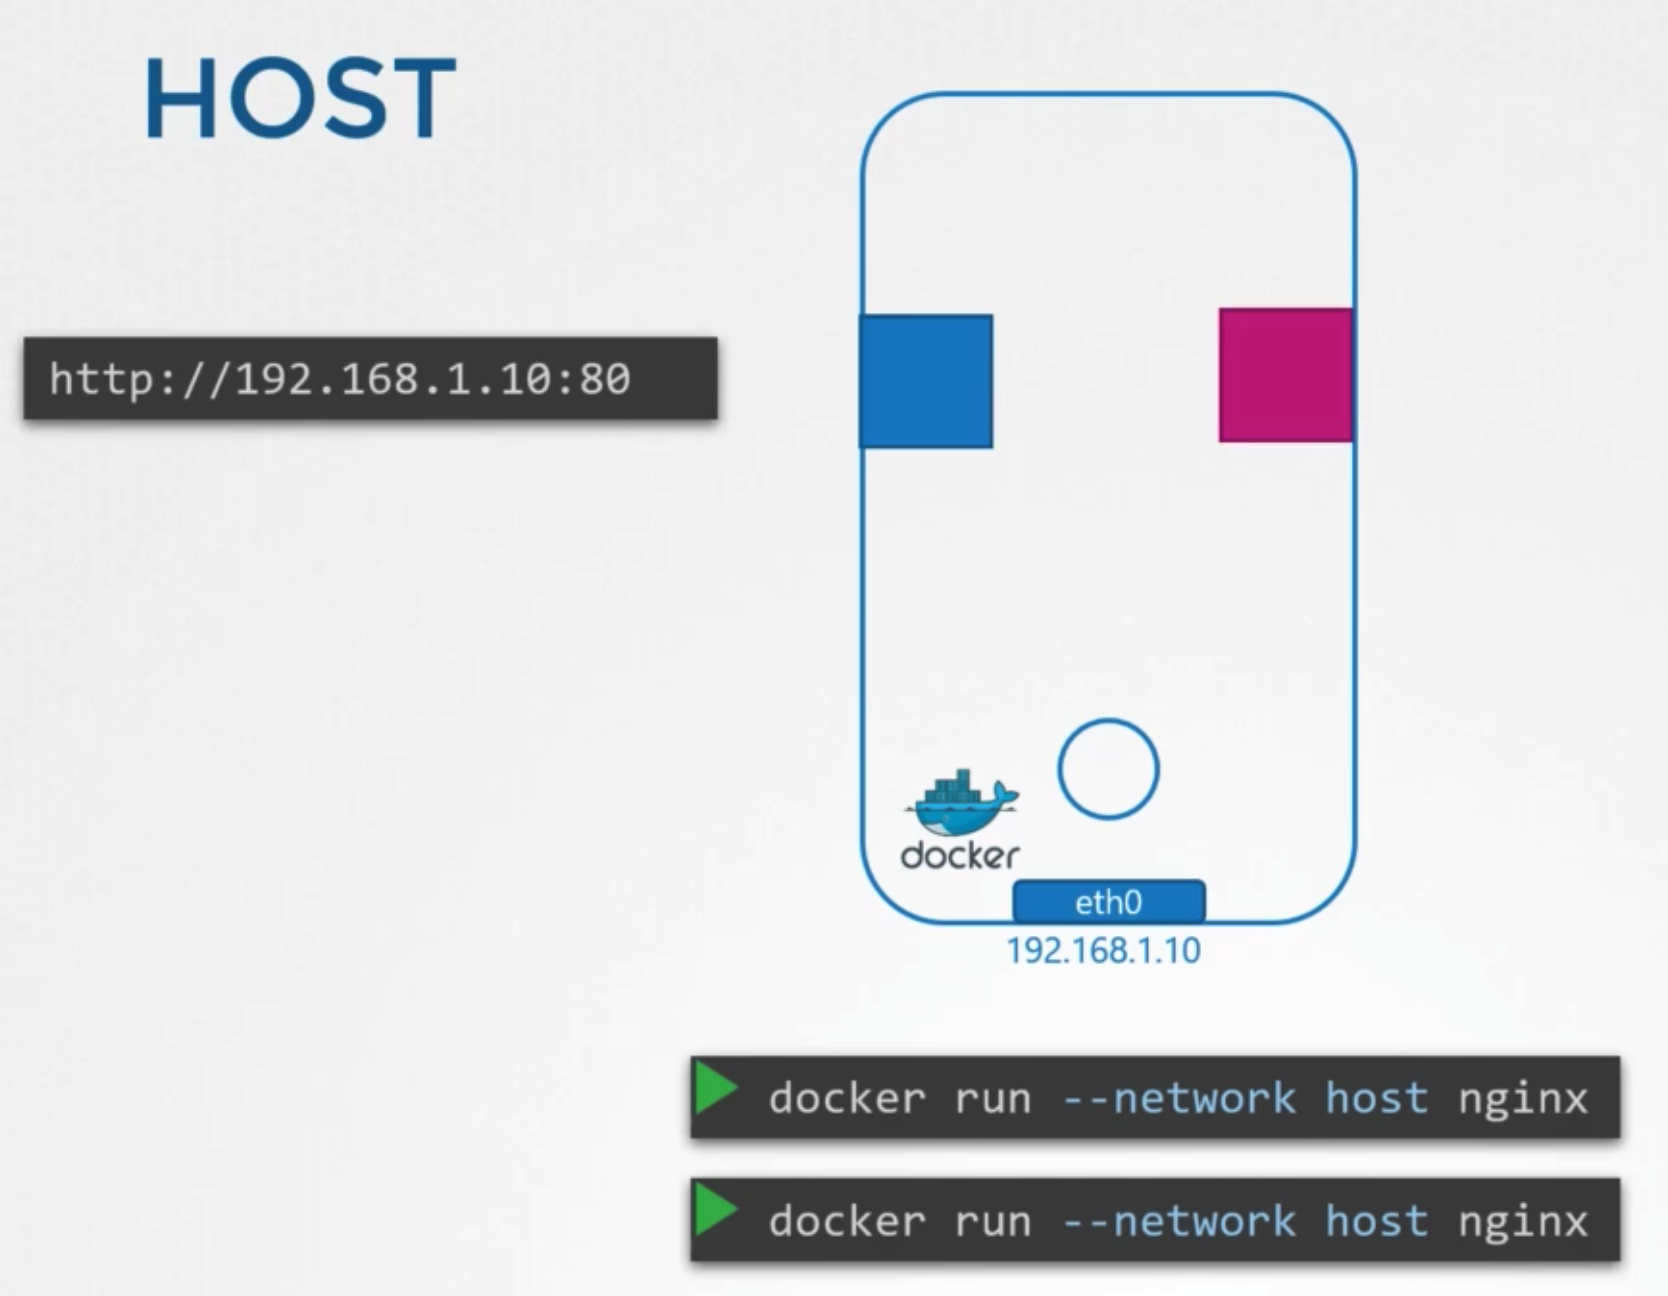
- container is attached to the host’s network
- sharing host network, cannot use same port at same time
Bridge
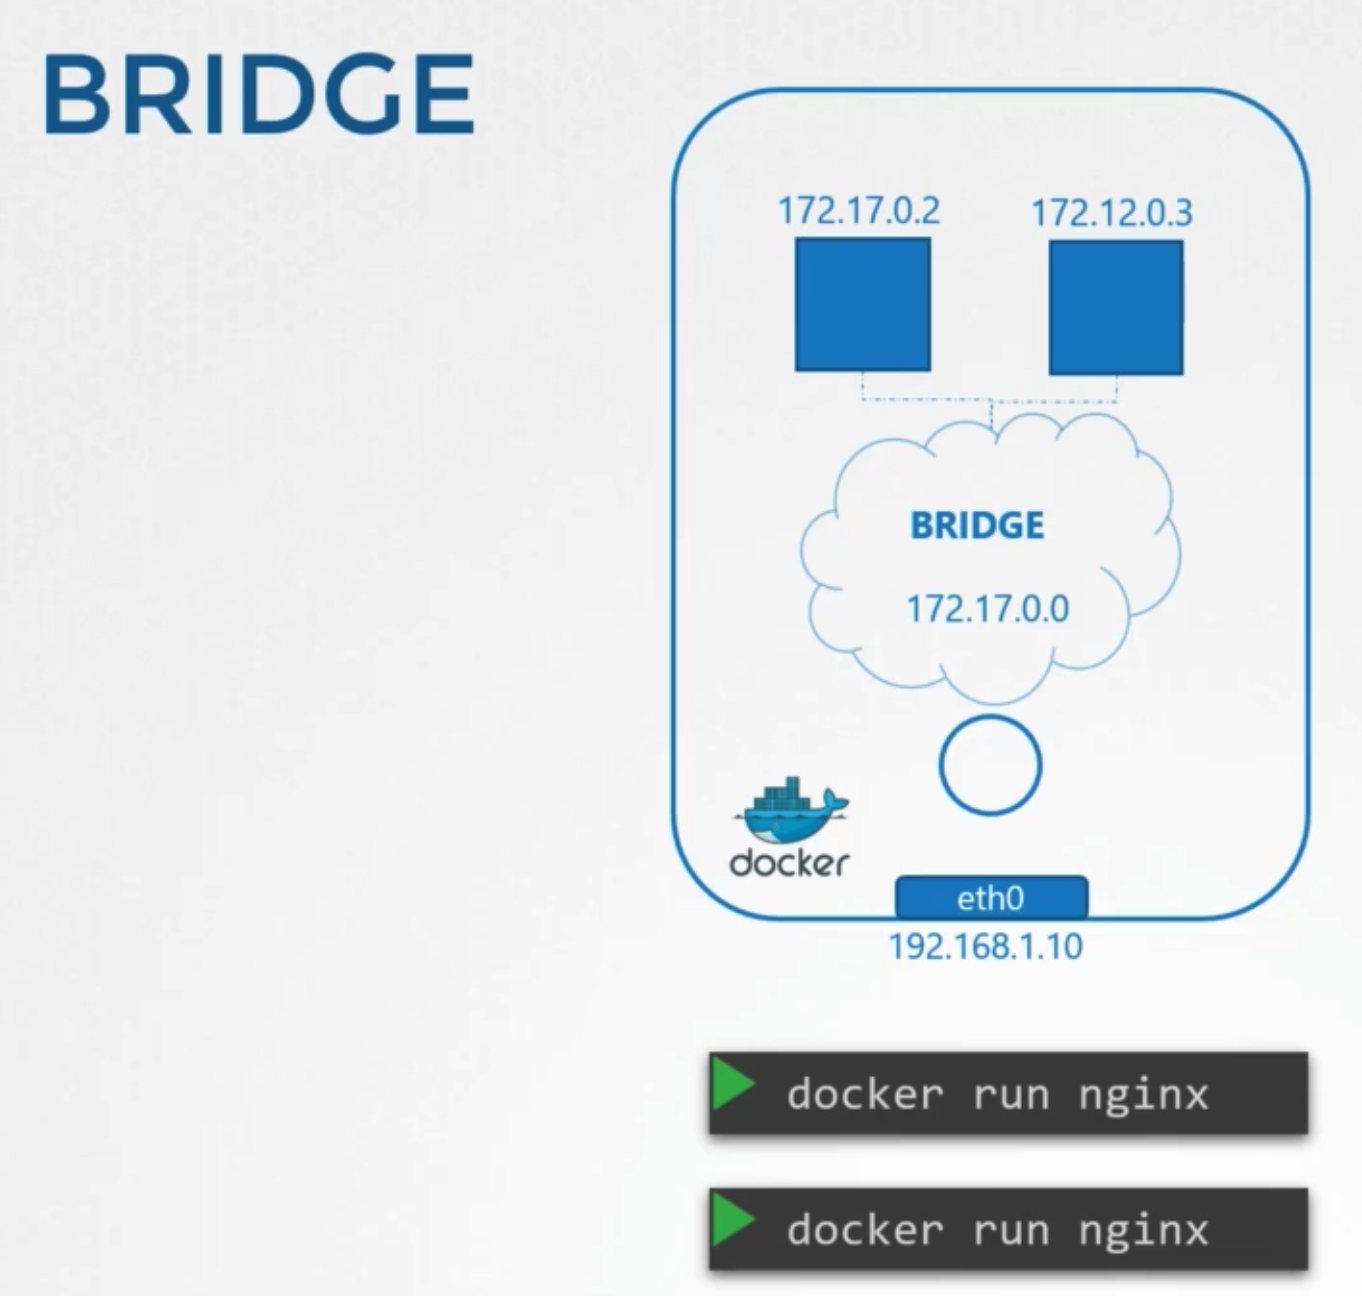
- internal private network is created which the docker host and containers attach to
- ip address: 172.17.0.0
Bridge
상태
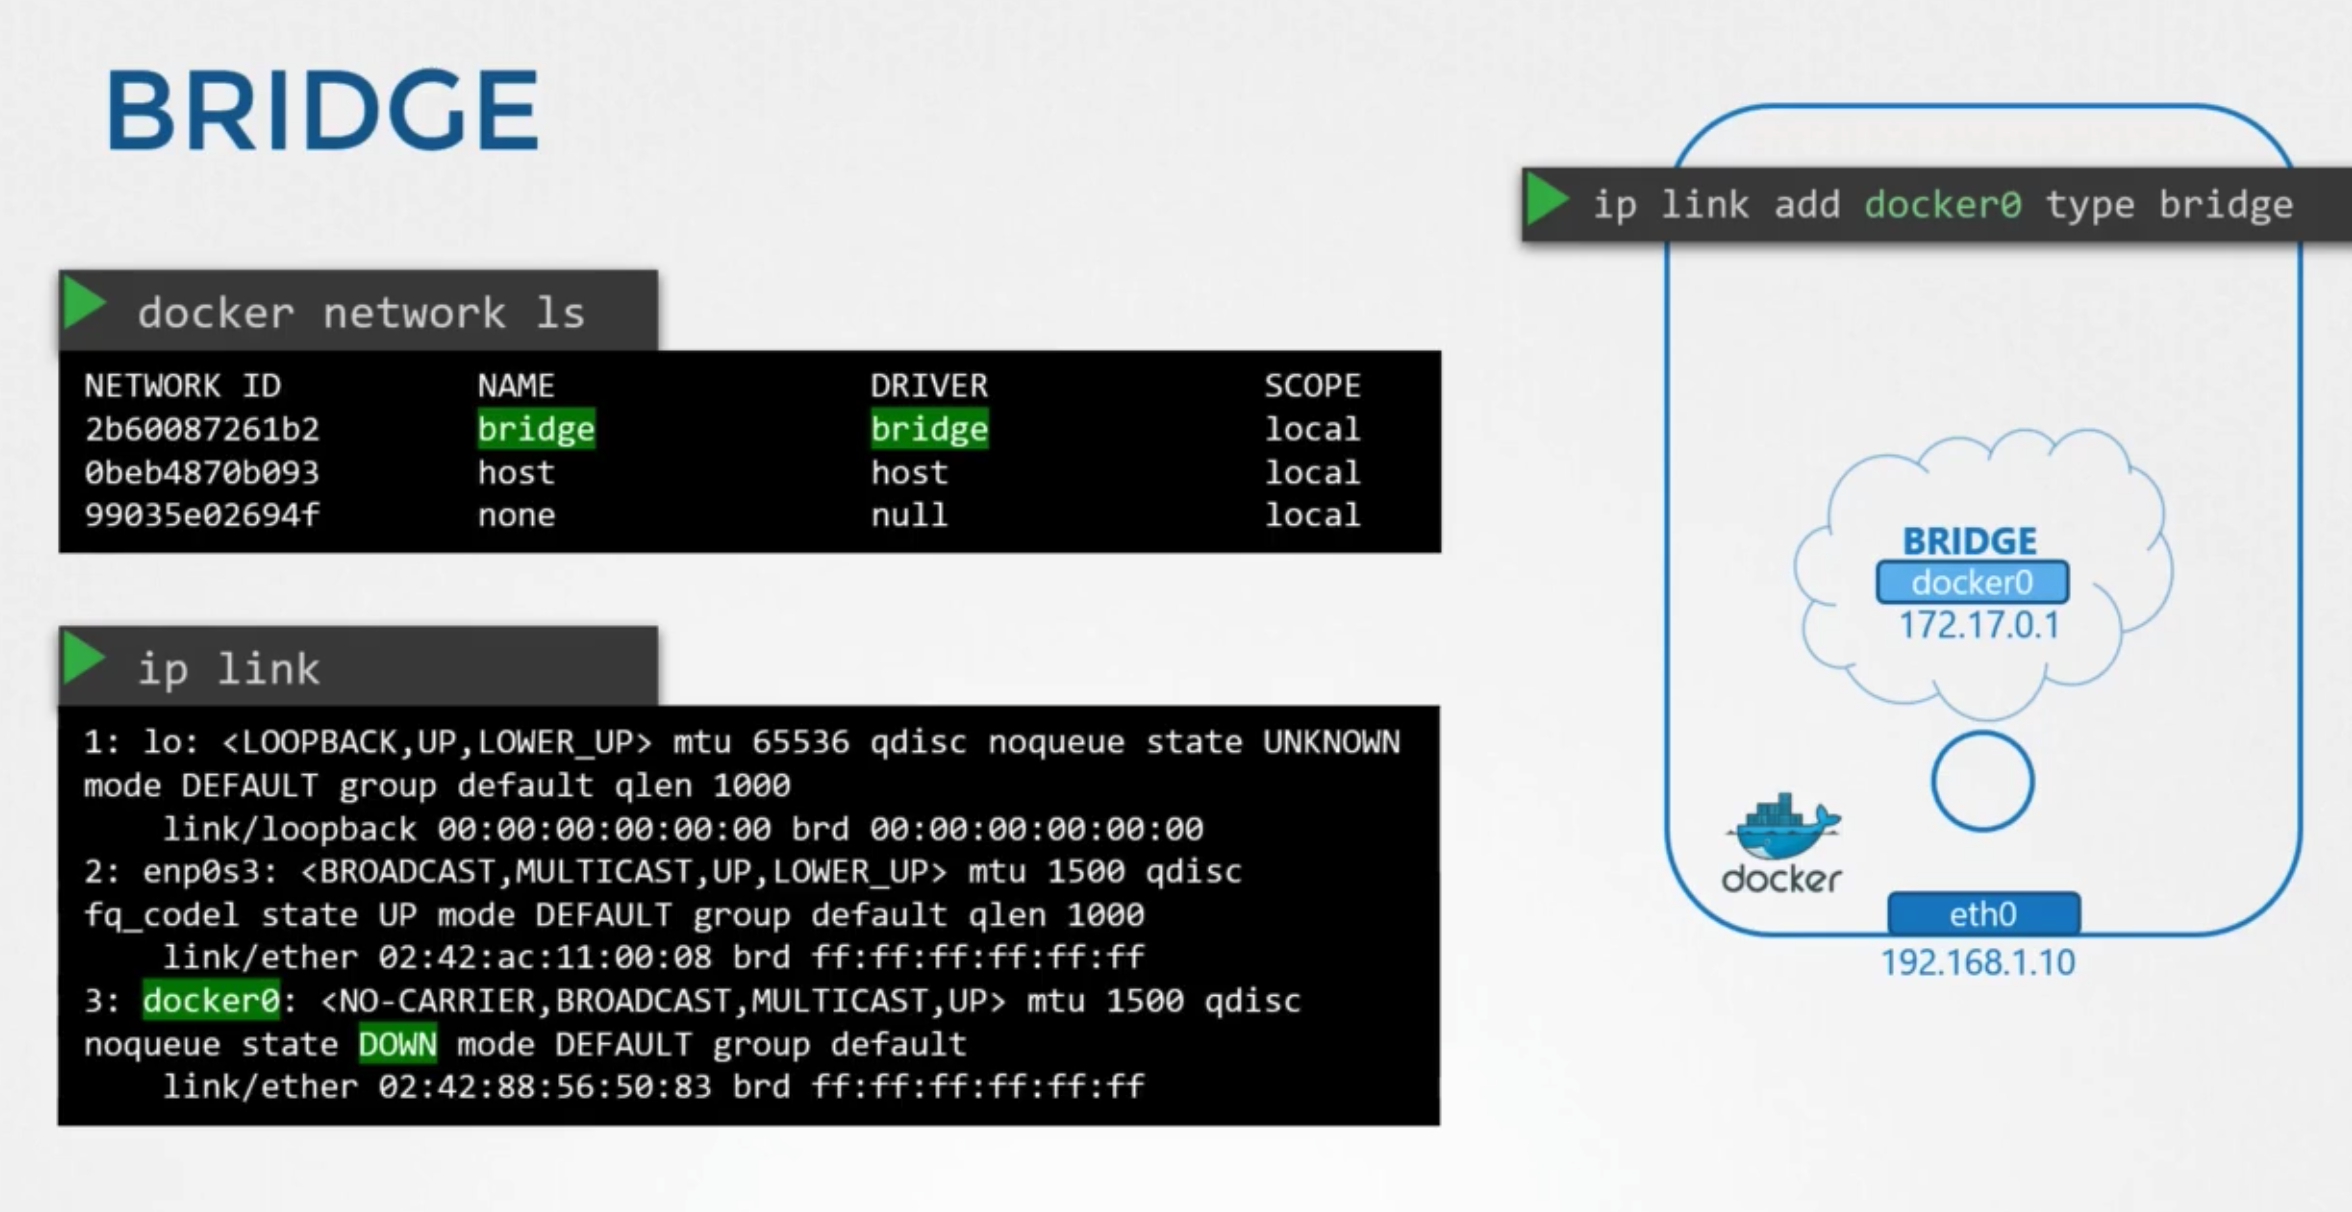
docker network ls- docker calls the network by the name bridge
ip link- host the name of network is created with docker0
- interface is currently down
ip addr
생성
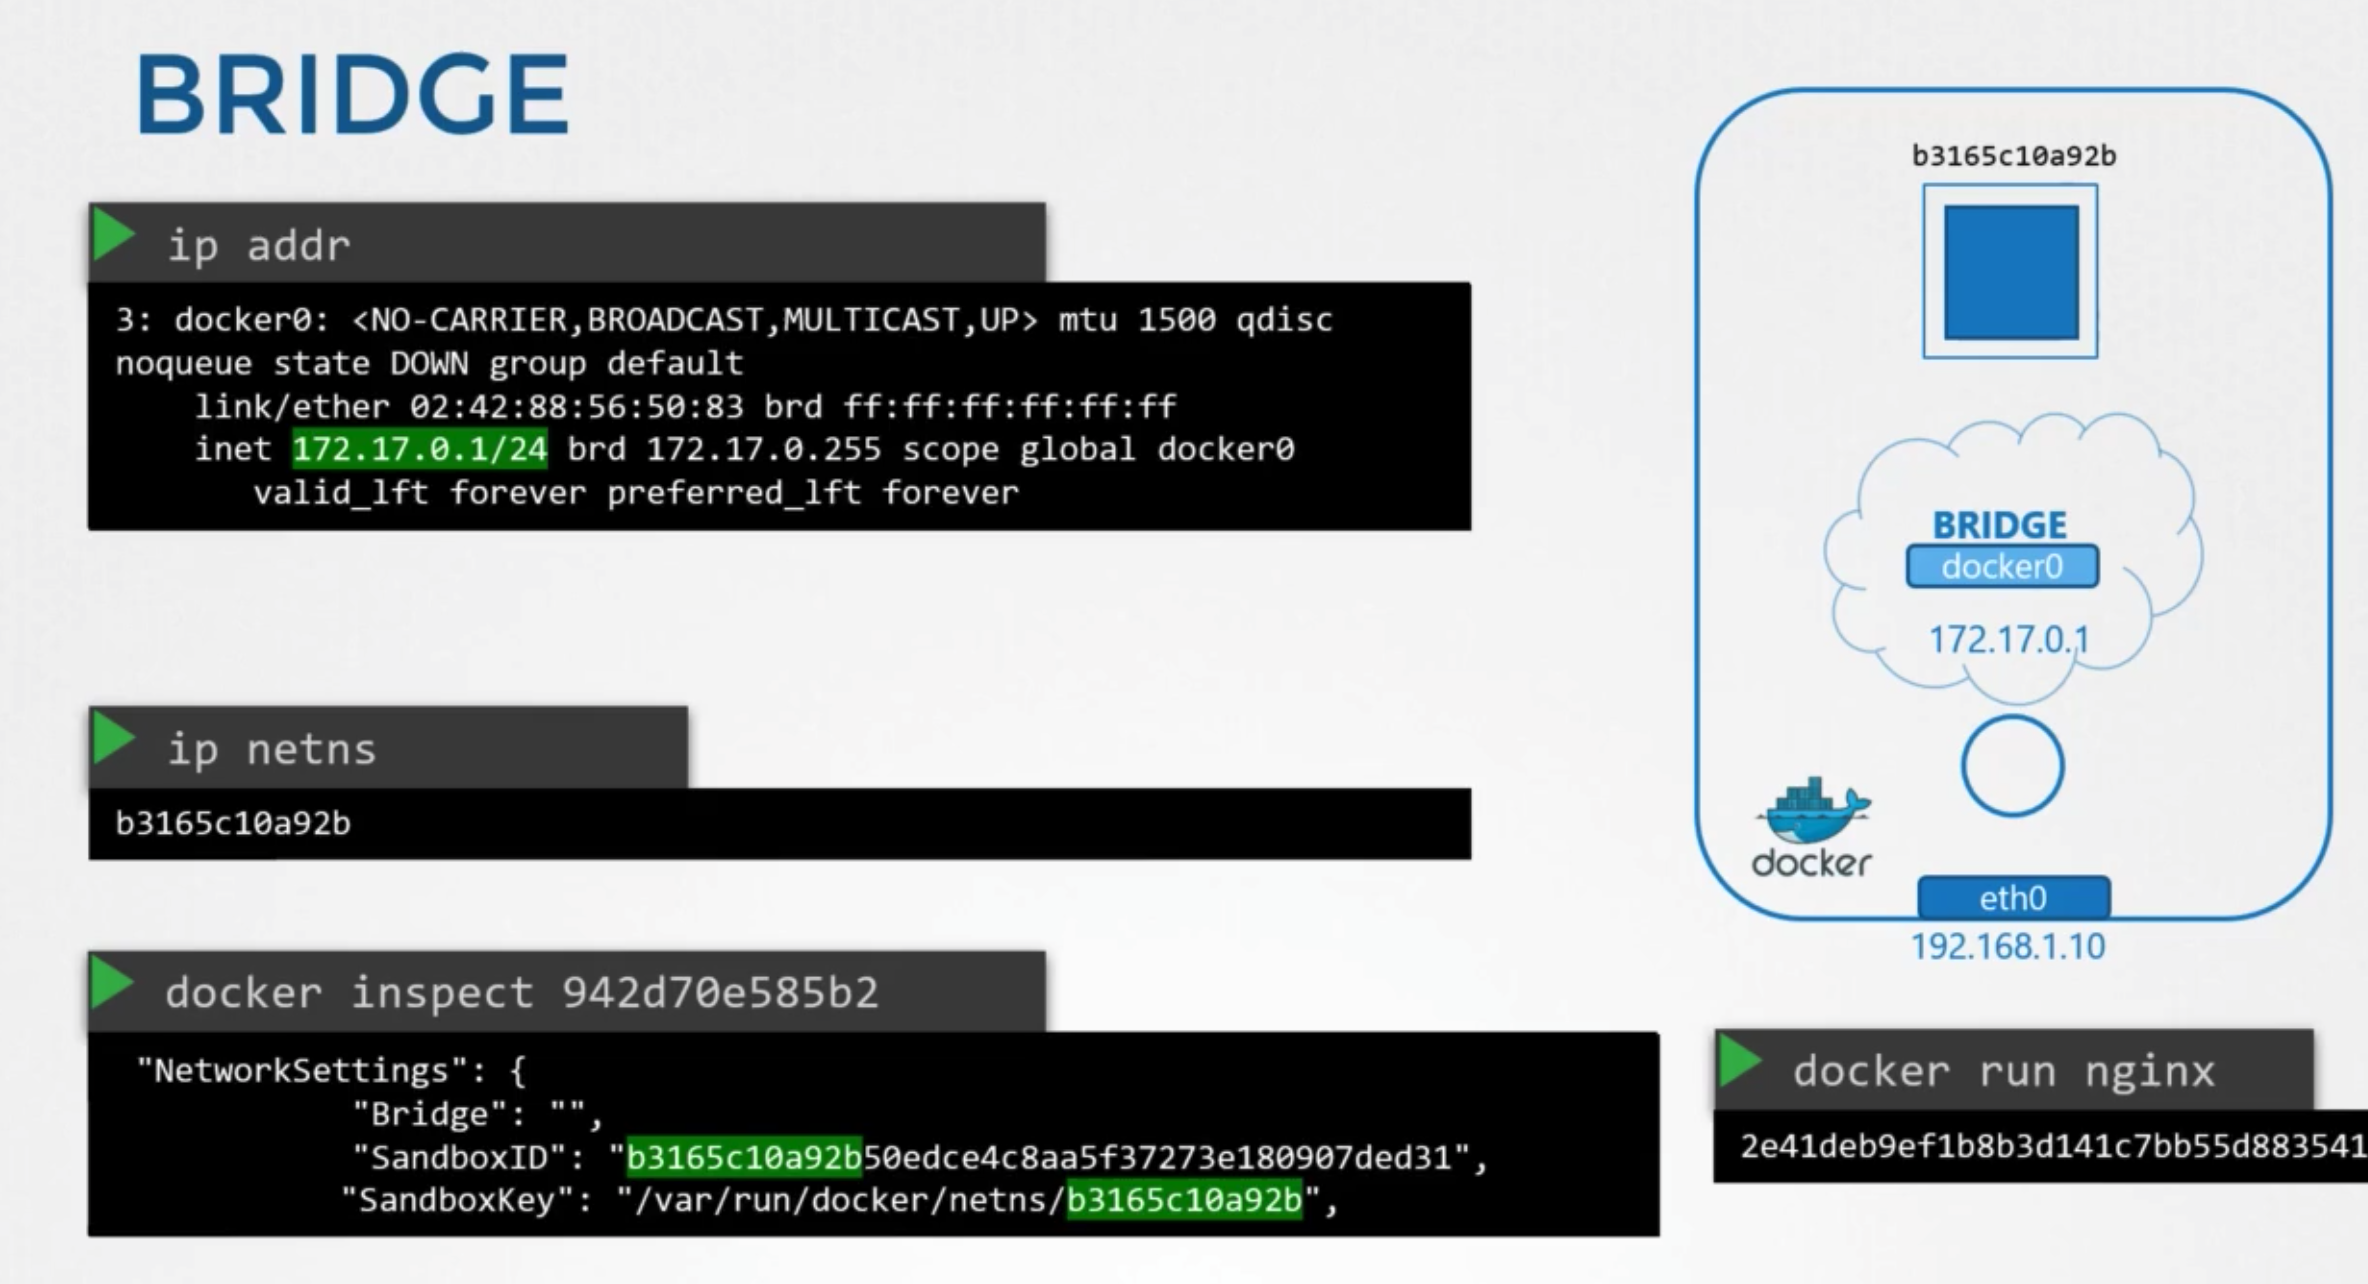
- container is created
- docker creates a network namepsace for it
ip netnsdocker inspect ~~
Attach container to the bridge
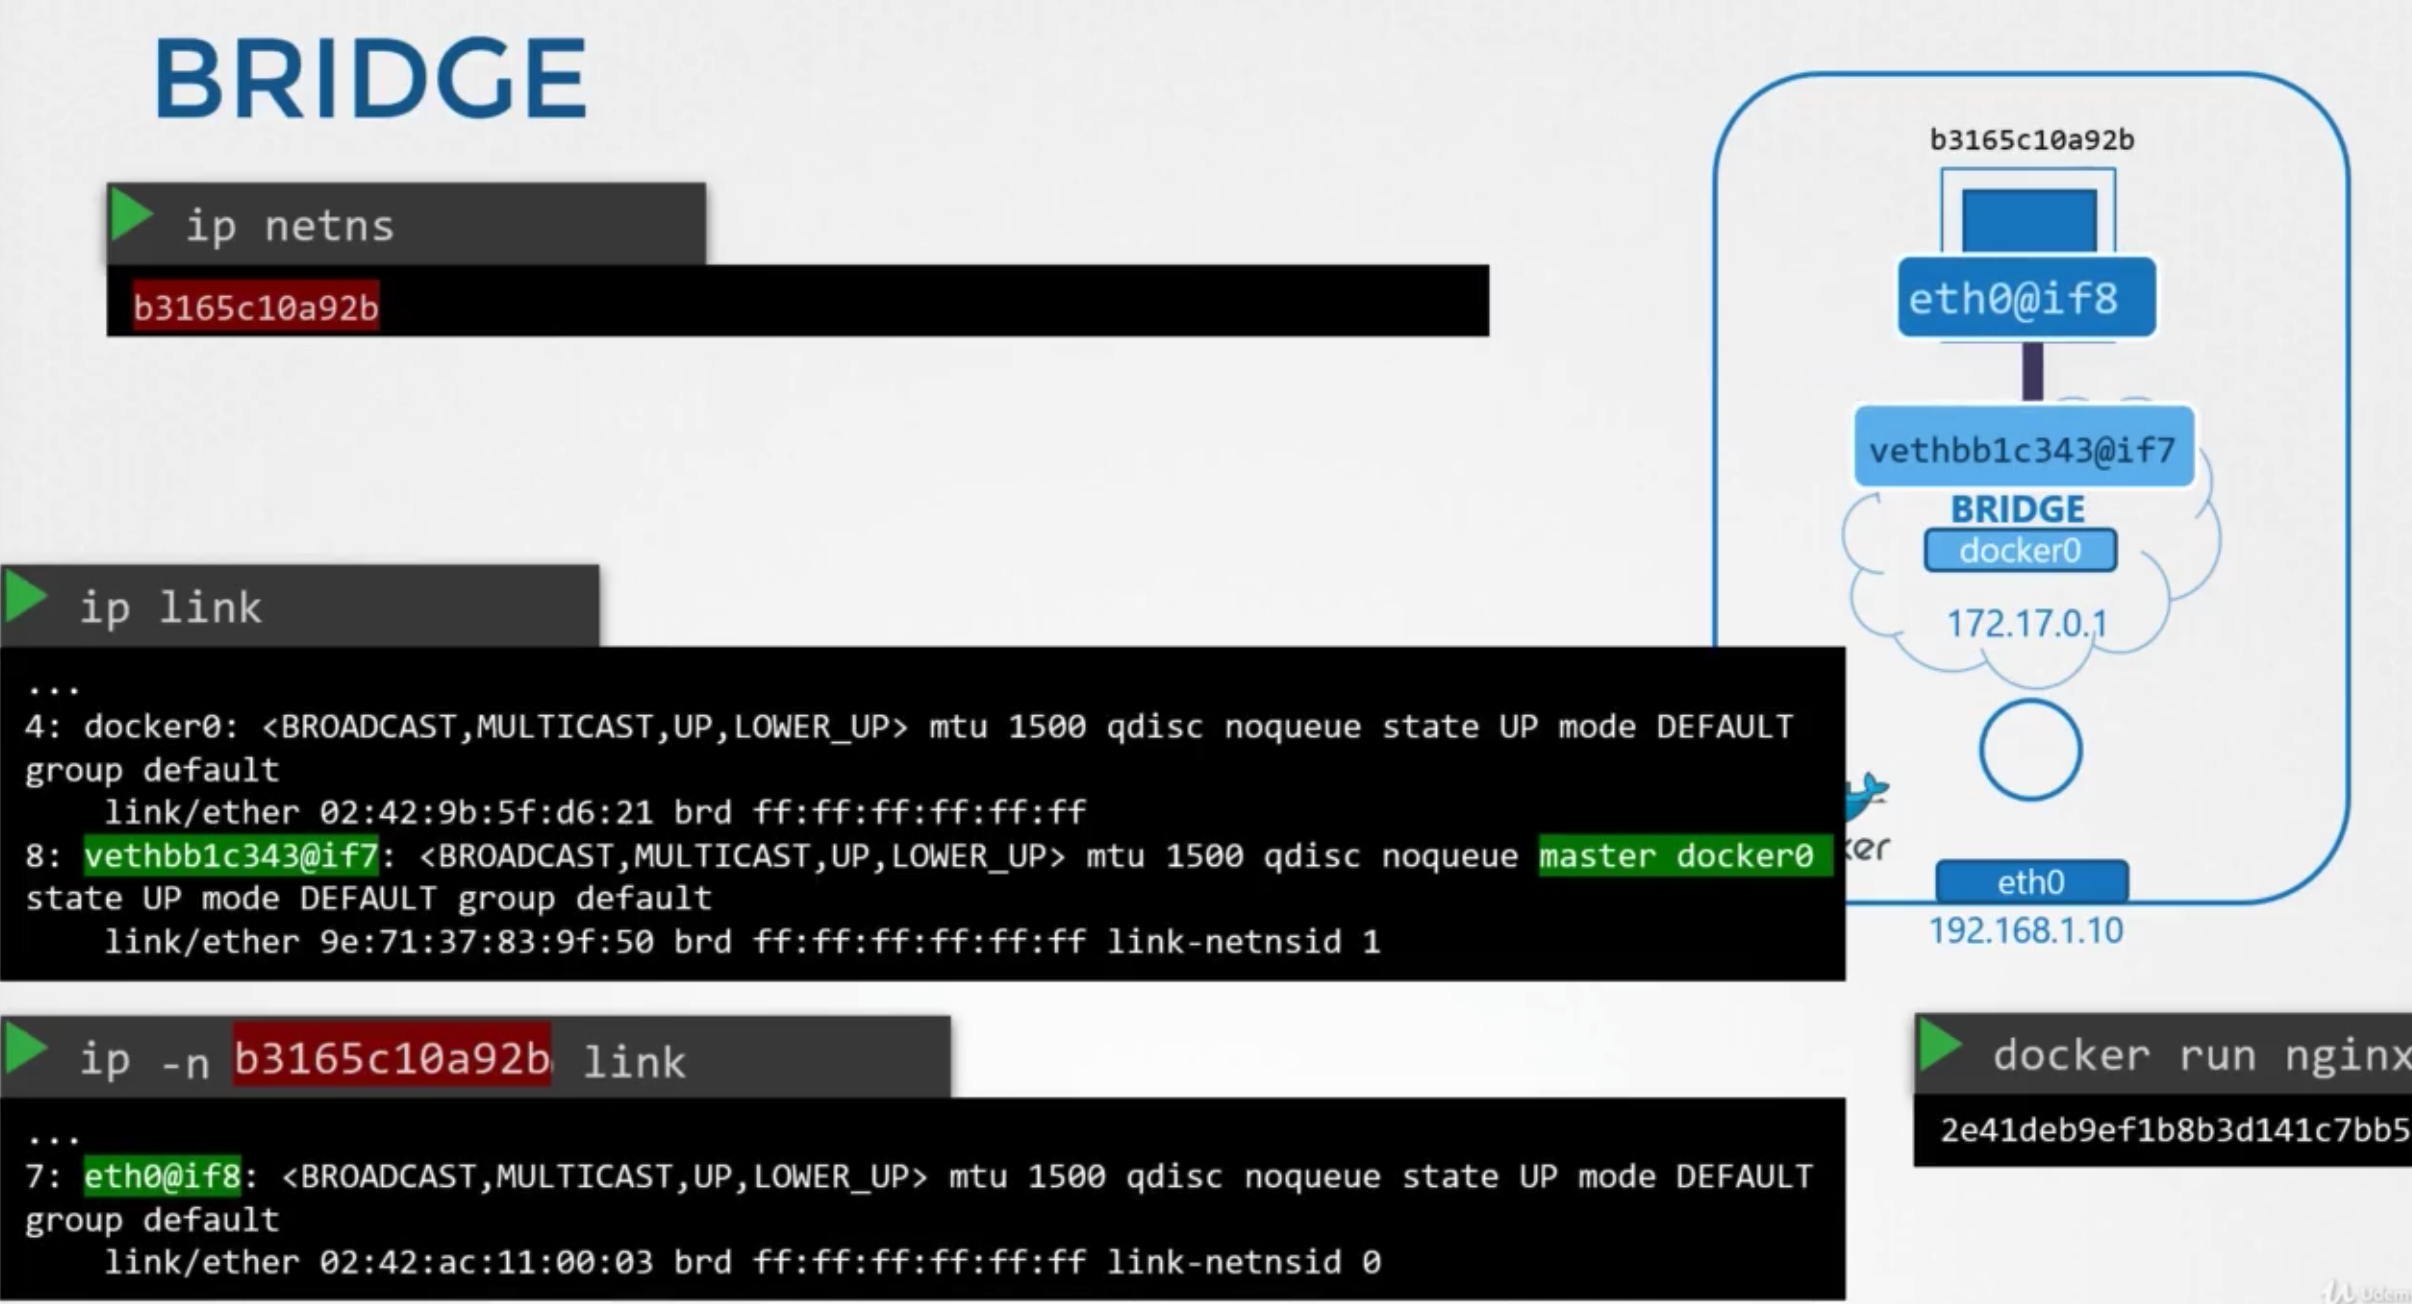
- creates a virtual cable
ip linkon docker host- end of the interface which is attached to the local bridge docker0
ip -n ~~ link
- check the ip
ip -n ~~ addr
Port Mapping
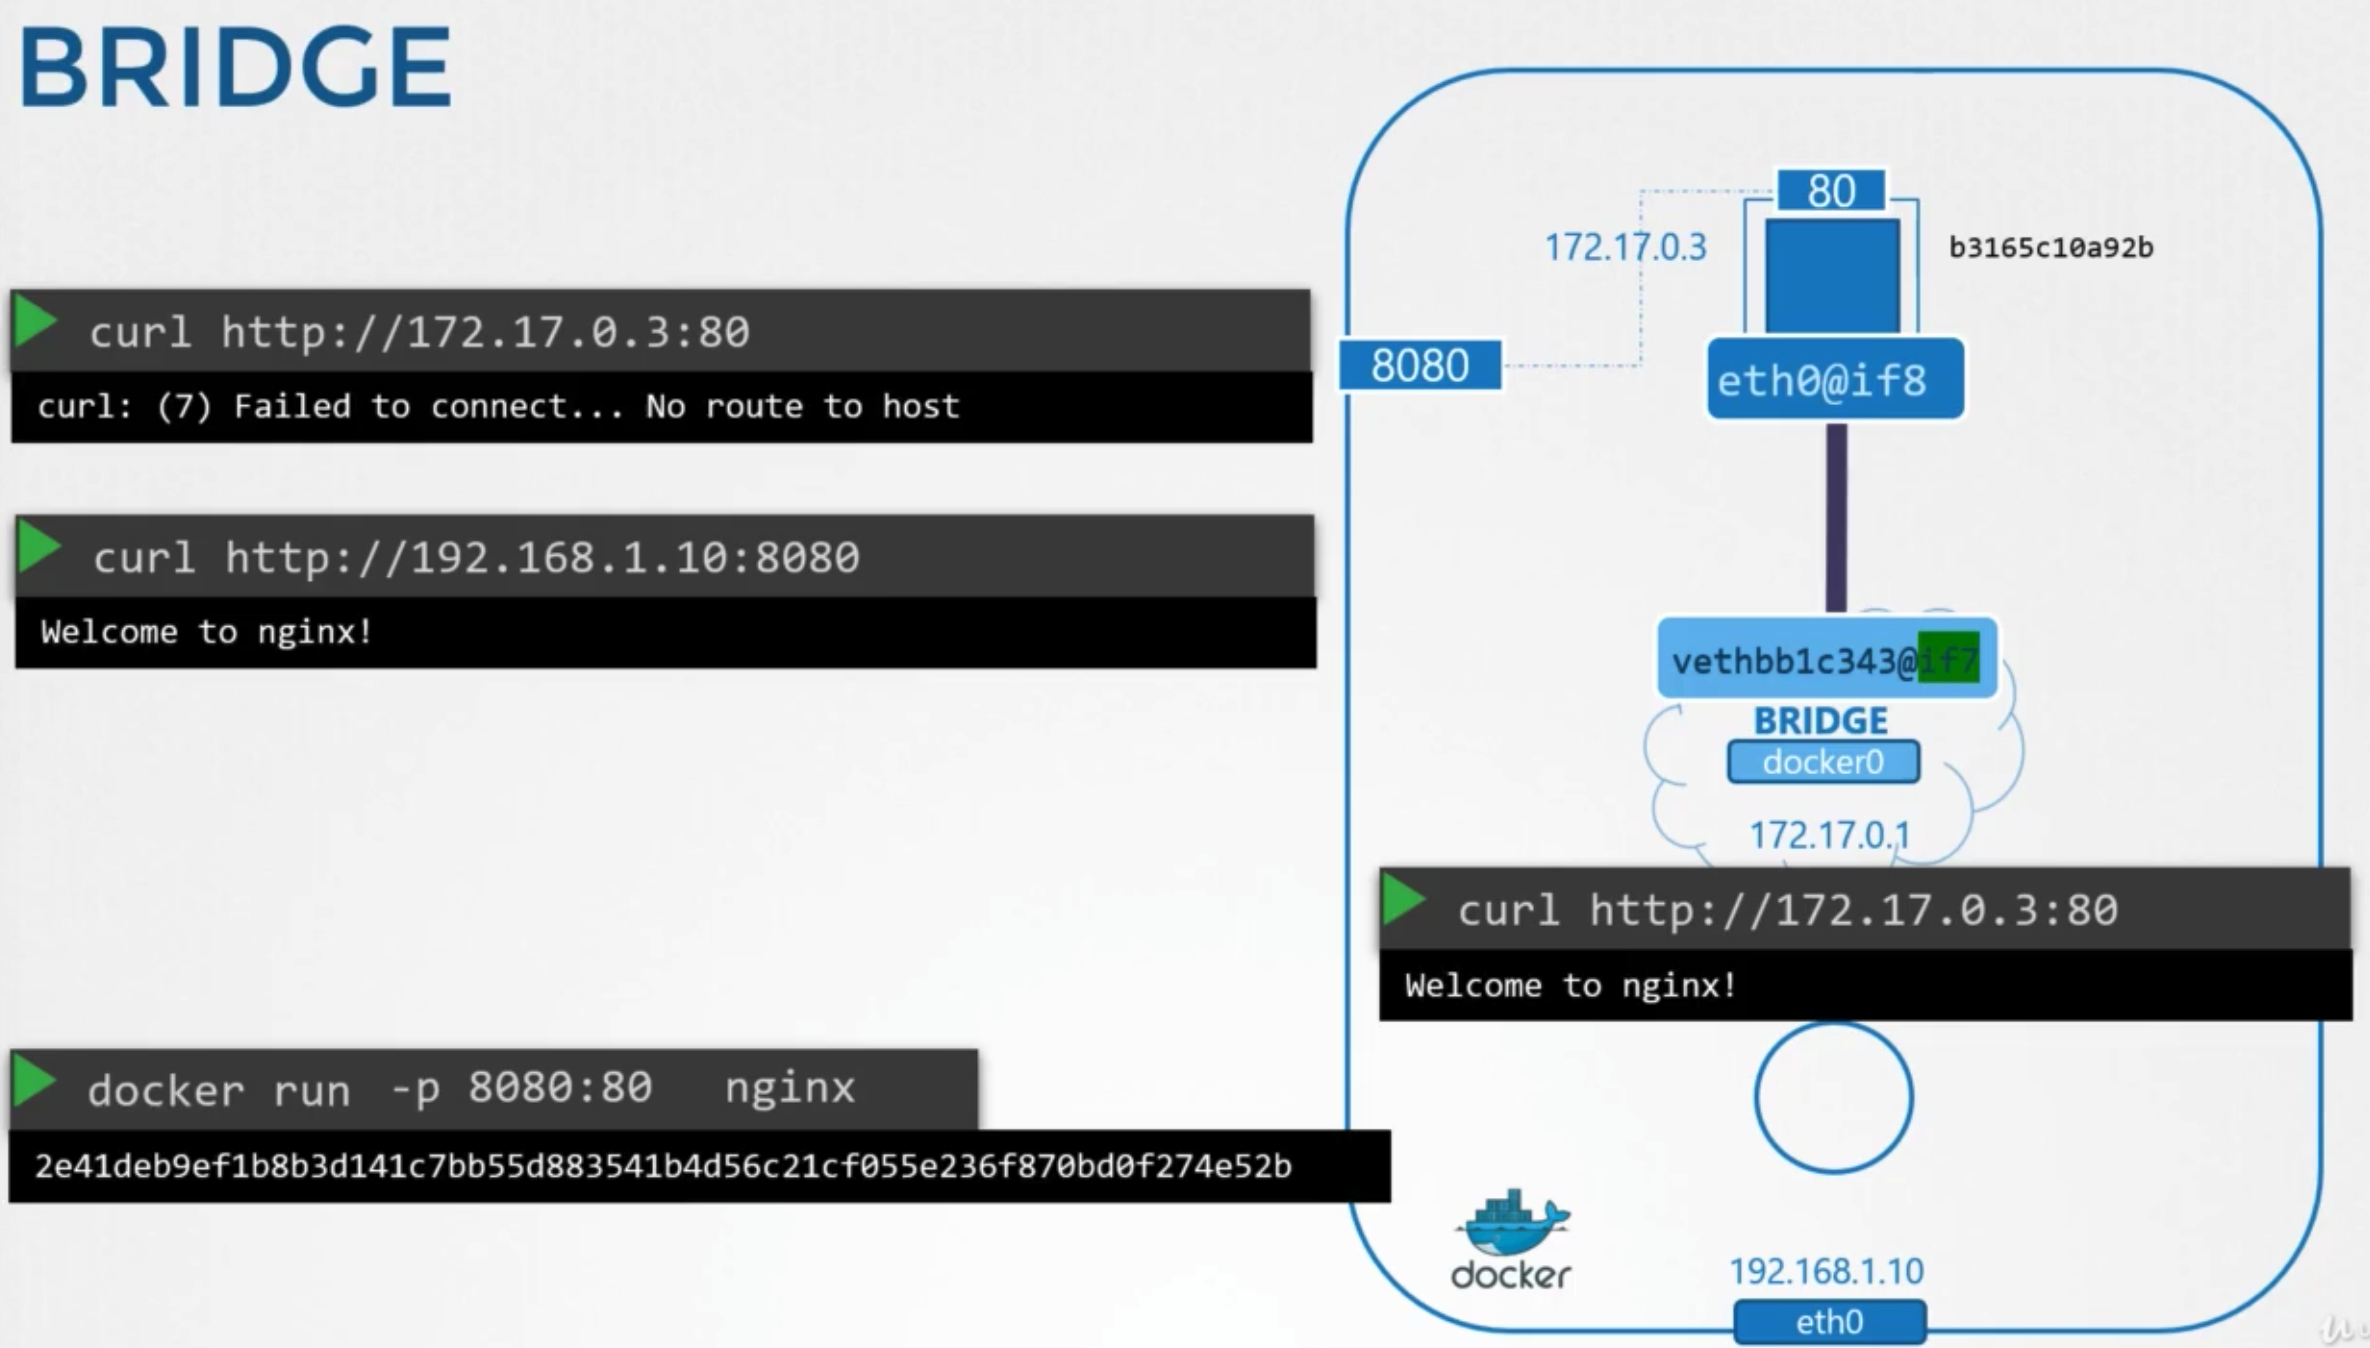
- port publishing or port mapping options
- to allow to access the applications hosted on containers
docker run -p 8080:80 nginx
방법
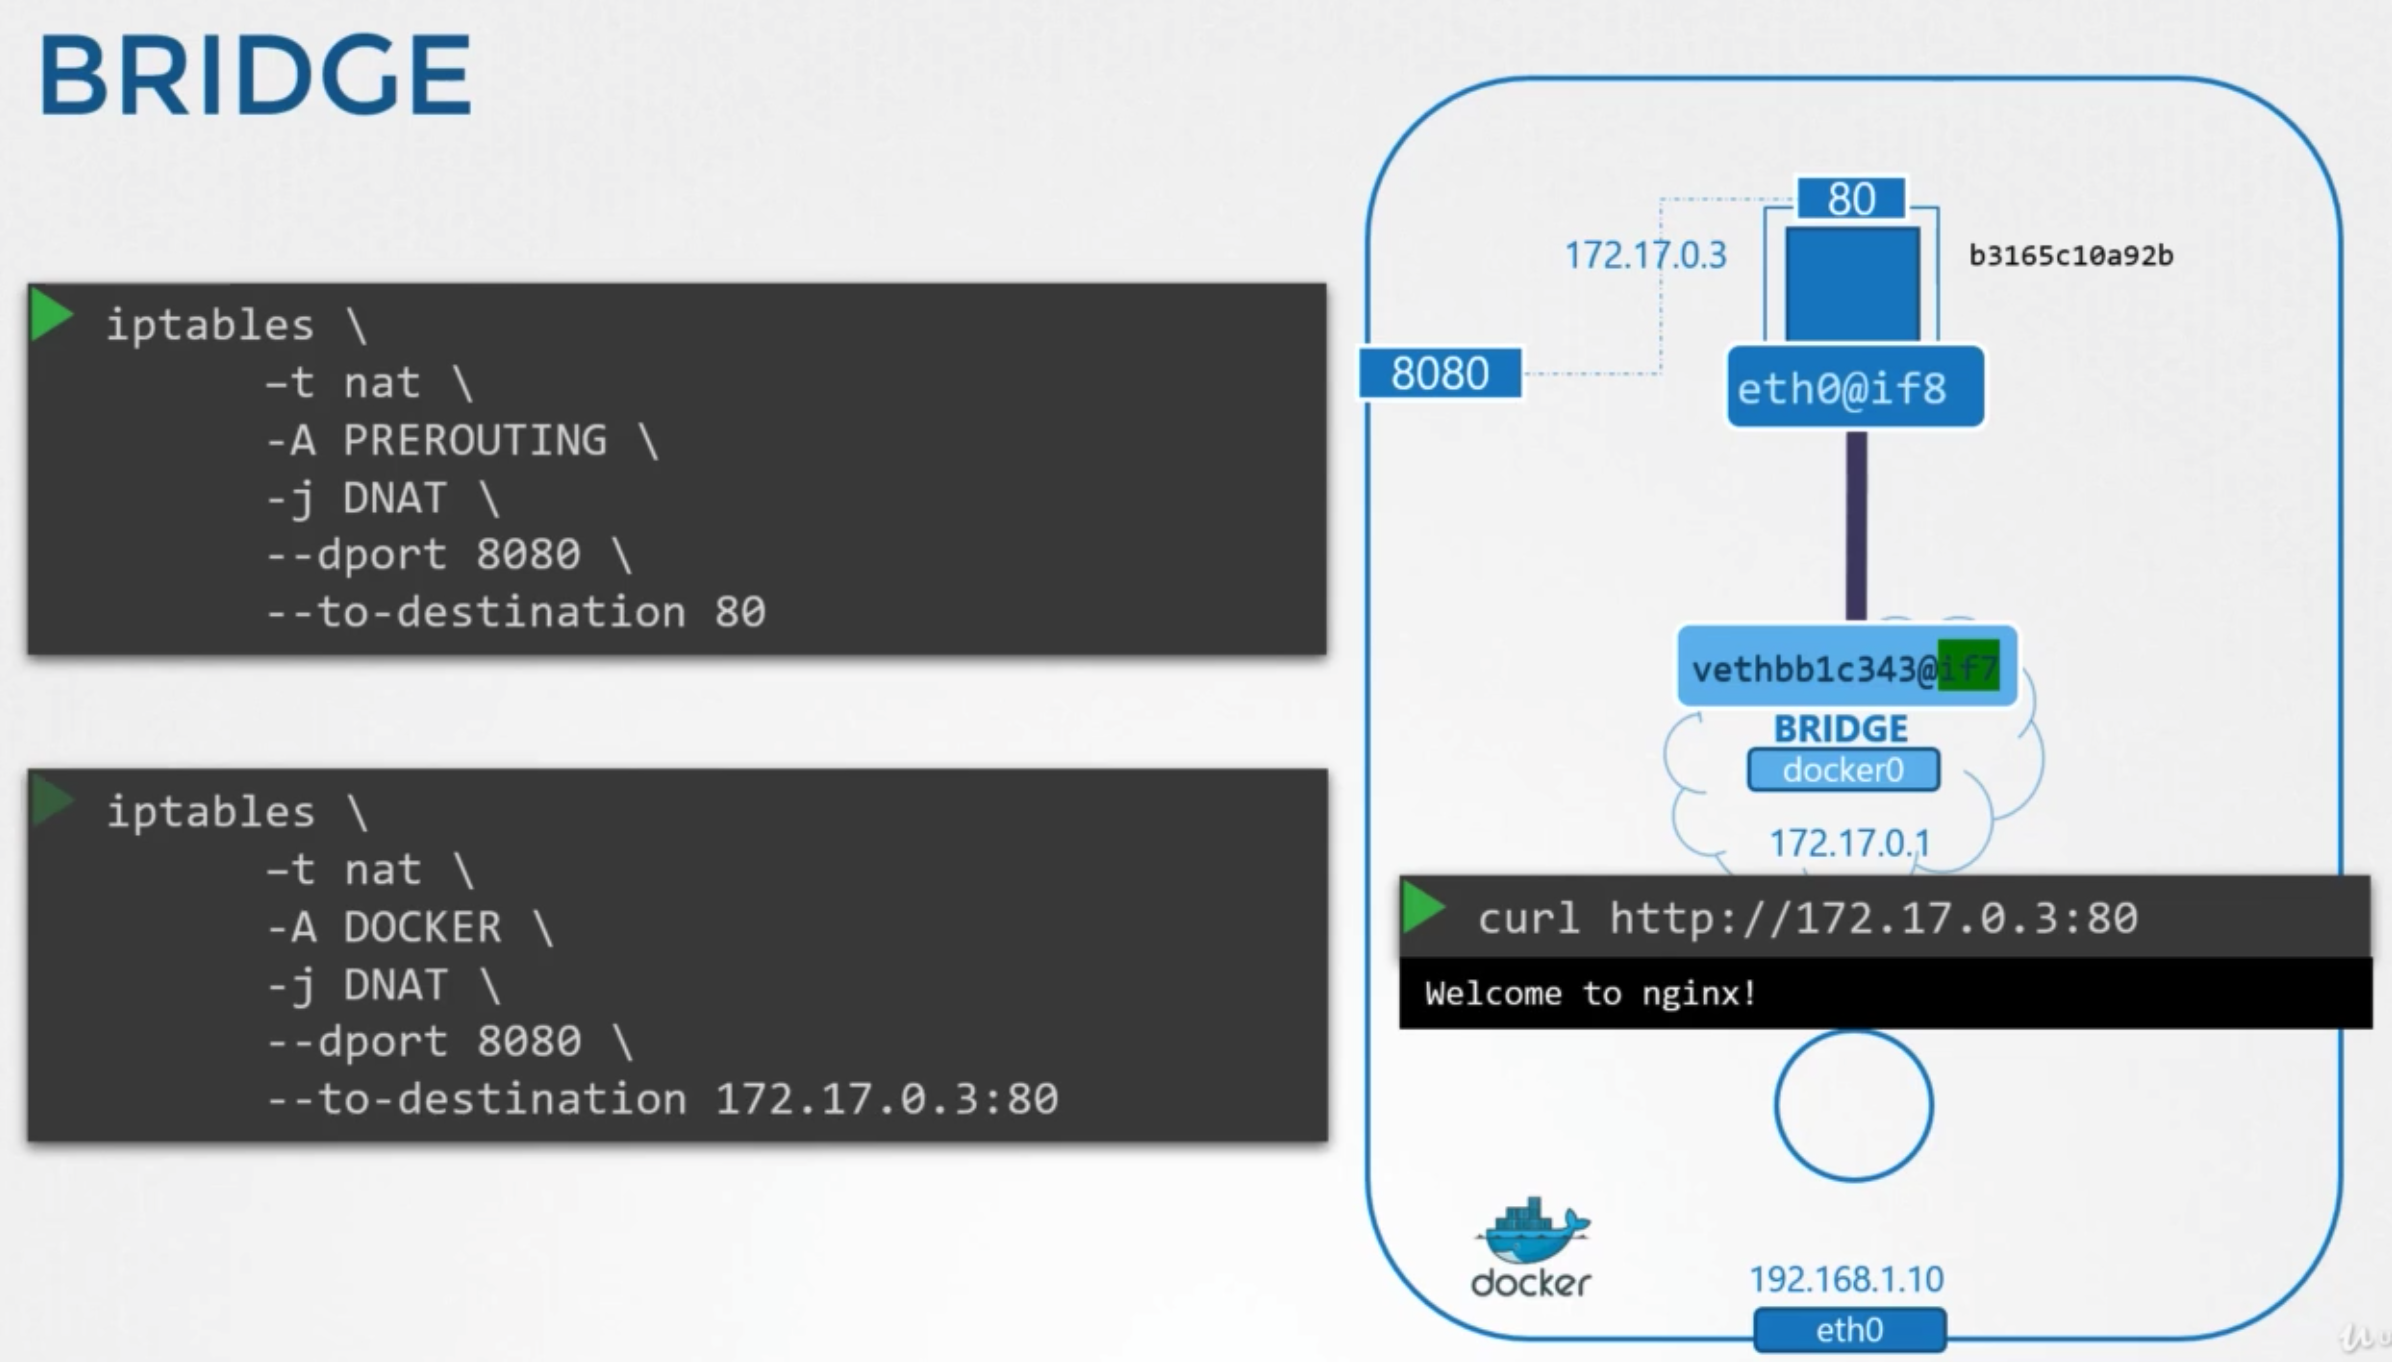
- requirements
- forward traffic coming in one port to another port on the server
- add rules to docker chain
- set destination to include the containers IP
- see the rule
iptables -nvL -t nat
Cluster Networking
IP & FQDN
- k8s cluster consists of master and worker nodes
- each node must have at least 1 interface connected to a network
- each interface must have an address configured
- the host must have a unique hostname set, unique MAC address
- note this if you created the VMs by cloning from existing ones.
PORTS
There are some ports to be opened.
Master
kube-api- 6443kubelet- 10250kube-scheduler- 10251kube-controller-manager- 10252etcd- 2379
- 2380, if multiple master nodes
Worker
kubelet- 10250services- 30000~32767
Practice
What is the network interface configured for cluster connectivity on the master node? node-to-node communication
Run: kubectl get nodes -o wide to see the IP address assigned to the controlplane node.
| |
In this case, the internal IP address used for node for node to node communication is 10.3.116.12.
Important Note : The result above is just an example, the node IP address will vary for each lab.
Next, find the network interface to which this IP is assigned by making use of the ip a command:
| |
Here you can see that the interface associated with this IP is eth0 on the host.
What is the MAC address assigned to node01?
| |