이번 포스트에서는 Istio를 사용하는 Seldon Core를 설치하는 방법에 대해서 설명합니다.
Ambassador를 사용해 설치하려면 다음 글을 확인해 주세요.
Pre-requisites
이번 실습에서는 Local에서 Seldon Core를 설치후 사용해보기 위한 k8s Tool로 minikube를 사용합니다.
- Minikube
- Helm
- Ingress
- Istio
1. Minikube
사용한 minikube version은 다음과 같습니다.
| |
minikube의 default config는 memory의 경우 2048mb 입니다.
이 경우 실습 중 메모리가 부족해서 OOM이슈가 생겨서 정상적으로 진행이 어려울 수 있습니다.
OOM을 방지하기 위해서 minikube의 메모리를 4096mb로 늘린 후 진행하도록 하겠습니다.
| |
minikube를 실행합니다.
| |
2. Helm
helm 공식 홈페이지의 방법을 따라 합니다. 이 때 설치해야 하는 버전은 3.x.x 입니다.
스크립트 방법을 이용해 설치하겠습니다.
| |
3. Ingress
minikube에서 ingress addon을 사용합니다.
| |
4. Istio
Istio 공식홈페이지 가이드를 따라합니다.
4.1 Download Istio
스크립트를 이용해 다운로드합니다.
```bash
curl -L <https://istio.io/downloadIstio> | sh -
cd istio-1.9.5
export PATH=$PWD/bin:$PATH
```
4.2 Install Istio
istioctl을 이용해 설치합니다.
```bash
istioctl install --set profile=demo -y
```
4.3 istio-injection
default namespace에 istio-injection을 시켜서 istio-system이 생성되게 합니다.
```bash
kubectl label namespace default istio-injection=enabled
```
4.4.ingress ip and ports
- ingress port 설정하기
1 2export INGRESS_PORT=$(kubectl -n istio-system get service istio-ingressgateway -o jsonpath='{.spec.ports[?(@.name=="http2")].nodePort}') export SECURE_INGRESS_PORT=$(kubectl -n istio-system get service istio-ingressgateway -o jsonpath='{.spec.ports[?(@.name=="https")].nodePort}') - Ingress port 확인하기저는 다음과 같은 출력을 얻었습니다.
1echo "$INGRESS_PORT"130687 - Secure Ingress port 확인하기저는 다음과 같은 출력을 얻었습니다.
1echo "$SECURE_INGRESS_PORT"130520 - Ingress ip 설정하기
1export INGRESS_HOST=$(minikube ip) - ip 설정 확인하기저는 다음과 같은 출력을 얻었습니다.
1echo "$INGRESS_HOST"1192.168.49.2
Seldon-core
1. Install seldon-core
namespace 생성
1kubectl create namespace seldon-systemhelm chart 생성
1 2 3 4 5helm install seldon-core seldon-core-operator \\ --repo <https://storage.googleapis.com/seldon-charts> \\ --set usageMetrics.enabled=true \\ --namespace seldon-system \\ --set istio.enabled=true상태 확인
1kubectl get po -n seldon-system다음과 같이 출력됩니다.
1 2NAME READY STATUS RESTARTS AGE seldon-controller-manager-559c567c9-pjtpl 1/1 Running 0 11s
2. Istio setting
istio-ingress.yaml생성1 2 3 4 5 6 7 8 9 10 11 12 13 14 15 16# istio-ingress.yaml apiVersion: networking.istio.io/v1alpha3 kind: Gateway metadata: name: seldon-gateway namespace: istio-system spec: selector: istio: ingressgateway # use istio default controller servers: - port: number: 80 name: http protocol: HTTP hosts: - "*"다음과 같은 istio ingress 를 파일 작성 후 apply 합니다.
1k apply -f istio-ingress.yaml
3. Sample deploy
namespace 생성
1kubectl create namespace seldonpod 생성
1 2 3 4 5 6 7 8 9 10 11 12 13 14 15 16kubectl apply -f - << END apiVersion: machinelearning.seldon.io/v1 kind: SeldonDeployment metadata: name: iris-model namespace: seldon spec: name: iris predictors: - graph: implementation: SKLEARN_SERVER modelUri: gs://seldon-models/sklearn/iris name: classifier name: default replicas: 1 ENDminikube tunnel
1minikube tunnel다음과 같은 출력을 얻습니다.
1 2 3 4 5 6 7 8 9 10Status: machine: minikube pid: 117019 route: 10.96.0.0/12 -> 192.168.49.2 minikube: Running services: [istio-ingressgateway] errors: minikube: no errors router: no errors loadbalancer emulator: no errorsingress external ip 확인
1k get svc -n istio-system1 2 3 4NAME TYPE CLUSTER-IP EXTERNAL-IP PORT (S) AGE istio-egressgateway ClusterIP 10.104.239.89 <none> 80/TCP,443/TCP,15443/ TCP 7m43s istio-ingressgateway LoadBalancer 10.111.24.207 10.111.24.207 15021:30945/TCP,80:30687/TCP,443:30520/TCP,31400:30072/TCP,15443:32717/ TCP 7m43s istiod ClusterIP 10.99.171.243 <none> 15010/TCP,15012/TCP,443/TCP,15014/ TCP 7m58s→ 이 경우 10.111.24.207
predict 요청하기
1 2 3curl -X POST <http://10.111.24.207/seldon/seldon/iris-model/api/v1.0/predictions> \\ -H 'Content-Type: application/json' \\ -d '{ "data": { "ndarray": [[1,2,3,4]] } }'- predict 요청을 하는 format은 다음과 같습니다.
http://<INGRESS_URL>/seldon/<NAMESPACE>/<MODEL-NAME>/api/v1.0/doc/
- predict 요청을 하는 format은 다음과 같습니다.
다음과 같은 결과를 얻을 수 있습니다.
1{"data":{"names":["t:0","t:1","t:2"],"ndarray":[[0.0006985194531162841,0.003668039039435755,0.9956334415074478]]},"meta":{"requestPath": {"classifier":"seldonio/sklearnserver:1.7.0"}}}
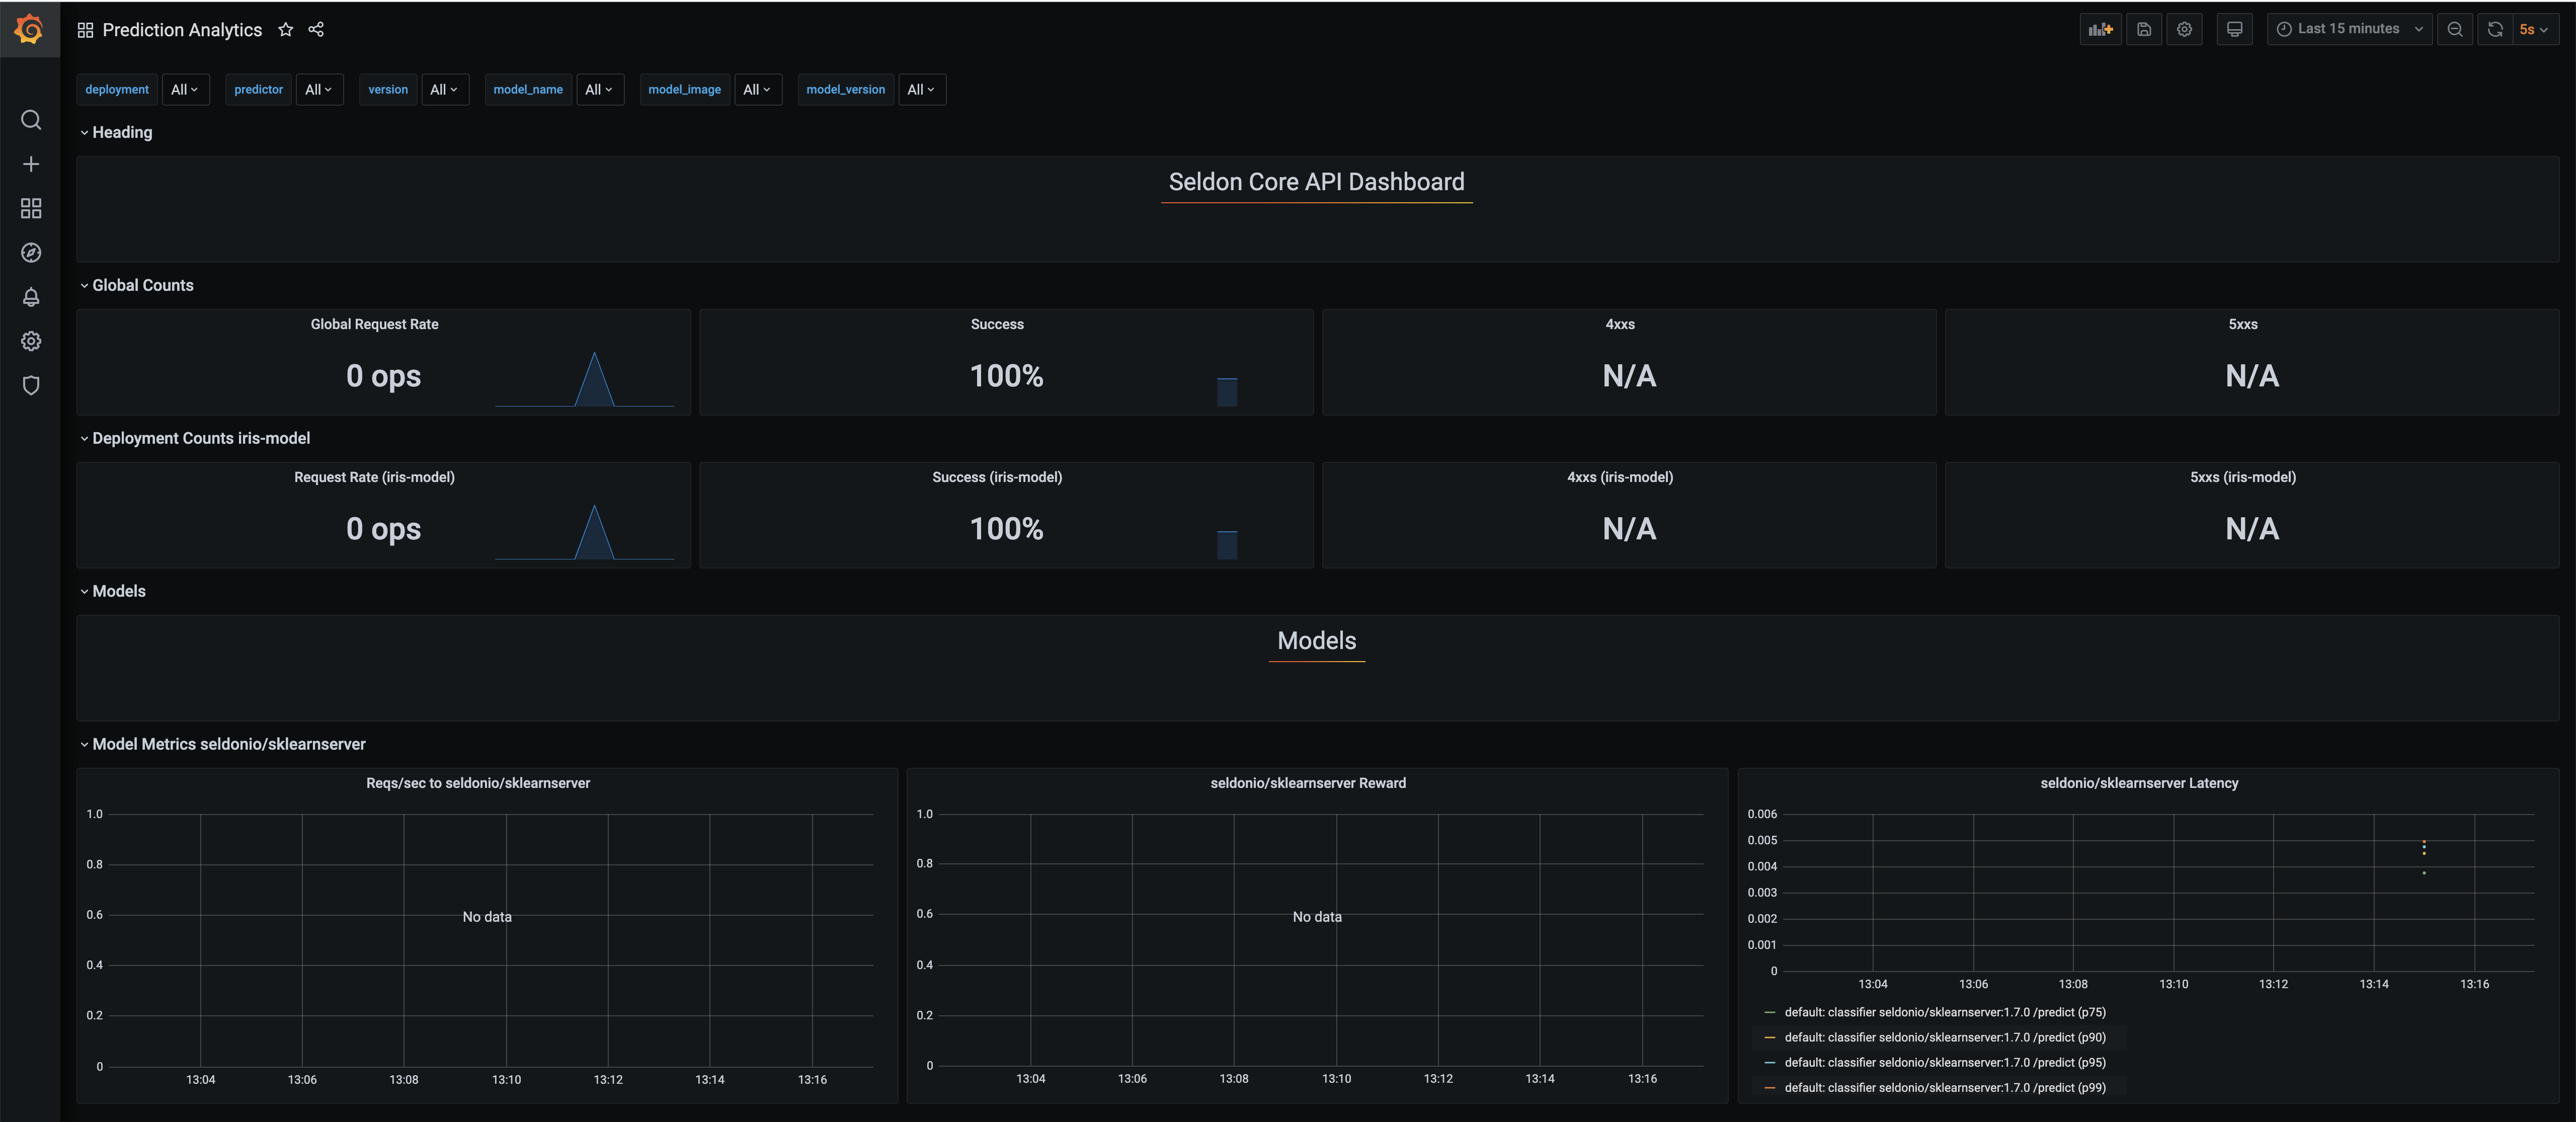
Seldon-analytics
1. Install
helm chart를 이용해 설치합니다.
| |
2.Usage
설치된 seldon-core-analytics port-forward 합니다.
| |
http://localhost:3000 에 접속합니다.
- 기본 ID/PW는 다음과 같습니다.
- ID: admin
- PW: password
- dashboard에서 prediction analytics를 클릭합니다
- 다음과 같은 dashboard를 볼 수 있습니다.