Vanila AutoEncoder
이번 페이지에서는 오토인코더를 이용해 f-minst 데이터셋을 압축하고 해제해서 reconstruction 을 하는 예제를 설명합니다.
Dataset
우선 튜토리얼에 들어가기에 앞서 사용할 데이터셋을 선언합니다. 데이터셋에 대한 자세한 설명은 Fashion-MNIST 페이지에서 확인할 수 있습니다.
from torchvision.transforms import Compose, ToTensor, Lambda
from torchvision.datasets.mnist import FashionMNIST
from torch.utils.data import DataLoader

transform = Compose(
    [
        ToTensor(),
        Lambda(lambda x: (x - 0.5) * 2),
    ]
)
dataset = FashionMNIST("./datasets", download=True, train=True, transform=transform)
loader = DataLoader(dataset, batch_size=128, shuffle=True)
AutoEncoder
이제 본격적으로 모델 코드를 작성해 보겠습니다.
AutoEncoder Block
우선 모델에서 전반적으로 사용할 단위의 블록을 선언합니다.
import torch
import torch.nn as nn


class AutoEncoderBlock(nn.Module):
    def __init__(
        self,
        shape,
        in_channel,
        out_channel,
        kernel_size=3,
        stride=1,
        padding=1,
        activation=None,
        normalize=True,
    ):
        super().__init__()
        self.layer_norm = nn.LayerNorm(shape)
        self.conv_1 = nn.Conv2d(in_channel, out_channel, kernel_size, stride, padding)
        self.conv_2 = nn.Conv2d(out_channel, out_channel, kernel_size, stride, padding)
        self.activation = nn.SiLU() if activation is None else activation
        self.normalize = normalize

    def forward(self, x):
        out = self.layer_norm(x) if self.normalize else x
        out = self.conv_1(out)
        out = self.activation(out)
        out = self.conv_2(out)
        out = self.activation(out)
        return out
Encoder
이번에는 오토인코더의 인코더, 즉 정보를 압축하는 모델을 작성해 보겠습니다.
class Encoder(nn.Module):
    def __init__(self):
        super().__init__()
        # layer 1
        self.layer_1_block = nn.Sequential(
            AutoEncoderBlock(shape=(1, 28, 28), in_channel=1, out_channel=10),
            AutoEncoderBlock(shape=(10, 28, 28), in_channel=10, out_channel=10),
            AutoEncoderBlock(shape=(10, 28, 28), in_channel=10, out_channel=10),
        )
        self.layer_1_down = nn.Conv2d(10, 10, 4, 2, 1)
        # layer 2
        self.layer_2_block = nn.Sequential(
            AutoEncoderBlock(shape=(10, 14, 14), in_channel=10, out_channel=20),
            AutoEncoderBlock(shape=(20, 14, 14), in_channel=20, out_channel=20),
            AutoEncoderBlock(shape=(20, 14, 14), in_channel=20, out_channel=20),
        )
        self.layer_2_down = nn.Conv2d(20, 20, 4, 2, 1)

        # layer 3
        self.layer_3_block = nn.Sequential(
            AutoEncoderBlock(shape=(20, 7, 7), in_channel=20, out_channel=40),
            AutoEncoderBlock(shape=(40, 7, 7), in_channel=40, out_channel=40),
            AutoEncoderBlock(shape=(40, 7, 7), in_channel=40, out_channel=40),
        )
        self.layer_3_down = nn.Sequential(
            nn.Conv2d(40, 40, 2, 1), nn.SiLU(), nn.Conv2d(40, 40, 4, 2, 1)
        )

    def forward(self, x):
        # encoding
        out_1_block_result = self.layer_1_block(x)  # (N, 10, 28, 28)
        out_1_down_result = self.layer_1_down(out_1_block_result)  # (N, 10, 14, 14)
        out_2_block_result = self.layer_2_block(out_1_down_result)  # (N, 20, 14, 14)
        out_2_down_result = self.layer_2_down(out_2_block_result)  # (N, 20, 7, 7)
        out_3_block_result = self.layer_3_block(out_2_down_result)  # (N, 40, 7, 7)
        out_3_down_result = self.layer_3_down(out_3_block_result)  # (N, 40, 3, 3)
        return out_3_down_result
한번 해당 블록의 내부 코드가 어떻게 동작하는 지 확인해 보도록 하겠습니다.
encoder = Encoder()

for batch in loader:
    x = batch[0]
    break

with torch.no_grad():
    out_1_block_result = encoder.layer_1_block(x)  # (N, 10, 28, 28)
    out_1_down_result = encoder.layer_1_down(out_1_block_result)  # (N, 10, 14, 14)
    out_2_block_result = encoder.layer_2_block(out_1_down_result)  # (N, 20, 14, 14)
    out_2_down_result = encoder.layer_2_down(out_2_block_result)  # (N, 20, 7, 7)
    out_3_block_result = encoder.layer_3_block(out_2_down_result)  # (N, 40, 7, 7)
    out_3_down_result = encoder.layer_3_down(out_3_block_result)  # (N, 40, 3, 3)
encoder: 위에서 작성한Encoder클래스를 선언합니다.for batch in loader:: ��데이터 로더에서 샘플을 위한 데이터 한 배치를 추출합니다.with torch.no_grad():: 빠른 실행을 위해서 gradient 를 계산하지 않고 실행하기 위한 코드입니다.
실행을 한 후 각 중간 텐서들의 shape 을 확인하면 다음과 같이 됩니다.
- (N, 10, 28, 28)
- (N, 10, 14, 14)
- (N, 20, 14, 14)
- (N, 20, 7, 7)
- (N, 40, 7, 7)
- (N, 40, 3, 3)
Decoder
class Decoder(nn.Module):
    def __init__(self):
        super().__init__()
        # layer 4
        self.layer_4_up = nn.Sequential(
            nn.ConvTranspose2d(40, 40, 4, 2, 1),
            nn.SiLU(),
            nn.ConvTranspose2d(40, 40, 2, 1),
        )

        self.layer_4_block = nn.Sequential(
            AutoEncoderBlock(shape=(40, 7, 7), in_channel=40, out_channel=40),
            AutoEncoderBlock(shape=(40, 7, 7), in_channel=40, out_channel=20),
            AutoEncoderBlock(shape=(20, 7, 7), in_channel=20, out_channel=20),
        )

        # layer 5
        self.layer_5_up = nn.ConvTranspose2d(20, 20, 4, 2, 1)
        self.layer_5_block = nn.Sequential(
            AutoEncoderBlock(shape=(20, 14, 14), in_channel=20, out_channel=20),
            AutoEncoderBlock(shape=(20, 14, 14), in_channel=20, out_channel=10),
            AutoEncoderBlock(shape=(10, 14, 14), in_channel=10, out_channel=10),
        )

        # layer 6
        self.layer_6_up = nn.ConvTranspose2d(10, 10, 4, 2, 1)
        self.layer_6_block = nn.Sequential(
            AutoEncoderBlock(shape=(10, 28, 28), in_channel=10, out_channel=10),
            AutoEncoderBlock(shape=(10, 28, 28), in_channel=10, out_channel=10),
            AutoEncoderBlock(
                shape=(10, 28, 28), in_channel=10, out_channel=10, normalize=False
            ),
        )

        self.conv_out = nn.Conv2d(10, 1, 3, 1, 1)

    def forward(self, z):
        # decoding
        out_4_up_result = self.layer_4_up(z)  # (N, 40, 7, 7)
        out_4_block_result = self.layer_4_block(out_4_up_result)  # (N, 20, 7, 7)
        out_5_up_result = self.layer_5_up(out_4_block_result)  # (N, 20, 14, 14)
        out_5_block_result = self.layer_5_block(out_5_up_result)  # (N, 10, 14, 14)
        out_6_up_result = self.layer_6_up(out_5_block_result)  # (N, 10, 28, 28)
        out_6_block_result = self.layer_6_block(out_6_up_result)  # (N, 10, 28, 28)
        out = self.conv_out(out_6_block_result)  # (N, 1, 28, 28)
        return out
이번에도 해당 블록의 내부 코드가 어떻게 동작하는 지 확인해 보도록 하겠습니다.
decoder = Decoder()

z = out_3_down_result

with torch.no_grad():
    out_4_up_result = decoder.layer_4_up(z)  # (N, 40, 7, 7)
    out_4_block_result = decoder.layer_4_block(out_4_up_result)  # (N, 20, 7, 7)
    out_5_up_result = decoder.layer_5_up(out_4_block_result)  # (N, 20, 14, 14)
    out_5_block_result = decoder.layer_5_block(out_5_up_result)  # (N, 10, 14, 14)
    out_6_up_result = decoder.layer_6_up(out_5_block_result)  # (N, 10, 28, 28)
    out_6_block_result = decoder.layer_6_block(out_6_up_result)  # (N, 10, 28, 28)
    out = decoder.conv_out(out_6_block_result)  # (N, 1, 28, 28)
decoder: 위에서 작성한Decoder클래스를 선언합니다.z = out_3_down_result: 디코더에서 사용할 샘플 데이터는 위의 인코더에서 사용한 결과물을 이용합니다.
실행을 한 후 각 중간 텐서들의 shape 을 확인하면 다음과 같이 됩니다.
- (N, 40, 7, 7)
- (N, 20, 7, 7)
- (N, 20, 14, 14)
- (N, 10, 14, 14)
- (N, 10, 28, 28)
- (N, 10, 28, 28)
- (N, 1, 28, 28)
AutoEncoder
이제 위에서 작성한 코드를 이용해 오토인코더를 작성합니다.
class AutoEncoder(nn.Module):
    def __init__(self):
        super().__init__()
        self.encoder = Encoder()
        self.decoder = Decoder()

    def forward(self, x):
        z = self.encoder(x)
        recon_x = self.decoder(z)
        return recon_x
auto_encoder = AutoEncoder()

x = batch[0]
with torch.no_grad():
    z = auto_encoder.encoder(x)
    recon_x = auto_encoder.decoder(z)
auto_encoder: 위에서 작성한AutoEncoder클래스를 선언합니다.x = batch[0]: 위에서 선언한 샘플 데이터를 이용합니다.
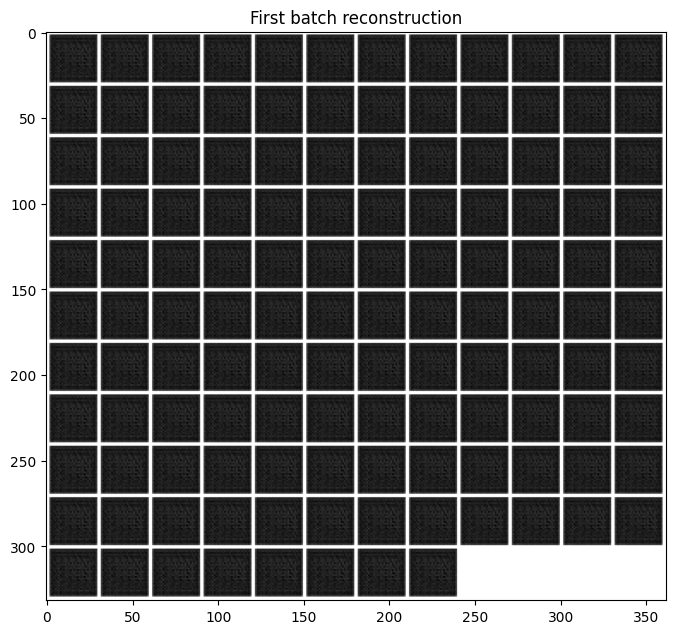
위의 모델을 통해 reconstruction 된 결과물을 확인해 보겠습니다.
import matplotlib.pyplot as plt
from torchvision.utils import make_grid


recon_x_grid = make_grid(recon_x, nrow=12).numpy()

plt.figure(figsize=(8, 8))
plt.title("First batch reconstruction")
plt.imshow(recon_x_grid[0], cmap="gray")

Train
이제 모델을 학습해 이미지를 reconstruction 하는 결과를 확인해 보겠습니다.
Convolution Network 는 원활한 학습을 위해서는 gpu 가 필요합니다.
GPU 가 없는 경우 학습에 다소 시간이 소요될 수 있습니다.
아래 코드를 이용해 device 를 선언합니다.
만약 gpu 가 사용 가능한 경우 device(type='cuda') 메세지가 나옵니다.
device = torch.device("cuda" if torch.cuda.is_available() else "cpu")
device
device(type='cuda')
위에서 선언한 모델을 gpu 메모리로 옮기겠습니다.
_ = auto_encoder.to(device)
학습을 위한 코드를 작성하고 실행해 보겠습니다.
import torch.optim as optim
from tqdm import tqdm

mse_fn = nn.MSELoss()
optimizer = optim.Adam(auto_encoder.parameters(), lr=0.001)
n_epochs = 10

for epoch in range(n_epochs):
    epoch_loss = 0.0
    for step, batch in enumerate(tqdm(loader, desc=f"Epoch {epoch + 1}/{n_epochs}")):
        x = batch[0].to(device)
        recon_x = auto_encoder(x)

        loss = mse_fn(x, recon_x)
        optimizer.zero_grad()
        loss.backward()
        optimizer.step()

        epoch_loss += loss.item() * len(x) / len(loader.dataset)

    log_string = f"Loss at epoch {epoch + 1}: {epoch_loss:.3f}"

    print(log_string)
Epoch 1/10: 100%|██████████| 469/469 [00:15<00:00, 30.89it/s]
Loss at epoch 1: 0.159
Epoch 2/10: 100%|██████████| 469/469 [00:13<00:00, 35.85it/s]
Loss at epoch 2: 0.064
Epoch 3/10: 100%|██████████| 469/469 [00:13<00:00, 35.74it/s]
Loss at epoch 3: 0.049
Epoch 4/10: 100%|██████████| 469/469 [00:13<00:00, 35.85it/s]
Loss at epoch 4: 0.043
Epoch 5/10: 100%|██████████| 469/469 [00:13<00:00, 35.66it/s]
Loss at epoch 5: 0.040
Epoch 6/10: 100%|██████████| 469/469 [00:12<00:00, 36.42it/s]
Loss at epoch 6: 0.038
Epoch 7/10: 100%|██████████| 469/469 [00:12<00:00, 36.58it/s]
Loss at epoch 7: 0.036
Epoch 8/10: 100%|██████████| 469/469 [00:12<00:00, 36.36it/s]
Loss at epoch 8: 0.034
Epoch 9/10: 100%|██████████| 469/469 [00:12<00:00, 36.17it/s]
Loss at epoch 9: 0.033
Epoch 10/10: 100%|██████████| 469/469 [00:12<00:00, 36.11it/s]
Loss at epoch 10: 0.032
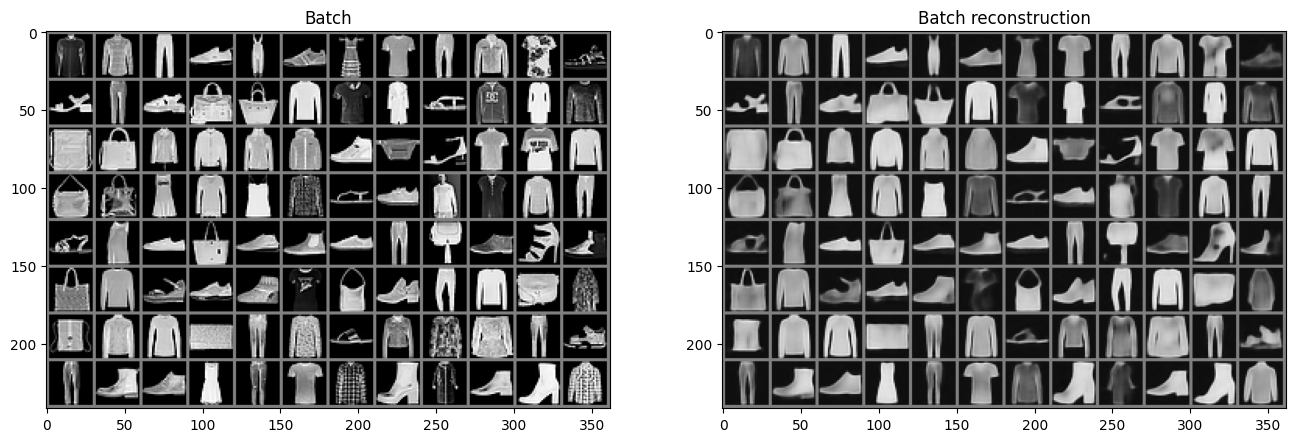
학습이 정상적으로 수행되었는지 이미지를 확인해 보겠습니다.
데이터 로더에서 하나의 배치의 원본 데이터와 학습된 모델이 추론한 결과를 비교합니다.
with torch.no_grad():
    x = batch[0].to(device)
    recon_x = auto_encoder(x)
recon_x = recon_x.cpu()

x_grid = make_grid(x.cpu(), nrow=12).numpy()
recon_x_grid = make_grid(recon_x, nrow=12).numpy()

fig, axes = plt.subplots(ncols=2, figsize=(16, 8))

axes[0].set_title("Batch")
axes[0].imshow(x_grid[0], cmap="gray")

axes[1].set_title("Batch reconstruction")
axes[1].imshow(recon_x_grid[0], cmap="gray")

적은 에폭으로 모델을 학습했지만 정상적으로 재현되는 것을 확인할 수 있었습니다.
Generation
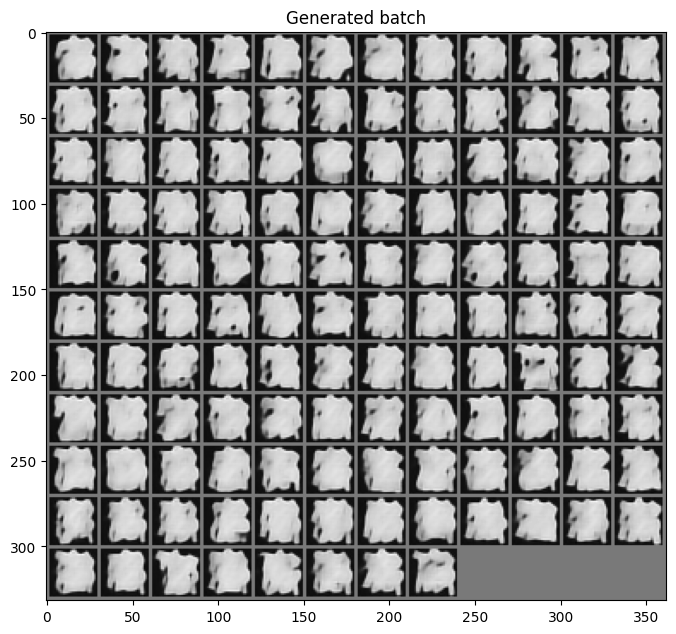
이번에는 학습한 모델의 디코더를 이용해 랜덤한 latent 값을 주었을 때 어떤 이미지를 생성하는 지 확인해 보겠습니다.
위의 예시에서 만들었던 latent vector z 와 shape 이 같은 random 값을 생성 후 decoder 로 복원을 하면 아래와 같은 이미지를 얻을 수 있습니다.
with torch.no_grad():
    random_z = torch.rand_like(z).to(device)
    generated_x = auto_encoder.decoder(random_z)

generated_x = generated_x.cpu()
generated_x_grid = make_grid(generated_x, nrow=12).numpy()

plt.figure(figsize=(8, 8))
plt.title("Generated batch")
plt.imshow(generated_x_grid[0], cmap="gray")
